HP T610 HP Designjet T610 Series - User's Guide - Page 38
Load a roll onto the 44-inch spindle
 |
UPC - 883585044344
View all HP T610 manuals
Add to My Manuals
Save this manual to your list of manuals |
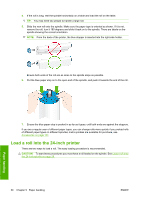
Page 38 highlights
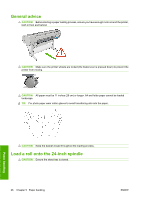
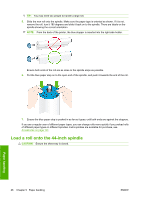
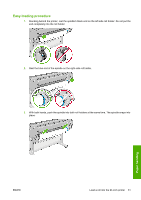
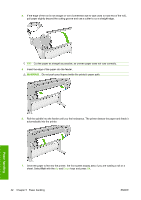
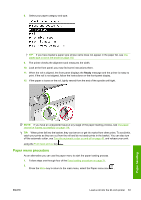
TIP: You may need two people to handle a large roll. 5. Slide the new roll onto the spindle. Make sure the paper type is oriented as shown. If it is not, remove the roll, turn it 180 degrees and slide it back on to the spindle. There are labels on the spindle showing the correct orientation. NOTE: From the back of the printer, the blue stopper is inserted into the right-side holder. Ensure both ends of the roll are as close to the spindle stops as possible. 6. Put the blue paper stop on to the open end of the spindle, and push it towards the end of the roll. 7. Ensure the blue paper stop is pushed in as far as it goes; until both ends are against the stoppers. If you are a regular user of different paper types, you can change rolls more quickly if you preload rolls of different paper types on different spindles. Extra spindles are available for purchase, see Accessories on page 107. Load a roll onto the 44-inch spindle CAUTION: Ensure the sheet tray is closed. Paper handling 28 Chapter 5 Paper handling ENWW
-
 1
1 -
2
-
3
-
4
-
5
-
6
-
7
-
8
-
9
-
10
-
11
-
12
-
13
-
14
-
15
-
16
-
17
-
18
-
19
-
20
-
21
-
22
-
23
-
24
-
25
-
26
-
27
-
28
-
29
-
30
-
31
-
32
-
 33
33 -
 34
34 -
 35
35 -
 36
36 -
 37
37 -
 38
38 -
 39
39 -
 40
40 -
 41
41 -
 42
42 -
 43
43 -
44
-
45
-
46
-
47
-
48
-
49
-
50
-
51
-
52
-
53
-
54
-
55
-
56
-
57
-
58
-
59
-
60
-
61
-
62
-
63
-
64
-
65
-
66
-
67
-
68
-
69
-
70
-
71
-
72
-
73
-
74
-
75
-
76
-
77
-
78
-
79
-
80
-
81
-
82
-
83
-
84
-
85
-
86
-
87
-
88
-
89
-
90
-
91
-
92
-
93
-
94
-
95
-
96
-
97
-
98
-
99
-
100
-
101
-
102
-
103
-
104
-
105
-
106
-
107
-
108
-
109
-
110
-
111
-
112
-
113
-
114
-
115
-
116
-
117
-
118
-
119
-
120
-
121
-
122
-
123
-
124
-
125
-
126
-
127
-
128
-
129
-
130
-
131
-
132
-
133
-
134
-
135
-
136
-
137
-
138
-
139
-
140
-
141
-
142
-
143
-
144
-
145
-
146
-
147
-
148
-
149
-
150
-
151
-
152
-
153
-
154
-
155
-
156
-
157
-
158
-
159
-
160
-
161
-
162
-
163
-
164
-
165
-
166
-
167
-
168
-
169
-
170
-
171
-
172
-
173
-
174
-
175
-
176
-
177
-
178
-
179
-
180
-
181
 |
 |
