HP Tc2120 serhp server tc2120 operations and maintenance guide - english - Page 69
Heading1 - Preventive Maintenance Procedures, Heading1 - Troubleshooting Checklist
 |
UPC - 808736945332
View all HP Tc2120 manuals
Add to My Manuals
Save this manual to your list of manuals |
Page 69 highlights
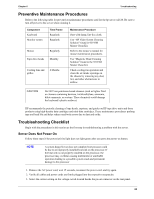
Chapter 6 Troubleshooting Preventive Maintenance Procedures Refer to the following table for preventive maintenance procedures used for the hp server tc2120. Be sure to turn off power to the server when cleaning it. Component Keyboard Monitor screen Time Frame Regularly Regularly Mouse Regularly Tape drive heads Monthly Cooling fans and grilles 6 Months Maintenance Procedure Dust with damp, lint-free cloth. Use "HP Video Screen Cleaning Solution" found in 92193M Master Clean Kit. Refer to the mouse's manual for mouse maintenance procedures. Use "Magnetic Head Cleaning Solution" found in the 92193M Master Clean Kit. Check cooling fan operation and clean the air intake openings on the chassis by removing any dust, lint, and other obstructions to airflow. CAUTION Do NOT use petroleum-based cleaners (such as lighter fluid or cleaners containing benzene, trichlorethylene, ammonia, dilute ammonia, or acetone. These chemicals could damage the keyboard's plastic surfaces). HP recommends the periodic cleaning of tape heads, capstans, and guides on HP tape drive units and those products using high-density data cartridges and mini-data cartridges. These maintenance procedures prolong tape and head life and helps reduce read/write errors due to dust and oxide. Troubleshooting Checklist Begin with the procedures in this section as the first step in troubleshooting a problem with the server. Server Does Not Power On Follow these steps if the power/activity light does not light green after you press the power-on button. NOTE A system hang (Server does not complete boot process) could be due to an improperly installed heat sink on the processor. If the heat sink is not properly installed on the processor, the processor may overheat causing intermittent or unreliable operation leading to a possible system crash and permanent damage to the processor 1. Remove the AC power cord, wait 15 seconds, reconnect the power cord, and try again. 2. Verify all cables and power cords are firmly plugged into the respective receptacles. 3. Select the correct setting on the voltage switch located beside the power connector on the rear panel. 63
-
 1
1 -
2
-
3
-
4
-
5
-
6
-
7
-
8
-
9
-
10
-
11
-
12
-
13
-
14
-
15
-
16
-
17
-
18
-
19
-
20
-
21
-
22
-
23
-
24
-
25
-
26
-
27
-
28
-
29
-
30
-
31
-
32
-
33
-
34
-
35
-
36
-
37
-
38
-
39
-
40
-
41
-
42
-
43
-
44
-
45
-
46
-
47
-
48
-
49
-
50
-
51
-
52
-
53
-
54
-
55
-
56
-
57
-
58
-
59
-
60
-
61
-
62
-
63
-
 64
64 -
 65
65 -
 66
66 -
 67
67 -
 68
68 -
 69
69 -
 70
70 -
 71
71 -
 72
72 -
 73
73 -
 74
74 -
75
-
76
-
77
-
78
-
79
-
80
-
81
-
82
-
83
-
84
-
85
-
86
-
87
-
88
-
89
-
90
-
91
-
92
-
93
-
94
-
95
-
96
-
97
-
98
-
99
-
100
-
101
-
102
-
103
-
104
-
105
-
106
-
107
-
108
-
109
-
110
-
111
-
112
-
113
-
114
-
115
-
116
-
117
-
118
-
119
-
120
-
121
-
122
-
123
-
124
-
125
 |
 |
