HP Xw8400 HP xw8400 Workstation - Service and Technical Reference Guide - Page 154
Device classes, General attach guidelines, Attach sequence rules by class priority
 |
UPC - 883585271085
View all HP Xw8400 manuals
Add to My Manuals
Save this manual to your list of manuals |
Page 154 highlights
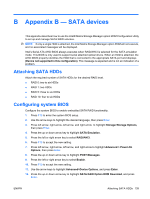
For optimal performance of a workstation system, all drives must be attached to the ATA controllers in a specified sequence. This sequence is determined by the device class of the drives and by specific attach sequence rules. Device classes To determine the best drive attach sequence, ATA/ATAPI drives are segregated into four different classes based on the bandwidth demands they place on an ATA controller. The most demanding devices are in Class 1 and the least demanding are in Class 4. Table C-1 Device classes Class 1 Hard drives Class 2 High Speed optical drives Class 3 Optical storage Class 4 Magnetic drives storage drives ATA-100 ATA-66 ATA-33 DVD DVD-CD R/W R/W CD-ROM CD-ROM LS-120 Tape Zip General attach guidelines ● The lower the device class number, the faster the device and the more bandwidth required. ● Drives installed in the Device 0 positions on both the primary and secondary controllers receive the greatest possible bandwidth. ● The bootable ATA hard drive should always be installed on the primary controller in the Device 0 position. Attach sequence rules by class priority Drives should be attached in the sequence shown for optimum performance starting at position 1. Installing drive order *If there are three or more devices, two or more of which are hard drives, two hard drives should be attached to the primary controller first before following the general attach sequence rule. The attach sequence rule can also be stated in table format: Table C-2 General attach sequence rule Sequence Description 1 The lowest class drive-Bootable hard drive recommended. 2 If only two drives, the last drive goes here; otherwise, the lowest class of the remaining drives goes here. 144 Appendix C Appendix C - Ultra ATA devices ENWW
-
 1
1 -
2
-
3
-
4
-
5
-
6
-
7
-
8
-
9
-
10
-
11
-
12
-
13
-
14
-
15
-
16
-
17
-
18
-
19
-
20
-
21
-
22
-
23
-
24
-
25
-
26
-
27
-
28
-
29
-
30
-
31
-
32
-
33
-
34
-
35
-
36
-
37
-
38
-
39
-
40
-
41
-
42
-
43
-
44
-
45
-
46
-
47
-
48
-
49
-
50
-
51
-
52
-
53
-
54
-
55
-
56
-
57
-
58
-
59
-
60
-
61
-
62
-
63
-
64
-
65
-
66
-
67
-
68
-
69
-
70
-
71
-
72
-
73
-
74
-
75
-
76
-
77
-
78
-
79
-
80
-
81
-
82
-
83
-
84
-
85
-
86
-
87
-
88
-
89
-
90
-
91
-
92
-
93
-
94
-
95
-
96
-
97
-
98
-
99
-
100
-
101
-
102
-
103
-
104
-
105
-
106
-
107
-
108
-
109
-
110
-
111
-
112
-
113
-
114
-
115
-
116
-
117
-
118
-
119
-
120
-
121
-
122
-
123
-
124
-
125
-
126
-
127
-
128
-
129
-
130
-
131
-
132
-
133
-
134
-
135
-
136
-
137
-
138
-
139
-
140
-
141
-
142
-
143
-
144
-
145
-
146
-
147
-
148
-
 149
149 -
 150
150 -
 151
151 -
 152
152 -
 153
153 -
 154
154 -
 155
155 -
 156
156 -
 157
157 -
 158
158 -
 159
159 -
160
-
161
-
162
-
163
-
164
-
165
-
166
-
167
-
168
-
169
-
170
-
171
-
172
-
173
-
174
-
175
-
176
-
177
-
178
-
179
-
180
-
181
-
182
-
183
-
184
-
185
-
186
-
187
-
188
-
189
-
190
-
191
-
192
-
193
-
194
-
195
-
196
-
197
-
198
-
199
-
200
 |
 |
