IBM 4560SLX User Guide - Page 22
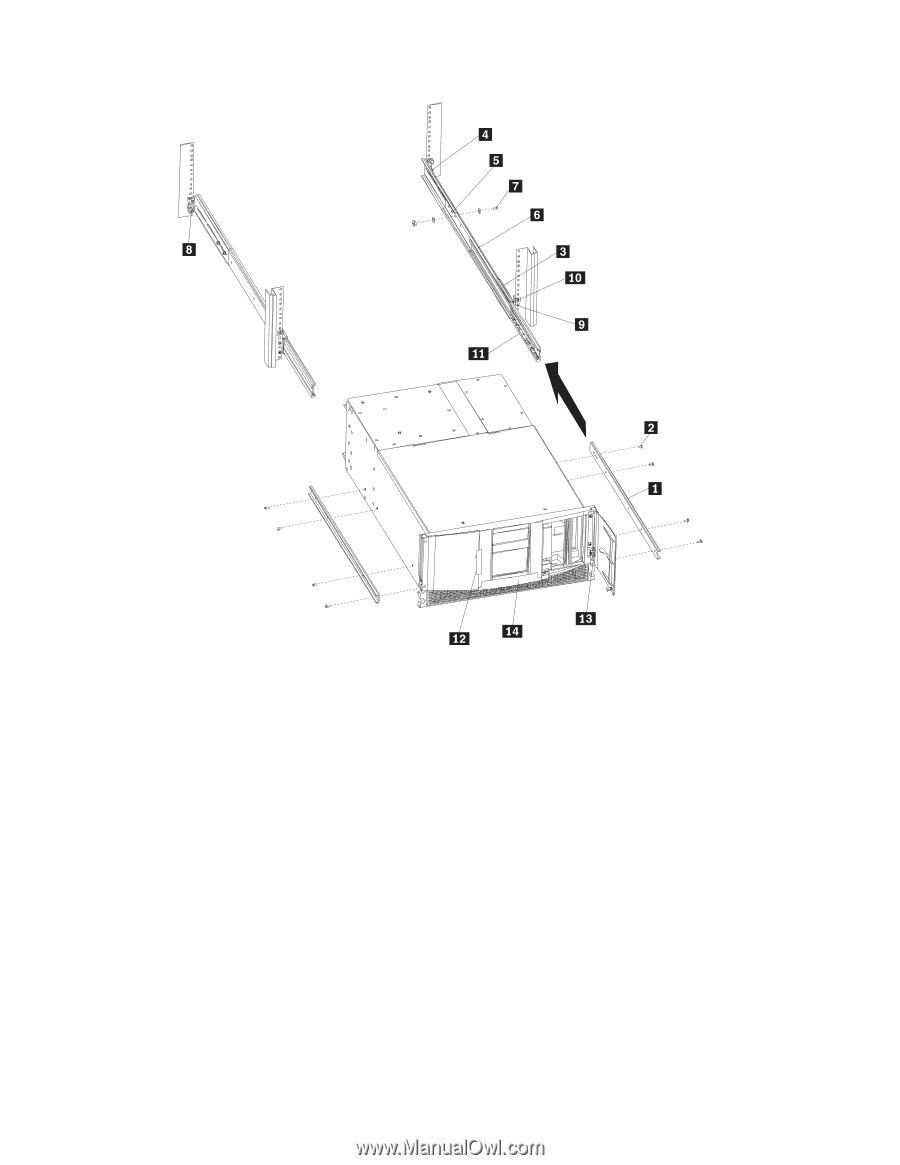
Attaching the slide members to the library, from each rack-mount slide.
 |
UPC - 087944855910
View all IBM 4560SLX manuals
Add to My Manuals
Save this manual to your list of manuals |
Page 22 highlights
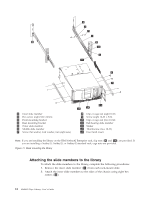
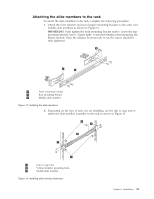
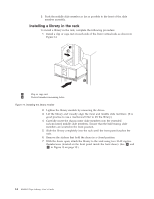
1 Inner slide member 2 Hex screw (eight M4 x 8mm) 3 Front mounting bracket 4 Rear mounting bracket 5 Outer slide member 6 Middle slide member 7 Screw, flat washer, lock washer, nut (eight sets) 8 Clip or cage nut (eight 8-32) 9 Screw (eight 10-32 x 5/8) 10 Clip or cage nut (two 10-32) 11 Ball bearing slide member 12 Sticker 13 Thumbscrew (two 10-32) 14 Door latch insert Note: If you are installing the library on the IBM Netbay42 Enterprise rack, clip nuts ( 8 and 10 ) are provided. If you are installing a Netbay11, Netbay25, or Netbay42 standard rack, cage nuts are provided. Figure 11. Rack mounting the library Attaching the slide members to the library To attach the slide members to the library, complete the following procedures: 1. Remove the inner slide member ( 1 ) from each rack-mount slide. 2. Attach the inner slide members to the sides of the chassis using eight hex screws ( 2 ). 12 4560SLX Tape Library: User's Guide
-
 1
1 -
2
-
3
-
4
-
5
-
6
-
7
-
8
-
9
-
10
-
11
-
12
-
13
-
14
-
15
-
16
-
 17
17 -
 18
18 -
 19
19 -
 20
20 -
 21
21 -
 22
22 -
 23
23 -
 24
24 -
 25
25 -
 26
26 -
 27
27 -
28
-
29
-
30
-
31
-
32
-
33
-
34
-
35
-
36
-
37
-
38
-
39
-
40
-
41
-
42
-
43
-
44
-
45
-
46
-
47
-
48
-
49
-
50
-
51
-
52
-
53
-
54
-
55
-
56
-
57
-
58
-
59
-
60
-
61
-
62
-
63
-
64
-
65
-
66
-
67
-
68
-
69
-
70
-
71
-
72
-
73
-
74
-
75
-
76
-
77
-
78
-
79
-
80
-
81
-
82
-
83
-
84
-
85
-
86
-
87
-
88
-
89
-
90
-
91
-
92
-
93
-
94
-
95
-
96
-
97
-
98
-
99
-
100
-
101
-
102
-
103
-
104
-
105
-
106
-
107
-
108
-
109
-
110
-
111
-
112
-
113
-
114
-
115
-
116
-
117
-
118
-
119
-
120
-
121
-
122
-
123
-
124
-
125
-
126
-
127
-
128
 |
 |