IBM 4560SLX User Guide - Page 32
SCSI ID selection screen, operation is complete.
 |
UPC - 087944855910
View all IBM 4560SLX manuals
Add to My Manuals
Save this manual to your list of manuals |
Page 32 highlights
Figure 23. SCSI ID selection screen 5. Select the button next to the SCSI ID you want to set. The screen will display the current setting as shown in Figure 24. Figure 24. SCSI ID editing screen 6. Enter a new value for the SCSI ID. This places your request in the New data field. 7. Select Save. A confirmation screen appears on the display as shown in Figure 25. Figure 25. SCSI ID Confirmation screen 8. Select OK to confirm. The newly selected SCSI ID flashes for a few seconds while the drive is being updated, then remains solid indicating that the operation is complete. 22 4560SLX Tape Library: User's Guide
-
 1
1 -
2
-
3
-
4
-
5
-
6
-
7
-
8
-
9
-
10
-
11
-
12
-
13
-
14
-
15
-
16
-
17
-
18
-
19
-
20
-
21
-
22
-
23
-
24
-
25
-
26
-
 27
27 -
 28
28 -
 29
29 -
 30
30 -
 31
31 -
 32
32 -
 33
33 -
 34
34 -
 35
35 -
 36
36 -
 37
37 -
38
-
39
-
40
-
41
-
42
-
43
-
44
-
45
-
46
-
47
-
48
-
49
-
50
-
51
-
52
-
53
-
54
-
55
-
56
-
57
-
58
-
59
-
60
-
61
-
62
-
63
-
64
-
65
-
66
-
67
-
68
-
69
-
70
-
71
-
72
-
73
-
74
-
75
-
76
-
77
-
78
-
79
-
80
-
81
-
82
-
83
-
84
-
85
-
86
-
87
-
88
-
89
-
90
-
91
-
92
-
93
-
94
-
95
-
96
-
97
-
98
-
99
-
100
-
101
-
102
-
103
-
104
-
105
-
106
-
107
-
108
-
109
-
110
-
111
-
112
-
113
-
114
-
115
-
116
-
117
-
118
-
119
-
120
-
121
-
122
-
123
-
124
-
125
-
126
-
127
-
128
 |
 |
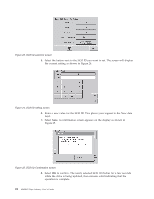
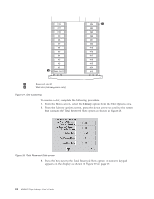
5.
Select the button next to the SCSI ID you want to set. The screen will display
the current setting as shown in Figure 24.
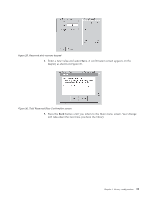
6.
Enter a new value for the SCSI ID. This places your request in the New data
field.
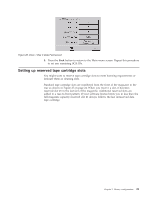
7.
Select
Save
. A confirmation screen appears on the display as shown in
Figure 25.
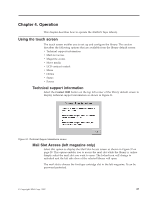
8.
Select
OK
to confirm. The newly selected SCSI ID flashes for a few seconds
while the drive is being updated, then remains solid indicating that the
operation is complete.
Figure 23. SCSI ID selection screen
Figure 24. SCSI ID editing screen
Figure 25. SCSI ID Confirmation screen
22
4560SLX Tape Library: User’s Guide