IBM 4560SLX User Guide - Page 80
Positioning the modules, Cartridge elevator router, Router installation - expansion
 |
UPC - 087944855910
View all IBM 4560SLX manuals
Add to My Manuals
Save this manual to your list of manuals |
Page 80 highlights
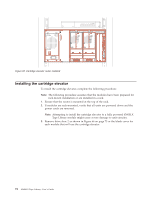
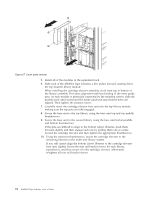
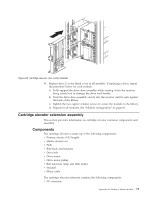
The cartridge elevator is composed of a 10U motor drive assembly with extensions equal to the combined heights of the number of modules installed in the rack. You will need to install an additional extension section and timing belt with each additional library you install. Prepare each module in a multi-unit library system for cartridge elevator installation by removing the cartridge elevator cover blanks, drive shoe assemblies (drive 2), and the blank drive shoe covers while they are outside of the storage cabinet. Alignment of the modules might be necessary during the installation. Positioning the modules The cartridge elevator motor drive section must be mounted at the top of the module stack. The top module is designated as the master through the touch screen and it senses the position of each module during initialization at power-up. The other modules are designated as slaves. For ease of installation, the router should be mounted at the top rear of the rack above the master module, allowing for easy expansion of your storage capability. Cartridge elevator router The cartridge elevator router is an 8-port configured device. It is a plug-and-play device when installed in a standard rack and connected by 10BaseT cables to individual modules. The router can support up to seven libraries. It is pre-configured specifically for use with a multi-module library. The router is physically encased in a rack-mountable shelf to be installed in the rack. Router installation To install the cartridge elevator router, complete the following procedure: 1. Verify that power is not applied to the router and that the power cord is not connected. 70 4560SLX Tape Library: User's Guide
-
 1
1 -
2
-
3
-
4
-
5
-
6
-
7
-
8
-
9
-
10
-
11
-
12
-
13
-
14
-
15
-
16
-
17
-
18
-
19
-
20
-
21
-
22
-
23
-
24
-
25
-
26
-
27
-
28
-
29
-
30
-
31
-
32
-
33
-
34
-
35
-
36
-
37
-
38
-
39
-
40
-
41
-
42
-
43
-
44
-
45
-
46
-
47
-
48
-
49
-
50
-
51
-
52
-
53
-
54
-
55
-
56
-
57
-
58
-
59
-
60
-
61
-
62
-
63
-
64
-
65
-
66
-
67
-
68
-
69
-
70
-
71
-
72
-
73
-
74
-
 75
75 -
 76
76 -
 77
77 -
 78
78 -
 79
79 -
 80
80 -
 81
81 -
 82
82 -
 83
83 -
 84
84 -
 85
85 -
86
-
87
-
88
-
89
-
90
-
91
-
92
-
93
-
94
-
95
-
96
-
97
-
98
-
99
-
100
-
101
-
102
-
103
-
104
-
105
-
106
-
107
-
108
-
109
-
110
-
111
-
112
-
113
-
114
-
115
-
116
-
117
-
118
-
119
-
120
-
121
-
122
-
123
-
124
-
125
-
126
-
127
-
128
 |
 |
