IBM 4560SLX User Guide - Page 81
correct for your system, proceed to Installing the cartridge elevator
 |
UPC - 087944855910
View all IBM 4560SLX manuals
Add to My Manuals
Save this manual to your list of manuals |
Page 81 highlights
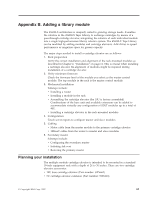
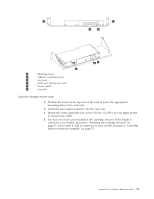
1 2 3 4 5 6 7 WAN 1 Mounting holes 2 10BaseT connection ports 3 Host port 4 COM port (factory use only) 5 Power switch 6 ac power Figure 64. Cartridge elevator router 2. Position the router at the top rear of the rack to locate the appropriate mounting holes in the rack rails. 3. Install the four captive fasteners into the rack rails. 4. Mount the router using the four screws (10-32x 1/2 P.H.). Do not apply power or connect any cables. 5. You have received a pre-assembled 10U cartridge elevator. If the length is correct for your system, proceed to "Installing the cartridge elevator" on page 72. If you need to add an extension to your system, proceed to "Cartridge elevator extension assembly" on page 75. Appendix B. Adding a library module 71
-
 1
1 -
2
-
3
-
4
-
5
-
6
-
7
-
8
-
9
-
10
-
11
-
12
-
13
-
14
-
15
-
16
-
17
-
18
-
19
-
20
-
21
-
22
-
23
-
24
-
25
-
26
-
27
-
28
-
29
-
30
-
31
-
32
-
33
-
34
-
35
-
36
-
37
-
38
-
39
-
40
-
41
-
42
-
43
-
44
-
45
-
46
-
47
-
48
-
49
-
50
-
51
-
52
-
53
-
54
-
55
-
56
-
57
-
58
-
59
-
60
-
61
-
62
-
63
-
64
-
65
-
66
-
67
-
68
-
69
-
70
-
71
-
72
-
73
-
74
-
75
-
 76
76 -
 77
77 -
 78
78 -
 79
79 -
 80
80 -
 81
81 -
 82
82 -
 83
83 -
 84
84 -
 85
85 -
 86
86 -
87
-
88
-
89
-
90
-
91
-
92
-
93
-
94
-
95
-
96
-
97
-
98
-
99
-
100
-
101
-
102
-
103
-
104
-
105
-
106
-
107
-
108
-
109
-
110
-
111
-
112
-
113
-
114
-
115
-
116
-
117
-
118
-
119
-
120
-
121
-
122
-
123
-
124
-
125
-
126
-
127
-
128
 |
 |
