IBM 4560SLX User Guide - Page 86
Assembly, should be long enough to support the full height of the cartridge elevator.
 |
UPC - 087944855910
View all IBM 4560SLX manuals
Add to My Manuals
Save this manual to your list of manuals |
Page 86 highlights
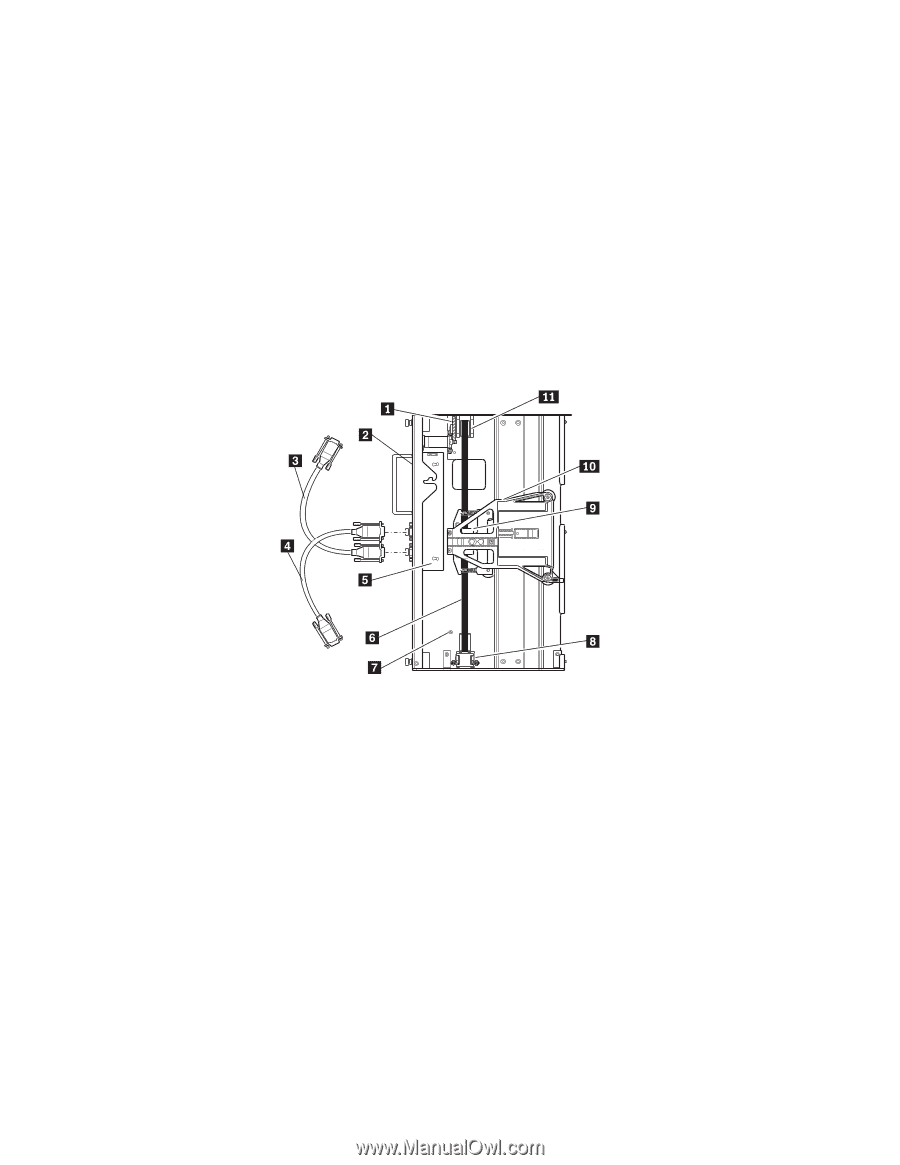
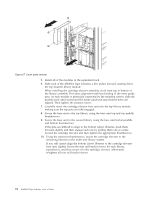
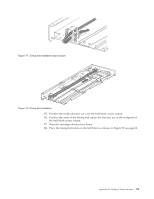
v Tie bars (to connect extensions) v Install hardware The following are required tools for the cartridge elevator: v #2 Phillips, stubby, or right-angle screwdriver v Flat-blade screwdriver v 0.05 in. allen wrench v Scissors or knife (for sizing the belt) Figure 69 shows a typical 10U cartridge elevator assembly. The motor drive section always goes on top, and the base section with the idler pulley always goes on the bottom. Extension sections are mounted between the motor drive section and the base section. All extensions are joined together with tie bars. The cartridge elevator moves tape cartridges vertically between the modules. 1 Drive motor 2 Primary chassis 3 Motor cable (master) 4 Secondary master cable 5 Printed circuit board 6 Drive belt 7 Standoff 8 Belt tensioner ramp and idler pulley 9 Belt 10 Elevator car 11 Drive belt pulley Figure 69. Factory assembled cartridge elevator Assembly You will need a clean, flat work area such as a table or work bench. The surface should be long enough to support the full height of the cartridge elevator. The height is equal to the height of the stack of modules in your system. Use the following procedure to assemble your cartridge elevator. If you received a pre-assembled 10U cartridge elevator and the length is correct for your system, see "Installing the cartridge elevator" on page 72. If you need to add a cartridge elevator extension section, complete the following procedure: 1. Remove the retaining screws from the bottom plate of the cartridge elevator. 76 4560SLX Tape Library: User's Guide
-
 1
1 -
2
-
3
-
4
-
5
-
6
-
7
-
8
-
9
-
10
-
11
-
12
-
13
-
14
-
15
-
16
-
17
-
18
-
19
-
20
-
21
-
22
-
23
-
24
-
25
-
26
-
27
-
28
-
29
-
30
-
31
-
32
-
33
-
34
-
35
-
36
-
37
-
38
-
39
-
40
-
41
-
42
-
43
-
44
-
45
-
46
-
47
-
48
-
49
-
50
-
51
-
52
-
53
-
54
-
55
-
56
-
57
-
58
-
59
-
60
-
61
-
62
-
63
-
64
-
65
-
66
-
67
-
68
-
69
-
70
-
71
-
72
-
73
-
74
-
75
-
76
-
77
-
78
-
79
-
80
-
 81
81 -
 82
82 -
 83
83 -
 84
84 -
 85
85 -
 86
86 -
 87
87 -
 88
88 -
 89
89 -
 90
90 -
 91
91 -
92
-
93
-
94
-
95
-
96
-
97
-
98
-
99
-
100
-
101
-
102
-
103
-
104
-
105
-
106
-
107
-
108
-
109
-
110
-
111
-
112
-
113
-
114
-
115
-
116
-
117
-
118
-
119
-
120
-
121
-
122
-
123
-
124
-
125
-
126
-
127
-
128
 |
 |