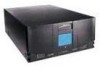
IBM 4560SLX User Guide - Page 79
Appendix B. Adding a library module, Planning your installation
 |
UPC - 087944855910
View all IBM 4560SLX manuals
Add to My Manuals
Save this manual to your list of manuals |
Page 79 highlights
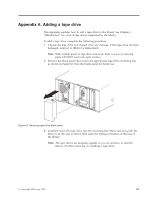
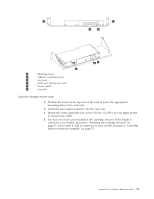
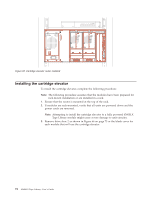
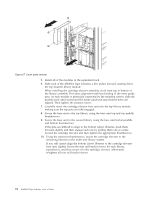
Appendix B. Adding a library module The 4560SLX architecture is uniquely suited to growing storage needs. It enables the robotics in the 4560SLX Tape Library to exchange cartridges by means of a pass-through cartridge elevator, integrating the robotics of each individual module into a single high-performance library robotics system. The 4560SLX Tape Library can be modified by adding modules and cartridge elevators. Add drives to speed performance or magazine space for greater capacity. The major steps needed to install a cartridge elevator are as follows: 1. Rack preparation Verify the correct installation and alignment of the rack-mounted modules as described in Chapter 2, "Installation" on page 11. This is crucial when installing a cartridge elevator. Re-alignment of modules might be required during installation of a cartridge elevator. 2. Verify minimum firmware Check the firmware level of the module you select as the master control module. The top module in the rack is the master control module. 3. Mechanical installation Substeps include: v Installing a router v Installing a module in the rack v Assembling the cartridge elevator (the 10U is factory assembled) Combinations of the base unit and available extensions can be added to accommodate virtually any configuration of SDLT modules up to a total of 40U. v Installing a cartridge elevator in the rack-mounted modules 4. Configuration Touch screen inputs to configure master and slave modules 5. Cabling v Motor cable from the master module to the primary cartridge elevator v 10BaseT cables from the router to master and slave modules 6. Secondary master Substeps include: v Configuring the secondary master v Initiating fail-over v Restoring the primary master Planning your installation The multiple module cartridge elevator is intended to be mounted in a standard 19-inch equipment rack with a depth of 24 to 30 inches. There are two cartridge elevator accessories: v 10U base cartridge elevator (Part number: 59P6662) v 5U cartridge elevator extension (Part number: 59P6663) © Copyright IBM Corp. 2002 69
-
 1
1 -
2
-
3
-
4
-
5
-
6
-
7
-
8
-
9
-
10
-
11
-
12
-
13
-
14
-
15
-
16
-
17
-
18
-
19
-
20
-
21
-
22
-
23
-
24
-
25
-
26
-
27
-
28
-
29
-
30
-
31
-
32
-
33
-
34
-
35
-
36
-
37
-
38
-
39
-
40
-
41
-
42
-
43
-
44
-
45
-
46
-
47
-
48
-
49
-
50
-
51
-
52
-
53
-
54
-
55
-
56
-
57
-
58
-
59
-
60
-
61
-
62
-
63
-
64
-
65
-
66
-
67
-
68
-
69
-
70
-
71
-
72
-
73
-
 74
74 -
 75
75 -
 76
76 -
 77
77 -
 78
78 -
 79
79 -
 80
80 -
 81
81 -
 82
82 -
 83
83 -
 84
84 -
85
-
86
-
87
-
88
-
89
-
90
-
91
-
92
-
93
-
94
-
95
-
96
-
97
-
98
-
99
-
100
-
101
-
102
-
103
-
104
-
105
-
106
-
107
-
108
-
109
-
110
-
111
-
112
-
113
-
114
-
115
-
116
-
117
-
118
-
119
-
120
-
121
-
122
-
123
-
124
-
125
-
126
-
127
-
128
 |
 |