IBM 4560SLX User Guide - Page 24
Installing a library in the rack
 |
UPC - 087944855910
View all IBM 4560SLX manuals
Add to My Manuals
Save this manual to your list of manuals |
Page 24 highlights
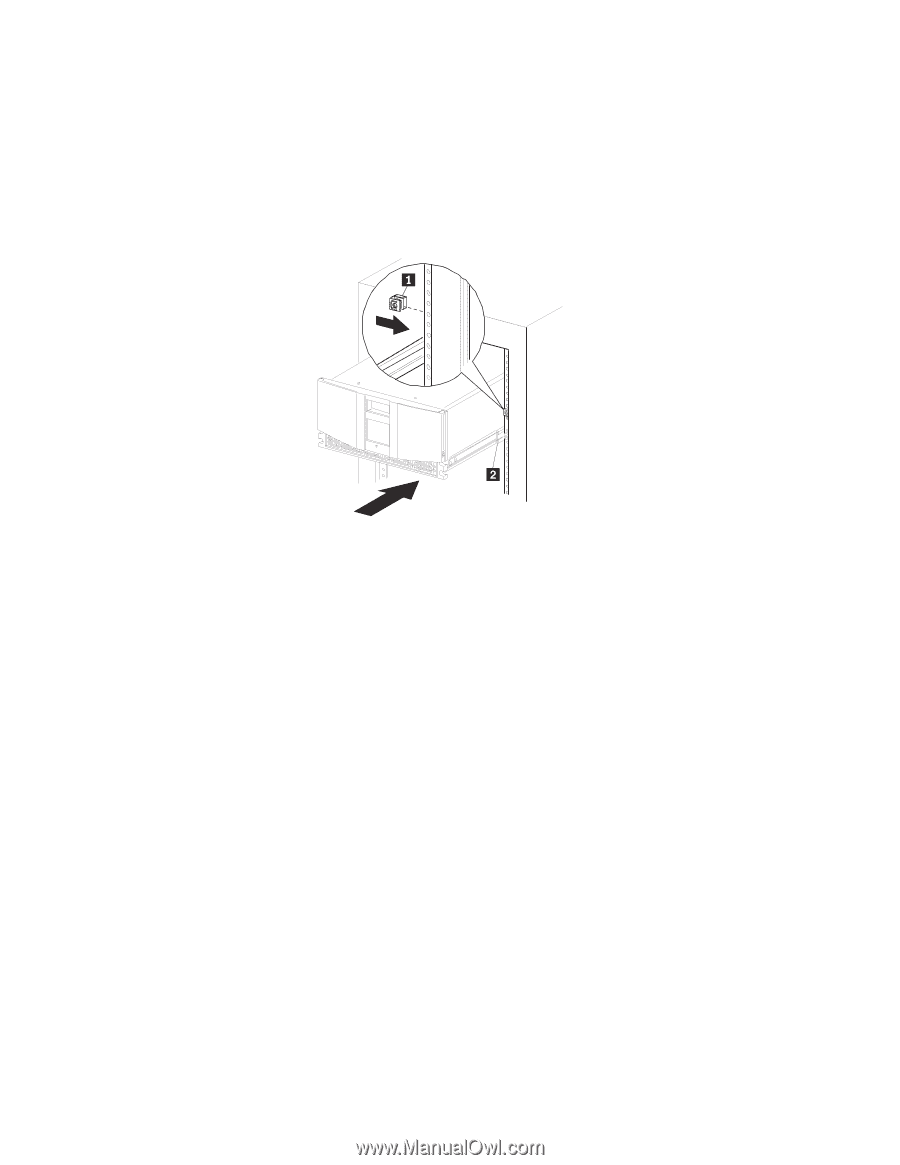
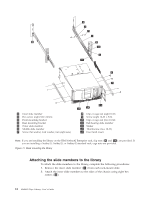
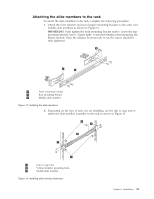
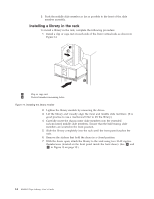
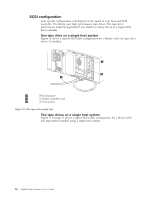
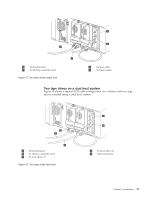
3. Push the middle slide member as far as possible to the front of the slide member assembly. Installing a library in the rack To install a library in the rack, complete the following procedure: 1. Install a clip or cage nut on each side of the front vertical rails as shown in Figure 14. 1 Clip or cage nut 2 Vertical member mounting holes Figure 14. Installing the library module 2. Lighten the library module by removing the drives. 3. Lift the library and visually align the inner and middle slide members. (It is good practice to use a mechanical lifter to lift the library.) 4. Carefully insert the chassis inner slide members into the extended rack-mounted middle slide members. Ensure that the ball bearing slide members are located in the front position. 5. Slide the library completely into the rack until the front panel touches the rack. 6. Remove the stickers that hold the doors in a closed position. 7. With the doors open, attach the library to the rack using two 10-32 captive thumbscrews (located on the front panel inside the front doors). (See 1 and 2 in Figure 15 on page 15.) 14 4560SLX Tape Library: User's Guide
-
 1
1 -
2
-
3
-
4
-
5
-
6
-
7
-
8
-
9
-
10
-
11
-
12
-
13
-
14
-
15
-
16
-
17
-
18
-
 19
19 -
 20
20 -
 21
21 -
 22
22 -
 23
23 -
 24
24 -
 25
25 -
 26
26 -
 27
27 -
 28
28 -
 29
29 -
30
-
31
-
32
-
33
-
34
-
35
-
36
-
37
-
38
-
39
-
40
-
41
-
42
-
43
-
44
-
45
-
46
-
47
-
48
-
49
-
50
-
51
-
52
-
53
-
54
-
55
-
56
-
57
-
58
-
59
-
60
-
61
-
62
-
63
-
64
-
65
-
66
-
67
-
68
-
69
-
70
-
71
-
72
-
73
-
74
-
75
-
76
-
77
-
78
-
79
-
80
-
81
-
82
-
83
-
84
-
85
-
86
-
87
-
88
-
89
-
90
-
91
-
92
-
93
-
94
-
95
-
96
-
97
-
98
-
99
-
100
-
101
-
102
-
103
-
104
-
105
-
106
-
107
-
108
-
109
-
110
-
111
-
112
-
113
-
114
-
115
-
116
-
117
-
118
-
119
-
120
-
121
-
122
-
123
-
124
-
125
-
126
-
127
-
128
 |
 |