IBM 4560SLX User Guide - Page 93
Configuring the primary master module, Under Edit Options press
 |
UPC - 087944855910
View all IBM 4560SLX manuals
Add to My Manuals
Save this manual to your list of manuals |
Page 93 highlights
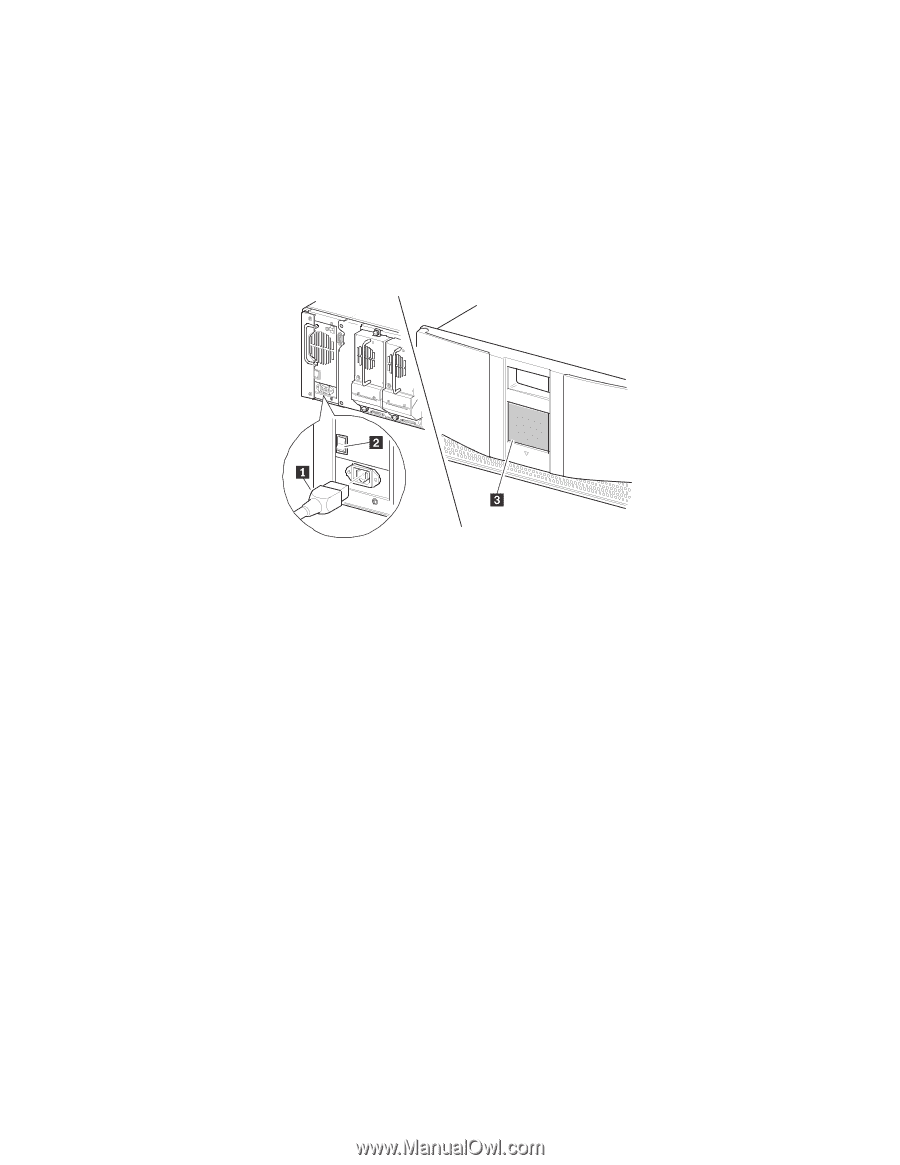
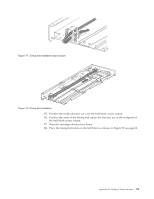
common functions in a slave module. The following procedure prepares your multi-module library for cartridge elevator use. The following procedure assumes that the modules are configured for standalone operation, that they have been rack mounted, that the system router is installed at the top of the rack above the primary master with power off, and that the 10BaseT cabling is not connected to any of the modules. If the modules are not powered up, apply power to all library modules as shown in Figure 81. 1 Power cord 2 Power switch 3 Touch screen Figure 81. Powering up the library 1. Connect the power cord to the power supply receptacle. 2. Toggle the power switch located on the power supply to ON. 3. Press the touch screen to apply power to the module. Configuring the primary master module To configure the primary master module, complete the following procedure: 1. Press Menu on the primary master library touch screen. 2. Under Edit Options press Library. 3. Press the scroll down arrow until Module Configuration is visible. 4. Press the button adjacent to Module Configuration. The Module Configuration screen is displayed. Appendix B. Adding a library module 83
-
 1
1 -
2
-
3
-
4
-
5
-
6
-
7
-
8
-
9
-
10
-
11
-
12
-
13
-
14
-
15
-
16
-
17
-
18
-
19
-
20
-
21
-
22
-
23
-
24
-
25
-
26
-
27
-
28
-
29
-
30
-
31
-
32
-
33
-
34
-
35
-
36
-
37
-
38
-
39
-
40
-
41
-
42
-
43
-
44
-
45
-
46
-
47
-
48
-
49
-
50
-
51
-
52
-
53
-
54
-
55
-
56
-
57
-
58
-
59
-
60
-
61
-
62
-
63
-
64
-
65
-
66
-
67
-
68
-
69
-
70
-
71
-
72
-
73
-
74
-
75
-
76
-
77
-
78
-
79
-
80
-
81
-
82
-
83
-
84
-
85
-
86
-
87
-
 88
88 -
 89
89 -
 90
90 -
 91
91 -
 92
92 -
 93
93 -
 94
94 -
 95
95 -
 96
96 -
 97
97 -
 98
98 -
99
-
100
-
101
-
102
-
103
-
104
-
105
-
106
-
107
-
108
-
109
-
110
-
111
-
112
-
113
-
114
-
115
-
116
-
117
-
118
-
119
-
120
-
121
-
122
-
123
-
124
-
125
-
126
-
127
-
128
 |
 |