Icom IP100H Instruction Manual ver. 2.30 - Page 30
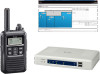
About the ID list, Click [Common Settings], then [ID list].
 |
View all Icom IP100H manuals
Add to My Manuals
Save this manual to your list of manuals |
Page 30 highlights
2 SETTING UP THE IP1000C SYSTEM 2. Transceiver settings ■■About the ID list Enter Names, Call types and so on in an ID list that the IP100H will use. After registration is finished, the IP100H needs to be rebooted. When using the ID list, set the "Use ID List" to "Enable." (p.4-40) 1 Click [Common Settings], then [ID list]. ••The [ID List] screen is displayed. 2 Select the ID list group in the "ID List Common Settings" field. ••The ID list group number (example: 1) is used in the "ID List" item on the [Common Settings] screen. 3 Enter the name, Call type, and destination ID (00001 ~ 60000) in the "ID List" field, then click . Select "Select From List" when selecting the registered Destination ID in the [Transceiver Registration] screen or [Destination Settings] screen. q Enter w Click 4 After registration is finished, confirm the registered contents in the "ID List Entries" field. Confirm 2-11
-
 1
1 -
2
-
3
-
4
-
5
-
6
-
7
-
8
-
9
-
10
-
11
-
12
-
13
-
14
-
15
-
16
-
17
-
18
-
19
-
20
-
21
-
22
-
23
-
24
-
 25
25 -
 26
26 -
 27
27 -
 28
28 -
 29
29 -
 30
30 -
 31
31 -
 32
32 -
 33
33 -
 34
34 -
 35
35 -
36
-
37
-
38
-
39
-
40
-
41
-
42
-
43
-
44
-
45
-
46
-
47
-
48
-
49
-
50
-
51
-
52
-
53
-
54
-
55
-
56
-
57
-
58
-
59
-
60
-
61
-
62
-
63
-
64
-
65
-
66
-
67
-
68
-
69
-
70
-
71
-
72
-
73
-
74
-
75
-
76
-
77
-
78
-
79
-
80
-
81
-
82
-
83
-
84
-
85
-
86
-
87
-
88
-
89
-
90
-
91
-
92
-
93
-
94
-
95
-
96
-
97
-
98
-
99
-
100
-
101
-
102
-
103
-
104
-
105
-
106
-
107
-
108
-
109
-
110
-
111
-
112
-
113
-
114
-
115
-
116
-
117
-
118
-
119
-
120
-
121
-
122
-
123
-
124
-
125
-
126
-
127
-
128
-
129
-
130
-
131
-
132
-
133
-
134
-
135
-
136
-
137
-
138
-
139
-
140
-
141
-
142
-
143
-
144
-
145
-
146
-
147
-
148
-
149
-
150
-
151
-
152
-
153
-
154
-
155
-
156
-
157
-
158
-
159
-
160
-
161
-
162
-
163
-
164
-
165
-
166
-
167
-
168
-
169
-
170
-
171
-
172
-
173
-
174
-
175
-
176
-
177
-
178
-
179
-
180
-
181
-
182
-
183
-
184
-
185
-
186
-
187
-
188
-
189
-
190
-
191
-
192
-
193
-
194
-
195
-
196
-
197
-
198
-
199
-
200
-
201
-
202
-
203
 |
 |
