Intermec PM23c PM23c, PM43, and PM43c Mid-Range Printer User Manual - Page 63
How to Connect the Printer to Your Network, Connect the Printer to an Ethernet Network
 |
View all Intermec PM23c manuals
Add to My Manuals
Save this manual to your list of manuals |
Page 63 highlights
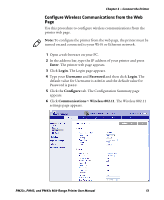
Chapter 3 - Connect the Printer Note: You must configure all printer settings through the printer Main Menu, the printer web page, or with PrintSet 5 and a USB connection before you use the parallel connection to the printer. 1 Connect one end of the IEEE 1284 cable to the interface adapter port on the back of the printer. 2 Connect the other end of the cable to to parallel port on the PC. How to Connect the Printer to Your Network You can connect the printer to your network using the: • Ethernet interface. • Wi-Fi + Bluetooth wireless interface. These network interfaces provide features such as security, FTP server, web page, and Alert handling. Connect the Printer to an Ethernet Network Use the Ethernet port to set up the PM43 or PM43c as a network printer. The printer is set to automatically retrieve an IP number from the network (DHCP) when you turn on the printer. You can use the network connection with InterDriver. You can also use it to directly send commands to the printer through a terminal connection (Telnet), or you can send instructions through FTP. 1 Turn the printer off. 2 Connect the Ethernet cable to the Ethernet port in the rear of the printer and connect the other end of the cable to your network. 3 Turn the printer on. If your printer uses a DHCP server to assign IP addresses, the IP address appears in the lower left corner of the screen. • For an icon printer, use Intermec PrintSet to retrieve the printer IP address. If you are not using a DHCP server to automatically assign IP addresses to devices in your network, you must set a static IP address and other network information manually. Continue with the next step. PM23c, PM43, and PM43c Mid-Range Printer User Manual 49
-
 1
1 -
2
-
3
-
4
-
5
-
6
-
7
-
8
-
9
-
10
-
11
-
12
-
13
-
14
-
15
-
16
-
17
-
18
-
19
-
20
-
21
-
22
-
23
-
24
-
25
-
26
-
27
-
28
-
29
-
30
-
31
-
32
-
33
-
34
-
35
-
36
-
37
-
38
-
39
-
40
-
41
-
42
-
43
-
44
-
45
-
46
-
47
-
48
-
49
-
50
-
51
-
52
-
53
-
54
-
55
-
56
-
57
-
 58
58 -
 59
59 -
 60
60 -
 61
61 -
 62
62 -
 63
63 -
 64
64 -
 65
65 -
 66
66 -
 67
67 -
 68
68 -
69
-
70
-
71
-
72
-
73
-
74
-
75
-
76
-
77
-
78
-
79
-
80
-
81
-
82
-
83
-
84
-
85
-
86
-
87
-
88
-
89
-
90
-
91
-
92
-
93
-
94
-
95
-
96
-
97
-
98
-
99
-
100
-
101
-
102
-
103
-
104
-
105
-
106
-
107
-
108
-
109
-
110
-
111
-
112
-
113
-
114
-
115
-
116
-
117
-
118
-
119
-
120
-
121
-
122
-
123
-
124
-
125
-
126
-
127
-
128
-
129
-
130
-
131
-
132
-
133
-
134
-
135
-
136
-
137
-
138
-
139
-
140
-
141
-
142
-
143
-
144
-
145
-
146
-
147
-
148
-
149
-
150
-
151
-
152
-
153
-
154
-
155
-
156
-
157
-
158
-
159
-
160
-
161
-
162
-
163
-
164
-
165
-
166
-
167
-
168
 |
 |
