Konica Minolta bizhub C654 bizhub C654/C754 Scan Operations User Guide - Page 148
Number], Stamp]
 |
View all Konica Minolta bizhub C654 manuals
Add to My Manuals
Save this manual to your list of manuals |
Page 148 highlights
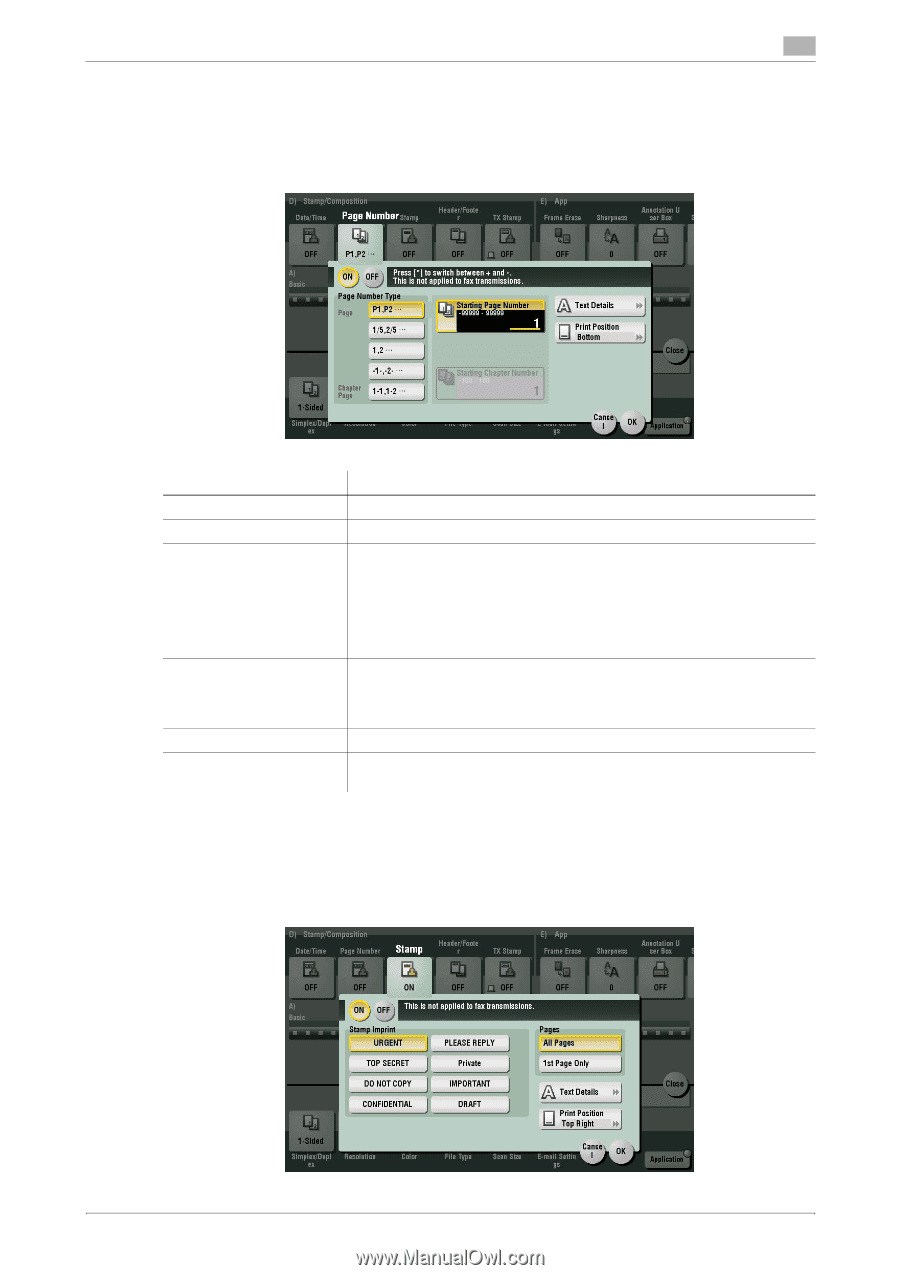
11 [Page Number] To display: [Scan/Fax] - [Application] - [Stamp/Composition] - [Page Number] Select the stamping position and format, and add page and chapter numbers. Page and chapter numbers are printed on all pages. Settings [ON]/[OFF] [Page Number Type] [Starting Page Number] [Starting Chapter Number] [Text Details] [Print Position] Description Select [ON] to print page numbers. Select the format of the page number. Enter the starting page number to be printed on the first page. For example, to print page numbers from the third page of the original, enter "-1". The first page of the original is counted as "-1", and the second page as "0", and the third page is counted as "1". In [Starting Page Number], a page number is printed on pages 1 and later. If "2" is entered, page numbers are printed from the first page of the original as "2, 3", etc. in order. The "-" (minus sign) changes to + each time you press *. Enter the starting chapter number if an original is divided into chapters, and you want to print chapter numbers from the second chapter. You can specify chapter numbers only when you have selected [Chapter Page] in [Page Number Type]. If necessary, select the print size, font, and text color. If necessary, select the print position of the text. You can more finely adjust the print position in [Adjust Position]. [Stamp] To display: [Scan/Fax] - [Application] - [Stamp/Composition] - [Stamp] Texts such as "PLEASE REPLY" and "DO NOT COPY" are printed on the first page or all pages. You can select the text to be added from the registered fix stamps and arbitrary registered stamps. bizhub C754/C654 11-23
-
 1
1 -
2
-
3
-
4
-
5
-
6
-
7
-
8
-
9
-
10
-
11
-
12
-
13
-
14
-
15
-
16
-
17
-
18
-
19
-
20
-
21
-
22
-
23
-
24
-
25
-
26
-
27
-
28
-
29
-
30
-
31
-
32
-
33
-
34
-
35
-
36
-
37
-
38
-
39
-
40
-
41
-
42
-
43
-
44
-
45
-
46
-
47
-
48
-
49
-
50
-
51
-
52
-
53
-
54
-
55
-
56
-
57
-
58
-
59
-
60
-
61
-
62
-
63
-
64
-
65
-
66
-
67
-
68
-
69
-
70
-
71
-
72
-
73
-
74
-
75
-
76
-
77
-
78
-
79
-
80
-
81
-
82
-
83
-
84
-
85
-
86
-
87
-
88
-
89
-
90
-
91
-
92
-
93
-
94
-
95
-
96
-
97
-
98
-
99
-
100
-
101
-
102
-
103
-
104
-
105
-
106
-
107
-
108
-
109
-
110
-
111
-
112
-
113
-
114
-
115
-
116
-
117
-
118
-
119
-
120
-
121
-
122
-
123
-
124
-
125
-
126
-
127
-
128
-
129
-
130
-
131
-
132
-
133
-
134
-
135
-
136
-
137
-
138
-
139
-
140
-
141
-
142
-
 143
143 -
 144
144 -
 145
145 -
 146
146 -
 147
147 -
 148
148 -
 149
149 -
 150
150 -
 151
151 -
 152
152 -
 153
153 -
154
-
155
-
156
-
157
-
158
-
159
-
160
-
161
-
162
-
163
-
164
-
165
-
166
-
167
-
168
-
169
-
170
-
171
-
172
-
173
-
174
-
175
-
176
-
177
-
178
-
179
-
180
-
181
-
182
-
183
-
184
-
185
-
186
-
187
-
188
-
189
-
190
-
191
-
192
 |
 |