Konica Minolta bizhub C654 bizhub C654/C754 Scan Operations User Guide - Page 95
Machine side: Option settings for the administrator, Using SSL communication, Using a proxy server
 |
View all Konica Minolta bizhub C654 manuals
Add to My Manuals
Save this manual to your list of manuals |
Page 95 highlights
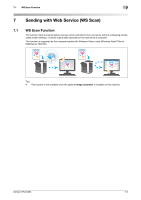
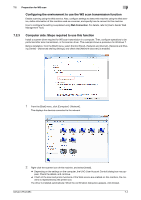
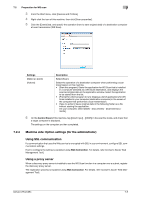
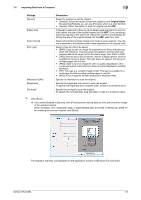
7.2 Preparation for WS scan 7 3 From the Start menu, click [Devices and Printers]. 4 Right-click the icon of this machine, then click [Scan properties]. 5 Click the [Events] tab, and specify the operation (how to save original data) of a destination computer at scan transmission (WS Scan). Settings [Select an event] [Actions] Description Select [Scan]. Select the operation of a destination computer when performing a scan transmission on this machine. • [Start this program]: Starts the application for WS Scan that is installed in a computer selected as a WS Scan destination, and displays the scanned original data on the application window. Select the application to be started from the list. • [Prompt for which program to run]: Displays a list of applications for WS Scan installed in your computer (destination computer) in the screen of the computer that performed a scan transmission. • [Take no action]: Saves original data in the following folder as a file without starting the application. On your computer, select [Start] - [Documents] - [Scanned Documents]. 6 On the Control Panel of this machine, tap [Direct Input] - [DPWS] in the scan/fax mode, and check that a target computer is displayed. The settings on the computer are then completed. 7.2.4 Machine side: Option settings (for the administrator) Using SSL communication If a communication that uses the Web service is encrypted with SSL in your environment, configure SSL communication settings. How to configure the setting is explained using Web Connection. For details, refer to [User's Guide: Web Management Tool]. Using a proxy server When a discovery proxy server is installed to use the WS Scan function in a computer over a subnet, register the discovery proxy server. The registration process is explained using Web Connection. For details, refer to [User's Guide: Web Management Tool]. bizhub C754/C654 7-5
-
 1
1 -
2
-
3
-
4
-
5
-
6
-
7
-
8
-
9
-
10
-
11
-
12
-
13
-
14
-
15
-
16
-
17
-
18
-
19
-
20
-
21
-
22
-
23
-
24
-
25
-
26
-
27
-
28
-
29
-
30
-
31
-
32
-
33
-
34
-
35
-
36
-
37
-
38
-
39
-
40
-
41
-
42
-
43
-
44
-
45
-
46
-
47
-
48
-
49
-
50
-
51
-
52
-
53
-
54
-
55
-
56
-
57
-
58
-
59
-
60
-
61
-
62
-
63
-
64
-
65
-
66
-
67
-
68
-
69
-
70
-
71
-
72
-
73
-
74
-
75
-
76
-
77
-
78
-
79
-
80
-
81
-
82
-
83
-
84
-
85
-
86
-
87
-
88
-
89
-
 90
90 -
 91
91 -
 92
92 -
 93
93 -
 94
94 -
 95
95 -
 96
96 -
 97
97 -
 98
98 -
 99
99 -
 100
100 -
101
-
102
-
103
-
104
-
105
-
106
-
107
-
108
-
109
-
110
-
111
-
112
-
113
-
114
-
115
-
116
-
117
-
118
-
119
-
120
-
121
-
122
-
123
-
124
-
125
-
126
-
127
-
128
-
129
-
130
-
131
-
132
-
133
-
134
-
135
-
136
-
137
-
138
-
139
-
140
-
141
-
142
-
143
-
144
-
145
-
146
-
147
-
148
-
149
-
150
-
151
-
152
-
153
-
154
-
155
-
156
-
157
-
158
-
159
-
160
-
161
-
162
-
163
-
164
-
165
-
166
-
167
-
168
-
169
-
170
-
171
-
172
-
173
-
174
-
175
-
176
-
177
-
178
-
179
-
180
-
181
-
182
-
183
-
184
-
185
-
186
-
187
-
188
-
189
-
190
-
191
-
192
 |
 |
