Konica Minolta bizhub C654 bizhub C654/C754 Scan Operations User Guide - Page 99
Importing Data from a Computer, Original Glass, Settings, Description
 |
View all Konica Minolta bizhub C654 manuals
Add to My Manuals
Save this manual to your list of manuals |
Page 99 highlights
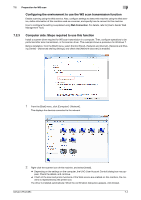
7.4 Importing Data from a Computer 7 Settings [Source] [Paper size] [Color format] [File Type] [Resolution (DPI)] [Brightness] [Contrast] Description Select the position to set the original. • [Flatbed]: Select this option to load the original on the Original Glass. By selecting [Flatbed], you can use [Preview], which is a scan function. • [Feeder]: Select this option to load the original into the ADF. If [Feeder] is selected in [Source], [Auto detect page size] starts to automatically detect the size of the original loaded into the ADF. If you are always scanning originals of the same size without the machine automatically detecting the size of the original loaded into the ADF, select any size. Select either [Color] or [Glay Scale] color mode to scan originals. The original is scanned in the selected color mode regardless of the original color. Select a type of a file to be saved. • [BMP]: Used to save an image file adopted by the Paint software sup- plied with Windows. This type does not support a function that compresses data to be saved, so the file size is larger than JPEG or PNG. • [JPG]: Used to save a file commonly used for a digital camera, which is available for saving a photo. This type does not support the saving of multiple pages into one file. • [PNG]: Used to save an image file with no quality degradation when compressing a file. Note that some files cannot be displayed in old Web browsers. • [TIF]: This type is a versatile image format. This type is available for a multi-page file that provides multiple pages in one file. • [XPS]: A new image file format introduced in Windows Vista. Specify the resolution to scan the original. Specify the brightness with which to scan the original. To specify the brightness level, drag the slider, or type in a numerical value. Specify the contrast to scan the original. To specify the contrast level, drag the slider, or type in a numerical value. 4 Click [Scan]. % If you select [Flatbet] in [Source], click [Preview] before saving data as a file, and check the image of the scanned original. When necessary, trim a displayed image, or adjust [Brightness], [Contrast], or [Resolution (DPI)]. After checking the scanned original, click [Scan]. The original is scanned, and displayed on the application window of [Windows Fax and Scan]. bizhub C754/C654 7-9
-
 1
1 -
2
-
3
-
4
-
5
-
6
-
7
-
8
-
9
-
10
-
11
-
12
-
13
-
14
-
15
-
16
-
17
-
18
-
19
-
20
-
21
-
22
-
23
-
24
-
25
-
26
-
27
-
28
-
29
-
30
-
31
-
32
-
33
-
34
-
35
-
36
-
37
-
38
-
39
-
40
-
41
-
42
-
43
-
44
-
45
-
46
-
47
-
48
-
49
-
50
-
51
-
52
-
53
-
54
-
55
-
56
-
57
-
58
-
59
-
60
-
61
-
62
-
63
-
64
-
65
-
66
-
67
-
68
-
69
-
70
-
71
-
72
-
73
-
74
-
75
-
76
-
77
-
78
-
79
-
80
-
81
-
82
-
83
-
84
-
85
-
86
-
87
-
88
-
89
-
90
-
91
-
92
-
93
-
 94
94 -
 95
95 -
 96
96 -
 97
97 -
 98
98 -
 99
99 -
 100
100 -
 101
101 -
 102
102 -
 103
103 -
 104
104 -
105
-
106
-
107
-
108
-
109
-
110
-
111
-
112
-
113
-
114
-
115
-
116
-
117
-
118
-
119
-
120
-
121
-
122
-
123
-
124
-
125
-
126
-
127
-
128
-
129
-
130
-
131
-
132
-
133
-
134
-
135
-
136
-
137
-
138
-
139
-
140
-
141
-
142
-
143
-
144
-
145
-
146
-
147
-
148
-
149
-
150
-
151
-
152
-
153
-
154
-
155
-
156
-
157
-
158
-
159
-
160
-
161
-
162
-
163
-
164
-
165
-
166
-
167
-
168
-
169
-
170
-
171
-
172
-
173
-
174
-
175
-
176
-
177
-
178
-
179
-
180
-
181
-
182
-
183
-
184
-
185
-
186
-
187
-
188
-
189
-
190
-
191
-
192
 |
 |
