Konica Minolta bizhub C654 bizhub C654/C754 Scan Operations User Guide - Page 94
Configuring the environment to use the WS scan transmission function, Computer side: Steps required
 |
View all Konica Minolta bizhub C654 manuals
Add to My Manuals
Save this manual to your list of manuals |
Page 94 highlights
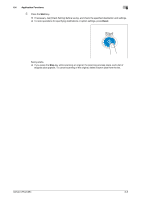
7.2 Preparation for WS scan 7 Configuring the environment to use the WS scan transmission function Enable scanning using the Web service. Also, configure settings to detect this machine using the Web service, define information of this machine used as a scanner, and specify how to connect to this machine. How to configure the setting is explained using Web Connection. For details, refer to [User's Guide: Web Management Tool]. 7.2.3 Computer side: Steps required to use this function Install a scanner driver required for WS scan transmission in a computer. Then, configure operations to be performed after scan transmission, in the scanner driver. This example shows a procedure for Windows 7. Before installation, from the [Start] menu, select [Control Panel] - [Network and Internet] - [Network and Sharing Center] - [Advanced sharing settings], and check that [Network discovery] is enabled. 1 From the [Start] menu, click [Computer] - [Network]. This displays the devices connected to the network. 2 Right-click the scanner icon of this machine, and select [Install]. % Depending on the settings on the computer, the UAC (User Account Control) dialog box may appear. Check the details, and continue. % If both of the scan and printer functions of the Web service are enabled on this machine, the machine is represented by the printer icon. The driver is installed automatically. When the confirmation dialog box appears, click [Close]. bizhub C754/C654 7-4
-
 1
1 -
2
-
3
-
4
-
5
-
6
-
7
-
8
-
9
-
10
-
11
-
12
-
13
-
14
-
15
-
16
-
17
-
18
-
19
-
20
-
21
-
22
-
23
-
24
-
25
-
26
-
27
-
28
-
29
-
30
-
31
-
32
-
33
-
34
-
35
-
36
-
37
-
38
-
39
-
40
-
41
-
42
-
43
-
44
-
45
-
46
-
47
-
48
-
49
-
50
-
51
-
52
-
53
-
54
-
55
-
56
-
57
-
58
-
59
-
60
-
61
-
62
-
63
-
64
-
65
-
66
-
67
-
68
-
69
-
70
-
71
-
72
-
73
-
74
-
75
-
76
-
77
-
78
-
79
-
80
-
81
-
82
-
83
-
84
-
85
-
86
-
87
-
88
-
 89
89 -
 90
90 -
 91
91 -
 92
92 -
 93
93 -
 94
94 -
 95
95 -
 96
96 -
 97
97 -
 98
98 -
 99
99 -
100
-
101
-
102
-
103
-
104
-
105
-
106
-
107
-
108
-
109
-
110
-
111
-
112
-
113
-
114
-
115
-
116
-
117
-
118
-
119
-
120
-
121
-
122
-
123
-
124
-
125
-
126
-
127
-
128
-
129
-
130
-
131
-
132
-
133
-
134
-
135
-
136
-
137
-
138
-
139
-
140
-
141
-
142
-
143
-
144
-
145
-
146
-
147
-
148
-
149
-
150
-
151
-
152
-
153
-
154
-
155
-
156
-
157
-
158
-
159
-
160
-
161
-
162
-
163
-
164
-
165
-
166
-
167
-
168
-
169
-
170
-
171
-
172
-
173
-
174
-
175
-
176
-
177
-
178
-
179
-
180
-
181
-
182
-
183
-
184
-
185
-
186
-
187
-
188
-
189
-
190
-
191
-
192
 |
 |
