Konica Minolta bizhub C654 bizhub C654/C754 Scan Operations User Guide - Page 170
System Settings]
 |
View all Konica Minolta bizhub C654 manuals
Add to My Manuals
Save this manual to your list of manuals |
Page 170 highlights
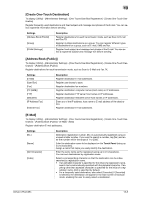
13 [System Settings] To display: [Utility] - [Administrator Settings] - [System Settings] Configure the operating environment of this machine such as the date and time of this machine, power saving function, functional operations, and screen displays. Settings [Power Supply/Power Save Settings] [Output Settings] [Date/Time Settings] [Daylight Saving Time] [Weekly Timer Settings] [Restrict User Access] [Expert Adjustment] [List/Counter] [Reset Settings] [User Box Settings] [Standard Size Setting] [Stamp Settings] [Blank Page Print Settings] [Registered Key Settings] [Job Priority Operation Settings] [Default Bypass Paper Type Setting] [Page Number Print Position] [Preview Settings] [Enlarge Display Settings] [Scan File Name Settings] [Set Paper Name by User] Description Configure the settings on how to use the Power key and the machine action in power save mode. Configure the output settings of this machine, such as the print setting of print and received fax data, and changing of primary output tray. Specify the current date and time and time zone of this machine. Select whether to apply daylight saving time settings. To apply daylight saving time, specify the daylight saving time, and the start and end dates. Select whether to automatically switch between power save and normal mode using the weekly timer. To use the weekly timer, specify the schedule for switching between power save and normal modes. Optionally, you can use a learning function that automatically sets a schedule to fit your office usage. You can restrict change and delete operations for each user. Also, you can delete registered copy programs. Specify this setting if the color tone of the print image, staple, hole-punch, and folding positions are changed. You can adjust various settings such as correction of printed image, staple, hole-punch, and folding positions. Print the list that includes the machine settings and manage the counter. Select whether to reset the functions and settings that are currently displayed when this machine has not been operated for a certain period of time. Specify the user box settings, such as deletion of unnecessary user boxes and files, and the time until the file saved in each user box is automatically deleted. Specify the detection capability setting of original size in the Original Glass and the Foolscap paper size setting. Register header/footer programs and specify the stamp setting when sending a fax. Select whether to print date/time and stamp on blank pages inserted by the cover seat and inter sheet functions. Change the function to be assigned to Register Key 1 to Register Key 3 in the Control Panel. Specify the printing priority order and whether to skip a job when you cannot perform a printing job immediately. Specify the default paper type used in the Bypass Tray. Select the printing position on the back side of the paper relative to the printing position of the page number in the front side for printing on both sides and when specifying both the booklet format and page number printing at the same time. Specify the preview function settings, such as the display mode of preview images that appear when Preview is pressed on the Control Panel. Select whether to use Enlarge Display mode as the initial display of the Touch Panel. Also, select whether to inherit the settings configured in the normal screen display when switching the screen from Normal to Enlarge Display Press this button to change the default file name of scanned original data when saving it. Select whether to use custom paper for which a given paper name and type have been registered. To use custom paper, register paper name and type to be assigned to it. bizhub C754/C654 13-3
-
 1
1 -
2
-
3
-
4
-
5
-
6
-
7
-
8
-
9
-
10
-
11
-
12
-
13
-
14
-
15
-
16
-
17
-
18
-
19
-
20
-
21
-
22
-
23
-
24
-
25
-
26
-
27
-
28
-
29
-
30
-
31
-
32
-
33
-
34
-
35
-
36
-
37
-
38
-
39
-
40
-
41
-
42
-
43
-
44
-
45
-
46
-
47
-
48
-
49
-
50
-
51
-
52
-
53
-
54
-
55
-
56
-
57
-
58
-
59
-
60
-
61
-
62
-
63
-
64
-
65
-
66
-
67
-
68
-
69
-
70
-
71
-
72
-
73
-
74
-
75
-
76
-
77
-
78
-
79
-
80
-
81
-
82
-
83
-
84
-
85
-
86
-
87
-
88
-
89
-
90
-
91
-
92
-
93
-
94
-
95
-
96
-
97
-
98
-
99
-
100
-
101
-
102
-
103
-
104
-
105
-
106
-
107
-
108
-
109
-
110
-
111
-
112
-
113
-
114
-
115
-
116
-
117
-
118
-
119
-
120
-
121
-
122
-
123
-
124
-
125
-
126
-
127
-
128
-
129
-
130
-
131
-
132
-
133
-
134
-
135
-
136
-
137
-
138
-
139
-
140
-
141
-
142
-
143
-
144
-
145
-
146
-
147
-
148
-
149
-
150
-
151
-
152
-
153
-
154
-
155
-
156
-
157
-
158
-
159
-
160
-
161
-
162
-
163
-
164
-
 165
165 -
 166
166 -
 167
167 -
 168
168 -
 169
169 -
 170
170 -
 171
171 -
 172
172 -
 173
173 -
 174
174 -
 175
175 -
176
-
177
-
178
-
179
-
180
-
181
-
182
-
183
-
184
-
185
-
186
-
187
-
188
-
189
-
190
-
191
-
192
 |
 |
