Kyocera TASKalfa 620 Printing System (W) Operation Guide (Functions Edition) - Page 24
Press [Off] and press [Close]., Press [On].
 |
View all Kyocera TASKalfa 620 manuals
Add to My Manuals
Save this manual to your list of manuals |
Page 24 highlights
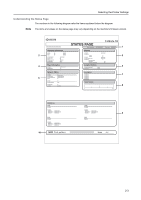
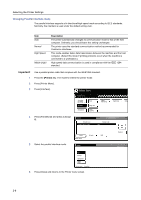
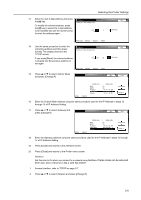
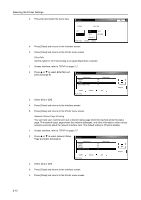
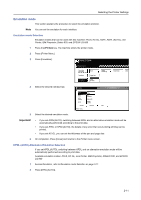
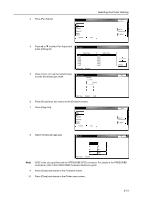
Selecting the Printer Settings 5 Press or to select TCP/IP and press [Change #]. Interface Default menu NetWare TCP/IP Ethertalk Network Status Page Setting mode On On On On Parallel Printer menu 6 Press [On]. 7 Press or to select DHCP and press [Change #]. Network USB Back Change # Close 8 Press [Off] and press [Close]. 9 Press or to select BOOTP and press [Change #]. nterface - Network Default menu DHCP BOOTP IP address Subnet Mask Gateway Setting mode On On 10. 141. 110. 204 255. 255. 248. 0 10. 181. 39. 254 Back Change # Close nterface - Network Default menu DHCP BOOTP IP address Subnet Mask Gateway - TCP/IP Setting mode On On 10. 141. 110. 204 255. 255. 248. 0 10. 181. 39. 254 10 Press [Off] and press [Close]. 11 Press or to select IP Address and press [Change #]. Back Change # Close nterface - Network Default menu DHCP BOOTP IP address Subnet Mask Gateway - TCP/IP Setting mode On On 10. 141. 110. 204 255. 255. 248. 0 10. 181. 39. 254 12 Use the numeric keys to enter the address. Enter the 3-digit address in the IP Address Confirm per 3 lines pressing # key. highlighted area and press the [#] key. Change # Back 10 0 0 0 (with #key) Printer menu - Interface - Network - TCP/IP 2-8
-
 1
1 -
2
-
3
-
4
-
5
-
6
-
7
-
8
-
9
-
10
-
11
-
12
-
13
-
14
-
15
-
16
-
17
-
18
-
 19
19 -
 20
20 -
 21
21 -
 22
22 -
 23
23 -
 24
24 -
 25
25 -
 26
26 -
 27
27 -
 28
28 -
 29
29 -
30
-
31
-
32
-
33
-
34
-
35
-
36
-
37
-
38
-
39
-
40
-
41
-
42
-
43
-
44
-
45
-
46
-
47
-
48
-
49
-
50
-
51
-
52
-
53
-
54
-
55
-
56
-
57
-
58
-
59
-
60
-
61
-
62
-
63
-
64
-
65
-
66
-
67
-
68
-
69
-
70
-
71
-
72
-
73
-
74
-
75
-
76
-
77
-
78
 |
 |
