Lenovo ThinkPad T540p (English) User Guide - Page 130
Date and Time menu, Security menu, Date/Time, System Date, Security, boldface, Attention
 |
View all Lenovo ThinkPad T540p manuals
Add to My Manuals
Save this manual to your list of manuals |
Page 130 highlights
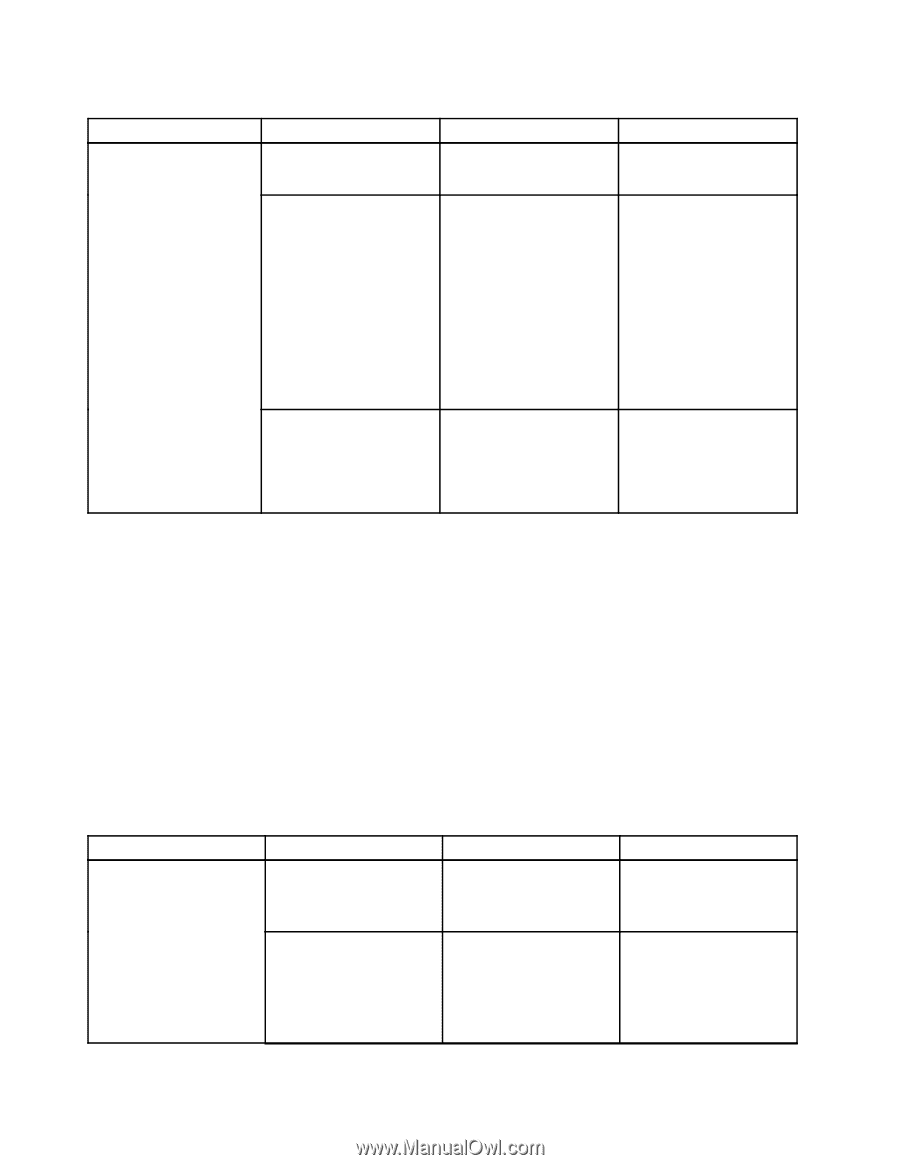
Table 4. Config menu items (continued) Menu item Submenu item CIRA Timeout Console Type Selection 0-255 Note: The default value is 60 seconds. • PC-ANSI • VT100 • VT100+ • VT-UTF8 Comments black button or Enter key during the power-on self-test (POST). Set the timeout option for CIRA connection to be established. Selectable second values are from 1 to 254. If you select 0, use 60 seconds as the default timeout value. If you select 255, the waiting time for establishing a connection is unlimited. Select the console type for AMT. Note: This console type should match the Intel AMT remote console. Date and Time menu To change the date or time of your computer, select the Date/Time tab from the ThinkPad Setup menu. Then do the following: 1. Use the cursor keys to select System Date or System Time. 2. Type a date or time. Security menu To change the security settings of your computer, select the Security tab from the ThinkPad Setup menu. The following table lists the Security menu items. Default values are in boldface. Attention: The default configurations are already optimized for you. Improper change of the configurations might cause unexpected results. Table 5. Security menu items Menu item Submenu item Password Hardware Password Manager Supervisor Password Selection • Disabled • Enabled • Disabled • Enabled Comments Manage your power-on password, supervisor password, and your hard disk passwords. Refer to "Supervisor password" on page 48. 114 User Guide
-
 1
1 -
2
-
3
-
4
-
5
-
6
-
7
-
8
-
9
-
10
-
11
-
12
-
13
-
14
-
15
-
16
-
17
-
18
-
19
-
20
-
21
-
22
-
23
-
24
-
25
-
26
-
27
-
28
-
29
-
30
-
31
-
32
-
33
-
34
-
35
-
36
-
37
-
38
-
39
-
40
-
41
-
42
-
43
-
44
-
45
-
46
-
47
-
48
-
49
-
50
-
51
-
52
-
53
-
54
-
55
-
56
-
57
-
58
-
59
-
60
-
61
-
62
-
63
-
64
-
65
-
66
-
67
-
68
-
69
-
70
-
71
-
72
-
73
-
74
-
75
-
76
-
77
-
78
-
79
-
80
-
81
-
82
-
83
-
84
-
85
-
86
-
87
-
88
-
89
-
90
-
91
-
92
-
93
-
94
-
95
-
96
-
97
-
98
-
99
-
100
-
101
-
102
-
103
-
104
-
105
-
106
-
107
-
108
-
109
-
110
-
111
-
112
-
113
-
114
-
115
-
116
-
117
-
118
-
119
-
120
-
121
-
122
-
123
-
124
-
 125
125 -
 126
126 -
 127
127 -
 128
128 -
 129
129 -
 130
130 -
 131
131 -
 132
132 -
 133
133 -
 134
134 -
 135
135 -
136
-
137
-
138
-
139
-
140
-
141
-
142
-
143
-
144
-
145
-
146
-
147
-
148
-
149
-
150
-
151
-
152
-
153
-
154
-
155
-
156
-
157
-
158
-
159
-
160
-
161
-
162
-
163
-
164
-
165
-
166
-
167
-
168
-
169
-
170
-
171
-
172
-
173
-
174
-
175
-
176
-
177
-
178
-
179
-
180
-
181
-
182
-
183
-
184
-
185
-
186
 |
 |