Lenovo ThinkPad T540p (English) User Guide - Page 23
Rear view, Status indicators, ac power connector - dock
 |
View all Lenovo ThinkPad T540p manuals
Add to My Manuals
Save this manual to your list of manuals |
Page 23 highlights
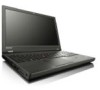
Rear view Figure 5. Rear view 1 Ethernet connector 2 ac power connector 3 Fan louvers (rear) 1 Ethernet connector Connect the computer to a local area network (LAN) with the Ethernet connector. DANGER To avoid the risk of electrical shock, do not connect the telephone cable to the Ethernet connector. You can only connect an Ethernet cable to this connector. The Ethernet connector has two indicators that show the status of the network connection. When the top-left indicator is solid green, it indicates that the computer connects to a LAN and a session with the network is available. When the top-right indicator blinks yellow, it indicates that data is being transmitted. Note: If you attach the computer to a supported docking station, use the Ethernet connector on the docking station to connect to a LAN, not the one on the computer. 2 ac power connector Connect the ac power adapter to the ac power connector to provide ac power to the computer and charge the battery. 3 Fan louvers (rear) The fan louvers and the internal fan enable air to circulate in the computer to ensure proper cooling, especially the cooling of the microprocessor. Note: To ensure proper airflow, do not place any obstacle in front of the fan louvers. Status indicators The status indicators show the current status of your computer. Chapter 1. Product overview 7
-
 1
1 -
2
-
3
-
4
-
5
-
6
-
7
-
8
-
9
-
10
-
11
-
12
-
13
-
14
-
15
-
16
-
17
-
 18
18 -
 19
19 -
 20
20 -
 21
21 -
 22
22 -
 23
23 -
 24
24 -
 25
25 -
 26
26 -
 27
27 -
 28
28 -
29
-
30
-
31
-
32
-
33
-
34
-
35
-
36
-
37
-
38
-
39
-
40
-
41
-
42
-
43
-
44
-
45
-
46
-
47
-
48
-
49
-
50
-
51
-
52
-
53
-
54
-
55
-
56
-
57
-
58
-
59
-
60
-
61
-
62
-
63
-
64
-
65
-
66
-
67
-
68
-
69
-
70
-
71
-
72
-
73
-
74
-
75
-
76
-
77
-
78
-
79
-
80
-
81
-
82
-
83
-
84
-
85
-
86
-
87
-
88
-
89
-
90
-
91
-
92
-
93
-
94
-
95
-
96
-
97
-
98
-
99
-
100
-
101
-
102
-
103
-
104
-
105
-
106
-
107
-
108
-
109
-
110
-
111
-
112
-
113
-
114
-
115
-
116
-
117
-
118
-
119
-
120
-
121
-
122
-
123
-
124
-
125
-
126
-
127
-
128
-
129
-
130
-
131
-
132
-
133
-
134
-
135
-
136
-
137
-
138
-
139
-
140
-
141
-
142
-
143
-
144
-
145
-
146
-
147
-
148
-
149
-
150
-
151
-
152
-
153
-
154
-
155
-
156
-
157
-
158
-
159
-
160
-
161
-
162
-
163
-
164
-
165
-
166
-
167
-
168
-
169
-
170
-
171
-
172
-
173
-
174
-
175
-
176
-
177
-
178
-
179
-
180
-
181
-
182
-
183
-
184
-
185
-
186
 |
 |
