Lenovo ThinkPad i Series 1124 ThinkPad 240 User's Reference that shipped with - Page 76
Display output location, LCD+External Display
 |
View all Lenovo ThinkPad i Series 1124 manuals
Add to My Manuals
Save this manual to your list of manuals |
Page 76 highlights
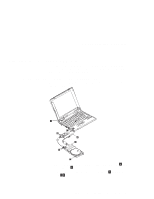
Attaching an external monitor a. Click the LCD or External Display ( or ) button. b. Click the Advanced Properties... button. You can select your monitor type from the monitor list, or click a new resolution or refresh rate. Note: Refer to the specifications for your external monitor to determine its supported resolutions and refresh rates. 4. Restart the computer to make the changes effective. Display output location Attention: Do not change the display output location while a moving picture is being drawn-for example, while playing a movie or a game. Stop the application before changing the display output location. You can change the display output location with the ThinkPad Configuration program. Select one of the following display output locations: LCD ( ): The computer output is displayed only on the LCD of the computer. External Display ( ): The computer output is displayed only on the attached external monitor. If no external monitor is attached to the computer and the display output location is set to External Display, the output is displayed on the LCD. LCD+External Display ( ): The computer output is displayed on both the LCD and the external monitor. You can also change the display output location using the Fn key function. Press and hold the Fn key; then press the F7 key. The output is displayed sequentially as follows: 64 ThinkPad 240 User's Reference
-
 1
1 -
2
-
3
-
4
-
5
-
6
-
7
-
8
-
9
-
10
-
11
-
12
-
13
-
14
-
15
-
16
-
17
-
18
-
19
-
20
-
21
-
22
-
23
-
24
-
25
-
26
-
27
-
28
-
29
-
30
-
31
-
32
-
33
-
34
-
35
-
36
-
37
-
38
-
39
-
40
-
41
-
42
-
43
-
44
-
45
-
46
-
47
-
48
-
49
-
50
-
51
-
52
-
53
-
54
-
55
-
56
-
57
-
58
-
59
-
60
-
61
-
62
-
63
-
64
-
65
-
66
-
67
-
68
-
69
-
70
-
 71
71 -
 72
72 -
 73
73 -
 74
74 -
 75
75 -
 76
76 -
 77
77 -
 78
78 -
 79
79 -
 80
80 -
 81
81 -
82
-
83
-
84
-
85
-
86
-
87
-
88
-
89
-
90
-
91
-
92
-
93
-
94
-
95
-
96
-
97
-
98
-
99
-
100
-
101
-
102
-
103
-
104
-
105
-
106
-
107
-
108
-
109
-
110
-
111
-
112
-
113
-
114
-
115
-
116
-
117
-
118
-
119
-
120
-
121
-
122
-
123
-
124
-
125
-
126
-
127
-
128
-
129
-
130
-
131
-
132
-
133
-
134
-
135
-
136
-
137
-
138
-
139
-
140
-
141
-
142
-
143
-
144
-
145
-
146
-
147
-
148
-
149
-
150
-
151
-
152
-
153
-
154
-
155
-
156
-
157
-
158
-
159
-
160
-
161
-
162
-
163
-
164
-
165
-
166
-
167
-
168
-
169
-
170
 |
 |
