Lexmark C912 User's Reference - Page 148
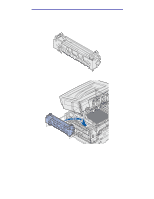
Replacing the fuser - fuser unit
 |
View all Lexmark C912 manuals
Add to My Manuals
Save this manual to your list of manuals |
Page 148 highlights
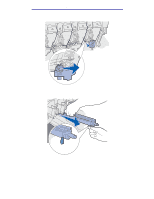
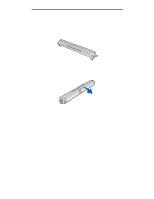
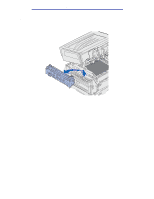
Maintenance 5 Push the waste toner arm until it connects with the photodeveloper and snaps into place. 6 Repeat steps 2 through 5 to install additional photodevelopers. CAUTION: Before closing the top cover make sure everyone is away from the printer and the area under the cover is free of hands, clothing, and other items. 7 Close the top cover and the front door. Note: If you need instructions on how to close the top cover, see Closing the top cover. For instructions about replacing other supply items, click one of the following headings: Removing the duplex unit Replacing the transfer belt Replacing the fuser Your printer monitors the life of your fuser. When the fuser reaches the end of its life, the printer displays 80 Fuser Exhausted. This message indicates it is time for you to replace the fuser. For best print quality, make sure you replace the fuser when the printer displays 80 Fuser Life Warning. Press Go to clear the message. The Supplies message appears on the second line of the display to remind you that supplies need attention. You can open the Supplies Menu to see the 80 Fuser Exhausted and 80 Fuser Life Warning messages. Replacing the fuser 143
-
 1
1 -
2
-
3
-
4
-
5
-
6
-
7
-
8
-
9
-
10
-
11
-
12
-
13
-
14
-
15
-
16
-
17
-
18
-
19
-
20
-
21
-
22
-
23
-
24
-
25
-
26
-
27
-
28
-
29
-
30
-
31
-
32
-
33
-
34
-
35
-
36
-
37
-
38
-
39
-
40
-
41
-
42
-
43
-
44
-
45
-
46
-
47
-
48
-
49
-
50
-
51
-
52
-
53
-
54
-
55
-
56
-
57
-
58
-
59
-
60
-
61
-
62
-
63
-
64
-
65
-
66
-
67
-
68
-
69
-
70
-
71
-
72
-
73
-
74
-
75
-
76
-
77
-
78
-
79
-
80
-
81
-
82
-
83
-
84
-
85
-
86
-
87
-
88
-
89
-
90
-
91
-
92
-
93
-
94
-
95
-
96
-
97
-
98
-
99
-
100
-
101
-
102
-
103
-
104
-
105
-
106
-
107
-
108
-
109
-
110
-
111
-
112
-
113
-
114
-
115
-
116
-
117
-
118
-
119
-
120
-
121
-
122
-
123
-
124
-
125
-
126
-
127
-
128
-
129
-
130
-
131
-
132
-
133
-
134
-
135
-
136
-
137
-
138
-
139
-
140
-
141
-
142
-
 143
143 -
 144
144 -
 145
145 -
 146
146 -
 147
147 -
 148
148 -
 149
149 -
 150
150 -
 151
151 -
 152
152 -
 153
153 -
154
-
155
-
156
-
157
-
158
-
159
-
160
-
161
-
162
-
163
-
164
-
165
-
166
-
167
-
168
-
169
-
170
-
171
-
172
-
173
-
174
-
175
-
176
-
177
-
178
-
179
-
180
-
181
-
182
-
183
-
184
-
185
-
186
-
187
-
188
-
189
-
190
-
191
-
192
-
193
-
194
-
195
-
196
-
197
-
198
-
199
-
200
-
201
-
202
-
203
-
204
-
205
-
206
-
207
 |
 |
