Lexmark C912 User's Reference - Page 149
Preparing for maintenance, Removing the fuser, Supplies, Printer Ready for Maintenance
 |
View all Lexmark C912 manuals
Add to My Manuals
Save this manual to your list of manuals |
Page 149 highlights
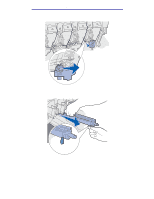
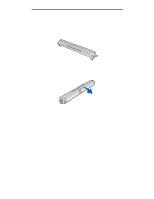
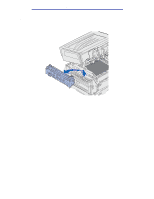
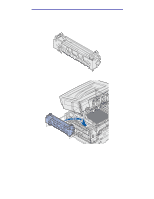
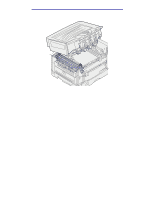
Maintenance The printer continues to display the Supplies message until you replace the fuser. To replace the fuser, use the following steps or the instruction sheet supplied with the fuser. Preparing for maintenance 1 Turn the printer on. 2 Follow the instructions in the table for the message your printer is displaying. Primary message 80 Fuser Life Warning Secondary message Select = Replace Go = Continue 80 Fuser Exhausted 80 Fuser/Belt Life Warning Select = Replace Select = Replace Go = Continue 80 Fuser/Belt Exhausted Select = Replace What you should do Press Select if you want to replace the fuser now. Press Go if you want to wait to replace the fuser. Press Select to replace the fuser. Press Select if you want to replace the fuser now. Press Go if you want to wait to replace the fuser. Press Select to replace the fuser. The Preparing for Maintenance message appears while the printer moves parts into position. After the parts are in position, the message Printer Ready for Maintenance appears, followed by Power Off to Replace Items. 3 Turn the printer off. Removing the fuser 1 Complete the steps in Preparing for maintenance. 2 Make sure the printer is turned off. Replacing the fuser 144
-
 1
1 -
2
-
3
-
4
-
5
-
6
-
7
-
8
-
9
-
10
-
11
-
12
-
13
-
14
-
15
-
16
-
17
-
18
-
19
-
20
-
21
-
22
-
23
-
24
-
25
-
26
-
27
-
28
-
29
-
30
-
31
-
32
-
33
-
34
-
35
-
36
-
37
-
38
-
39
-
40
-
41
-
42
-
43
-
44
-
45
-
46
-
47
-
48
-
49
-
50
-
51
-
52
-
53
-
54
-
55
-
56
-
57
-
58
-
59
-
60
-
61
-
62
-
63
-
64
-
65
-
66
-
67
-
68
-
69
-
70
-
71
-
72
-
73
-
74
-
75
-
76
-
77
-
78
-
79
-
80
-
81
-
82
-
83
-
84
-
85
-
86
-
87
-
88
-
89
-
90
-
91
-
92
-
93
-
94
-
95
-
96
-
97
-
98
-
99
-
100
-
101
-
102
-
103
-
104
-
105
-
106
-
107
-
108
-
109
-
110
-
111
-
112
-
113
-
114
-
115
-
116
-
117
-
118
-
119
-
120
-
121
-
122
-
123
-
124
-
125
-
126
-
127
-
128
-
129
-
130
-
131
-
132
-
133
-
134
-
135
-
136
-
137
-
138
-
139
-
140
-
141
-
142
-
143
-
 144
144 -
 145
145 -
 146
146 -
 147
147 -
 148
148 -
 149
149 -
 150
150 -
 151
151 -
 152
152 -
 153
153 -
 154
154 -
155
-
156
-
157
-
158
-
159
-
160
-
161
-
162
-
163
-
164
-
165
-
166
-
167
-
168
-
169
-
170
-
171
-
172
-
173
-
174
-
175
-
176
-
177
-
178
-
179
-
180
-
181
-
182
-
183
-
184
-
185
-
186
-
187
-
188
-
189
-
190
-
191
-
192
-
193
-
194
-
195
-
196
-
197
-
198
-
199
-
200
-
201
-
202
-
203
-
204
-
205
-
206
-
207
 |
 |
