Lexmark X264 Service Manual - Page 104
Base Sensor Test, Printer Setup, Defaults, Counts
 |
View all Lexmark X264 manuals
Add to My Manuals
Save this manual to your list of manuals |
Page 104 highlights
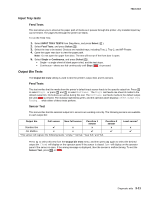
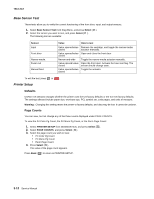
7013-XXX Base Sensor Test These tests allow you to verify the correct functioning of the front door, input, and output sensors. 1. Select Base Sensor Test from Diag Menu, and press Select ( ). 2. Select the sensor you want to test, and press Select ( ). The following test are available: Sensor Input Front door Narrow media Fuser exit Manual feed Value How to test Value opened/value Remove the cartridge, and toggle the narrow media closed actuator manually. Value opened/value Open and close the front door. closed Narrow and wide Toggle the narrow media actuator manually. Value opened/ value Open the front door. Activate the fuser exit flag. The closed sensor should change state. Value opened/value Toggle the actuator. closed To exit the test, press or . Printer Setup Defaults US/Non-US defaults changes whether the printer uses the US factory defaults or the non-US factory defaults. The settings affected include paper size, envelope size, PCL symbol set, code pages, and units of measure. Warning: Changing this setting resets the printer to factory defaults, and data may be lost. It cannot be undone. Page Counts You can view, but not change any of the three counts displayed under PAGE COUNTS. To view the Prt Color Pg Count, the Prt Mono Pg Count, or the Perm Page Count: 1. Select PRINTER SETUP from DIAGNOSTICS, and press Select ( ). 2. Select PAGE COUNTS, and press Select ( ). 3. Select the page count you wish to view: • Prt Color Pg Count • Prt Mono Pg Count • Perm Page Count 4. Press Select ( ). The value of the page count appears. Press Back ( ) to return to PRINTER SETUP. 3-12 Service Manual
-
 1
1 -
2
-
3
-
4
-
5
-
6
-
7
-
8
-
9
-
10
-
11
-
12
-
13
-
14
-
15
-
16
-
17
-
18
-
19
-
20
-
21
-
22
-
23
-
24
-
25
-
26
-
27
-
28
-
29
-
30
-
31
-
32
-
33
-
34
-
35
-
36
-
37
-
38
-
39
-
40
-
41
-
42
-
43
-
44
-
45
-
46
-
47
-
48
-
49
-
50
-
51
-
52
-
53
-
54
-
55
-
56
-
57
-
58
-
59
-
60
-
61
-
62
-
63
-
64
-
65
-
66
-
67
-
68
-
69
-
70
-
71
-
72
-
73
-
74
-
75
-
76
-
77
-
78
-
79
-
80
-
81
-
82
-
83
-
84
-
85
-
86
-
87
-
88
-
89
-
90
-
91
-
92
-
93
-
94
-
95
-
96
-
97
-
98
-
 99
99 -
 100
100 -
 101
101 -
 102
102 -
 103
103 -
 104
104 -
 105
105 -
 106
106 -
 107
107 -
 108
108 -
 109
109 -
110
-
111
-
112
-
113
-
114
-
115
-
116
-
117
-
118
-
119
-
120
-
121
-
122
-
123
-
124
-
125
-
126
-
127
-
128
-
129
-
130
-
131
-
132
-
133
-
134
-
135
-
136
-
137
-
138
-
139
-
140
-
141
-
142
-
143
-
144
-
145
-
146
-
147
-
148
-
149
-
150
-
151
-
152
-
153
-
154
-
155
-
156
-
157
-
158
-
159
-
160
-
161
-
162
-
163
-
164
-
165
-
166
-
167
-
168
-
169
-
170
-
171
-
172
-
173
-
174
-
175
-
176
-
177
-
178
-
179
-
180
-
181
-
182
-
183
-
184
-
185
-
186
-
187
-
188
-
189
-
190
-
191
-
192
-
193
-
194
-
195
-
196
-
197
-
198
-
199
-
200
-
201
-
202
-
203
-
204
-
205
-
206
-
207
-
208
-
209
-
210
-
211
-
212
-
213
-
214
-
215
-
216
-
217
-
218
-
219
-
220
-
221
-
222
-
223
-
224
-
225
-
226
-
227
-
228
-
229
-
230
-
231
-
232
-
233
-
234
-
235
-
236
-
237
-
238
-
239
-
240
-
241
-
242
-
243
-
244
-
245
-
246
-
247
-
248
-
249
-
250
 |
 |
