Lexmark X264 Service Manual - Page 82
ADF cover open service check, ADF streak service check, Replace the ADF. See - remove adf glass
 |
View all Lexmark X264 manuals
Add to My Manuals
Save this manual to your list of manuals |
Page 82 highlights
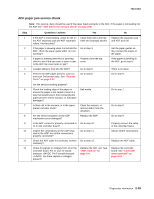
7013-XXX ADF cover open service check Step 1 2 3 4 5 6 7 8 9 Questions / actions Yes Is the ADF cover properly closed? Go to step 3. Close the ADF cover. Does the problem go away? Issue resolved Perform the ADF cover open sensor test. See "Scanner Tests" on page 3-17. Does the sensor work properly? Go to step 4 On the bottom of the ADF cover, inspect the ADF cover closed sensor actuator. Does it move freely? Go to step 6. Fix the actuator so it moves freely. Does this fix the problem? Issue resolved. Remove the ADF rear cover and inspect the ADF cover closed sensor for dirt and debris. Is there dirt and debris present? Go to step 7. Clean the dirt and debris from the sensor. Does this fix the issue? Issue resolved. Inspect the connections on the ADF relay card in the ADF. Are all the connections properly connected? Go to step 9. Check the ADF cable for continuity. Is there Go to step 10. continuity? 10 Check for signals or voltages from J4 on the Replace the ADF. See controller board. Pin 11 and 12 should "ADF removal" on measure +24VDC. Pin 5 should measure page 4-4. +14VDC. Are there signals or voltages present? ADF streak service check No Go to step 2. Go to step 3. Go to step 8. Go to step 5. Go to step 6. Go to step 8. Go to step 8. Secure all the connections. Replace the ADF cable. See "ADF cable removal" on page 4-7. Replace the controller board. See "Controller board removal" on page 4-13. Step 1 Questions / actions Do streaks appear on the middle of scans when using the ADF? Yes No Clean the ADF glass on the flatbed using a lint-free cloth. Kit 40X0392 is available for cleaning the glass on the flatbed. No issue to fix. Also, clean the separator roll and pad with a damp cloth. 2-48 Service Manual
-
 1
1 -
2
-
3
-
4
-
5
-
6
-
7
-
8
-
9
-
10
-
11
-
12
-
13
-
14
-
15
-
16
-
17
-
18
-
19
-
20
-
21
-
22
-
23
-
24
-
25
-
26
-
27
-
28
-
29
-
30
-
31
-
32
-
33
-
34
-
35
-
36
-
37
-
38
-
39
-
40
-
41
-
42
-
43
-
44
-
45
-
46
-
47
-
48
-
49
-
50
-
51
-
52
-
53
-
54
-
55
-
56
-
57
-
58
-
59
-
60
-
61
-
62
-
63
-
64
-
65
-
66
-
67
-
68
-
69
-
70
-
71
-
72
-
73
-
74
-
75
-
76
-
 77
77 -
 78
78 -
 79
79 -
 80
80 -
 81
81 -
 82
82 -
 83
83 -
 84
84 -
 85
85 -
 86
86 -
 87
87 -
88
-
89
-
90
-
91
-
92
-
93
-
94
-
95
-
96
-
97
-
98
-
99
-
100
-
101
-
102
-
103
-
104
-
105
-
106
-
107
-
108
-
109
-
110
-
111
-
112
-
113
-
114
-
115
-
116
-
117
-
118
-
119
-
120
-
121
-
122
-
123
-
124
-
125
-
126
-
127
-
128
-
129
-
130
-
131
-
132
-
133
-
134
-
135
-
136
-
137
-
138
-
139
-
140
-
141
-
142
-
143
-
144
-
145
-
146
-
147
-
148
-
149
-
150
-
151
-
152
-
153
-
154
-
155
-
156
-
157
-
158
-
159
-
160
-
161
-
162
-
163
-
164
-
165
-
166
-
167
-
168
-
169
-
170
-
171
-
172
-
173
-
174
-
175
-
176
-
177
-
178
-
179
-
180
-
181
-
182
-
183
-
184
-
185
-
186
-
187
-
188
-
189
-
190
-
191
-
192
-
193
-
194
-
195
-
196
-
197
-
198
-
199
-
200
-
201
-
202
-
203
-
204
-
205
-
206
-
207
-
208
-
209
-
210
-
211
-
212
-
213
-
214
-
215
-
216
-
217
-
218
-
219
-
220
-
221
-
222
-
223
-
224
-
225
-
226
-
227
-
228
-
229
-
230
-
231
-
232
-
233
-
234
-
235
-
236
-
237
-
238
-
239
-
240
-
241
-
242
-
243
-
244
-
245
-
246
-
247
-
248
-
249
-
250
 |
 |
