Lexmark X264 Service Manual - Page 99
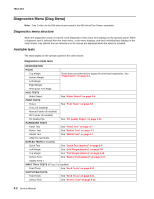
Hardware Tests, Panel Test, Button Test, DRAM Test
 |
View all Lexmark X264 manuals
Add to My Manuals
Save this manual to your list of manuals |
Page 99 highlights
7013-XXX Hardware Tests Panel Test This test verifies the operator panel LCD function. To run the Panel Test: 1. Select Hardware Tests from Diag Menu, and press Select ( ). 2. Select Panel Test, and press Select ( ). The Panel Test continually executes. Press Stop ( ) to cancel the test. Button Test This test verifies the operator panel button function. To run the Button Test: 1. Select Hardware Tests from Diag Menu, and press Select ( ). 2. Select Button Test, and press Select ( ). Press count: 0 appears. Press each operator panel button, and watch to see if the number of press counts increases by one for each press. Note: If you press Stop ( ), you end the test. Press Stop ( ) to cancel the test. DRAM Test This test checks the validity of DRAM, both standard and optional. The test writes patterns of data to DRAM to verify that each bit in memory can be set and read correctly. To run the DRAM Test: 1. Select Hardware Tests in Diag Menu, and press Select ( ). 2. Select DRAM Test, and press Select ( ). a. The printer displays: DRAM Test Testing... b. The printer initiates a POR of the printer, and the following screen is displayed: Resetting the Printer c. After the POR, the printer begins testing the memory. DRAM Test P:###### 128M F:##### P:###### represents the number of times the memory test has passed and finished successfully. Initially, 000000 displays with the maximum pass count being 99,999. F:##### represents the number of times the memory test has failed and finished with errors. Initially, 0000 displays with the maximum fail count being 99,999. 3. Once all the memory is tested, the test stops. Diagnostic aids 3-7
-
 1
1 -
2
-
3
-
4
-
5
-
6
-
7
-
8
-
9
-
10
-
11
-
12
-
13
-
14
-
15
-
16
-
17
-
18
-
19
-
20
-
21
-
22
-
23
-
24
-
25
-
26
-
27
-
28
-
29
-
30
-
31
-
32
-
33
-
34
-
35
-
36
-
37
-
38
-
39
-
40
-
41
-
42
-
43
-
44
-
45
-
46
-
47
-
48
-
49
-
50
-
51
-
52
-
53
-
54
-
55
-
56
-
57
-
58
-
59
-
60
-
61
-
62
-
63
-
64
-
65
-
66
-
67
-
68
-
69
-
70
-
71
-
72
-
73
-
74
-
75
-
76
-
77
-
78
-
79
-
80
-
81
-
82
-
83
-
84
-
85
-
86
-
87
-
88
-
89
-
90
-
91
-
92
-
93
-
 94
94 -
 95
95 -
 96
96 -
 97
97 -
 98
98 -
 99
99 -
 100
100 -
 101
101 -
 102
102 -
 103
103 -
 104
104 -
105
-
106
-
107
-
108
-
109
-
110
-
111
-
112
-
113
-
114
-
115
-
116
-
117
-
118
-
119
-
120
-
121
-
122
-
123
-
124
-
125
-
126
-
127
-
128
-
129
-
130
-
131
-
132
-
133
-
134
-
135
-
136
-
137
-
138
-
139
-
140
-
141
-
142
-
143
-
144
-
145
-
146
-
147
-
148
-
149
-
150
-
151
-
152
-
153
-
154
-
155
-
156
-
157
-
158
-
159
-
160
-
161
-
162
-
163
-
164
-
165
-
166
-
167
-
168
-
169
-
170
-
171
-
172
-
173
-
174
-
175
-
176
-
177
-
178
-
179
-
180
-
181
-
182
-
183
-
184
-
185
-
186
-
187
-
188
-
189
-
190
-
191
-
192
-
193
-
194
-
195
-
196
-
197
-
198
-
199
-
200
-
201
-
202
-
203
-
204
-
205
-
206
-
207
-
208
-
209
-
210
-
211
-
212
-
213
-
214
-
215
-
216
-
217
-
218
-
219
-
220
-
221
-
222
-
223
-
224
-
225
-
226
-
227
-
228
-
229
-
230
-
231
-
232
-
233
-
234
-
235
-
236
-
237
-
238
-
239
-
240
-
241
-
242
-
243
-
244
-
245
-
246
-
247
-
248
-
249
-
250
 |
 |
