Lexmark X264 Service Manual - Page 192
paper path., Reinstall the gear drive.
 |
View all Lexmark X264 manuals
Add to My Manuals
Save this manual to your list of manuals |
Page 192 highlights
7013-XXX 6. Using a pair of pliers, squeeze the connector to secure the red wires in place. Note: Check the connector to make sure that the gray connector is pressed flush to the bottom of the wire splice. 7. Repeat steps four through six for the black wires on the clutch and printer. 8. Tuck the connectors securely above the duplex guide. Note: If needed, use a wire tie to secure the cable in place. Make sure the tie does not interfere with the paper path. 9. Reinstall the gear drive. 10. Print the menu pages to test the printer. 11. Reinstall the left cover. 4-54 Service Manual
-
 1
1 -
2
-
3
-
4
-
5
-
6
-
7
-
8
-
9
-
10
-
11
-
12
-
13
-
14
-
15
-
16
-
17
-
18
-
19
-
20
-
21
-
22
-
23
-
24
-
25
-
26
-
27
-
28
-
29
-
30
-
31
-
32
-
33
-
34
-
35
-
36
-
37
-
38
-
39
-
40
-
41
-
42
-
43
-
44
-
45
-
46
-
47
-
48
-
49
-
50
-
51
-
52
-
53
-
54
-
55
-
56
-
57
-
58
-
59
-
60
-
61
-
62
-
63
-
64
-
65
-
66
-
67
-
68
-
69
-
70
-
71
-
72
-
73
-
74
-
75
-
76
-
77
-
78
-
79
-
80
-
81
-
82
-
83
-
84
-
85
-
86
-
87
-
88
-
89
-
90
-
91
-
92
-
93
-
94
-
95
-
96
-
97
-
98
-
99
-
100
-
101
-
102
-
103
-
104
-
105
-
106
-
107
-
108
-
109
-
110
-
111
-
112
-
113
-
114
-
115
-
116
-
117
-
118
-
119
-
120
-
121
-
122
-
123
-
124
-
125
-
126
-
127
-
128
-
129
-
130
-
131
-
132
-
133
-
134
-
135
-
136
-
137
-
138
-
139
-
140
-
141
-
142
-
143
-
144
-
145
-
146
-
147
-
148
-
149
-
150
-
151
-
152
-
153
-
154
-
155
-
156
-
157
-
158
-
159
-
160
-
161
-
162
-
163
-
164
-
165
-
166
-
167
-
168
-
169
-
170
-
171
-
172
-
173
-
174
-
175
-
176
-
177
-
178
-
179
-
180
-
181
-
182
-
183
-
184
-
185
-
186
-
 187
187 -
 188
188 -
 189
189 -
 190
190 -
 191
191 -
 192
192 -
 193
193 -
 194
194 -
 195
195 -
 196
196 -
 197
197 -
198
-
199
-
200
-
201
-
202
-
203
-
204
-
205
-
206
-
207
-
208
-
209
-
210
-
211
-
212
-
213
-
214
-
215
-
216
-
217
-
218
-
219
-
220
-
221
-
222
-
223
-
224
-
225
-
226
-
227
-
228
-
229
-
230
-
231
-
232
-
233
-
234
-
235
-
236
-
237
-
238
-
239
-
240
-
241
-
242
-
243
-
244
-
245
-
246
-
247
-
248
-
249
-
250
 |
 |

4-54
Service Manual
7013-XXX
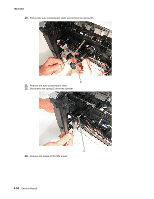
6.
Using a pair of pliers, squeeze the connector to secure the red wires in place.
Note:
Check the connector to make sure that the gray connector is pressed flush to the bottom of the wire
splice.
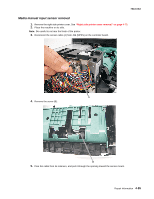
7.
Repeat steps four through six for the black wires on the clutch and printer.
8.
Tuck the connectors securely above the duplex guide.
Note:
If needed, use a wire tie to secure the cable in place. Make sure the tie does not interfere with the
paper path.
9.
Reinstall the gear drive.
10.
Print the menu pages to test the printer.
11.
Reinstall the left cover.