Lexmark X264 Service Manual - Page 35
Diagnostics information, Start, Power-On Self Test POST sequence
 |
View all Lexmark X264 manuals
Add to My Manuals
Save this manual to your list of manuals |
Page 35 highlights
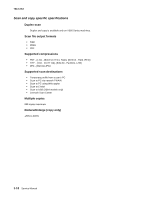
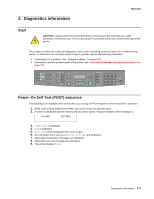
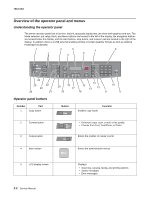
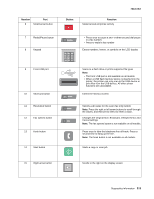
2. Diagnostics information 7013-XXX Start CAUTION: Unplug power from the printer before connecting or disconnecting any cable, assembly, or electronic card. This is a precaution for personal safety and to prevent damage to the printer. This chapter contains the codes and diagnostic tools to aid in providing corrective action for a malfunctioning printer. To determine the corrective action to repair a printer, look for the following information: • A description of a problem. See "Symptom tables" on page 2-23. • Information from the operator panel of the printer. See "Overview of the operator panel and menus" on page 2-2. Copy Scan/Email Content Darkness Text Text/Photo Photo Fax Duplex/2-Sided Copy Copies Scale Options Menu Back Select Stop/Cancel Start Fax Redial/Pause Resolution Options Hook 1@!. 2 ABC 3 DEF 4 5 JKL 6 MNO 7PQRS 8 TUV 9WXYZ * 0 # Shortcuts Power-On Self Test (POST) sequence The following is an example of the events that occur during the POR sequence when the printer is turned on. 1. While code is being loaded into DRAM, dots scroll across the operator panel. 2. A screen is displayed with the memory and processor speed. A typical example of this message is: *xxx MB 267 Mhz 3. Please wait is displayed. 4. Busy is displayed. 5. Close Door will be displayed if the cover is open. 6. Any cartridge errors, such as Defective Cartridge, are displayed. 7. Applicable maintenance messages are displayed. 8. Applicable toner low messages are displayed. 9. The printer displays Ready. Diagnostics information 2-1
-
 1
1 -
2
-
3
-
4
-
5
-
6
-
7
-
8
-
9
-
10
-
11
-
12
-
13
-
14
-
15
-
16
-
17
-
18
-
19
-
20
-
21
-
22
-
23
-
24
-
25
-
26
-
27
-
28
-
29
-
 30
30 -
 31
31 -
 32
32 -
 33
33 -
 34
34 -
 35
35 -
 36
36 -
 37
37 -
 38
38 -
 39
39 -
 40
40 -
41
-
42
-
43
-
44
-
45
-
46
-
47
-
48
-
49
-
50
-
51
-
52
-
53
-
54
-
55
-
56
-
57
-
58
-
59
-
60
-
61
-
62
-
63
-
64
-
65
-
66
-
67
-
68
-
69
-
70
-
71
-
72
-
73
-
74
-
75
-
76
-
77
-
78
-
79
-
80
-
81
-
82
-
83
-
84
-
85
-
86
-
87
-
88
-
89
-
90
-
91
-
92
-
93
-
94
-
95
-
96
-
97
-
98
-
99
-
100
-
101
-
102
-
103
-
104
-
105
-
106
-
107
-
108
-
109
-
110
-
111
-
112
-
113
-
114
-
115
-
116
-
117
-
118
-
119
-
120
-
121
-
122
-
123
-
124
-
125
-
126
-
127
-
128
-
129
-
130
-
131
-
132
-
133
-
134
-
135
-
136
-
137
-
138
-
139
-
140
-
141
-
142
-
143
-
144
-
145
-
146
-
147
-
148
-
149
-
150
-
151
-
152
-
153
-
154
-
155
-
156
-
157
-
158
-
159
-
160
-
161
-
162
-
163
-
164
-
165
-
166
-
167
-
168
-
169
-
170
-
171
-
172
-
173
-
174
-
175
-
176
-
177
-
178
-
179
-
180
-
181
-
182
-
183
-
184
-
185
-
186
-
187
-
188
-
189
-
190
-
191
-
192
-
193
-
194
-
195
-
196
-
197
-
198
-
199
-
200
-
201
-
202
-
203
-
204
-
205
-
206
-
207
-
208
-
209
-
210
-
211
-
212
-
213
-
214
-
215
-
216
-
217
-
218
-
219
-
220
-
221
-
222
-
223
-
224
-
225
-
226
-
227
-
228
-
229
-
230
-
231
-
232
-
233
-
234
-
235
-
236
-
237
-
238
-
239
-
240
-
241
-
242
-
243
-
244
-
245
-
246
-
247
-
248
-
249
-
250
 |
 |