Lexmark X264 Service Manual - Page 87
Fax transmission service check, Behind a PABX - fax settings
 |
View all Lexmark X264 manuals
Add to My Manuals
Save this manual to your list of manuals |
Page 87 highlights
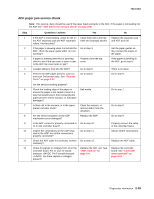
7013-XXX Fax transmission service check Note: Before performing this service check, verify that the correct country code for the MFP is selected. This setting must match the country in which the MFP is used to transmit and receive faxes. If the setting is wrong, the modem settings can be changed in the Fax/SE menu. See step 14. These settings should only be performed with guidance from your second-level support. Step 1 2 3 Questions / actions Is the phone line properly connected to the modem card and the wall jack? Properly connect the phone line to the modem card and wall jack. Did this fix the problem? Test the phone line's ability to send and receive calls. Yes Go to step 3. Problem resolved. Go to step 5. No Go to step 2. Go to step 3. Go to step 4. Did the phone line work properly? 4 Use the MFP on a properly functioning phone jack. Did this fix the problem? Problem resolved. 5 Is the phone line being used by the MFP an Go to step 8. analog line? 6 Is the line being used a VOIP line? Go to step 7. 7 Have the system administrator verify that Go to step 8. the VOIP server is configured to receive faxes. Is the server properly configured? 8 Is the MFP on a PABX? Go to step 9. 9 Enable Behind a PABX under fax settings Problem fixed. in the Administration menu. Did this fix the issue? 10 Is a dial prefix needed to get an outside line? Go to step 11. 11 Try sending a fax using a dial prefix. Did the fax transmit? Problem fixed. 12 Is the fax failing to send to one specific destination? Go to step 13. 13 Check the device that cannot receive a fax. Go to step 14. Can it send a fax? 14 Press **411 to enter the Fax/SE Menu. Select "Print Logs". Problem resolved. Print the T30 transmission log. Check the error being reported with the fax error code table. See "Service error codes" on page 2-17. Perform the suggested resolution for the error. Did this fix the problem? Go to step 5. Go to step 6. Go to step 8. Stop here. The issue is VOIP related. The VOIP provider needs to change the server configuration. Go to step 10. Disable Behind a PABX, and go to step 10. Go to step 12. Go to step 12. Go to step 14. Stop here. The issue is with the other device. Go to step 15. Diagnostics information 2-53
-
 1
1 -
2
-
3
-
4
-
5
-
6
-
7
-
8
-
9
-
10
-
11
-
12
-
13
-
14
-
15
-
16
-
17
-
18
-
19
-
20
-
21
-
22
-
23
-
24
-
25
-
26
-
27
-
28
-
29
-
30
-
31
-
32
-
33
-
34
-
35
-
36
-
37
-
38
-
39
-
40
-
41
-
42
-
43
-
44
-
45
-
46
-
47
-
48
-
49
-
50
-
51
-
52
-
53
-
54
-
55
-
56
-
57
-
58
-
59
-
60
-
61
-
62
-
63
-
64
-
65
-
66
-
67
-
68
-
69
-
70
-
71
-
72
-
73
-
74
-
75
-
76
-
77
-
78
-
79
-
80
-
81
-
 82
82 -
 83
83 -
 84
84 -
 85
85 -
 86
86 -
 87
87 -
 88
88 -
 89
89 -
 90
90 -
 91
91 -
 92
92 -
93
-
94
-
95
-
96
-
97
-
98
-
99
-
100
-
101
-
102
-
103
-
104
-
105
-
106
-
107
-
108
-
109
-
110
-
111
-
112
-
113
-
114
-
115
-
116
-
117
-
118
-
119
-
120
-
121
-
122
-
123
-
124
-
125
-
126
-
127
-
128
-
129
-
130
-
131
-
132
-
133
-
134
-
135
-
136
-
137
-
138
-
139
-
140
-
141
-
142
-
143
-
144
-
145
-
146
-
147
-
148
-
149
-
150
-
151
-
152
-
153
-
154
-
155
-
156
-
157
-
158
-
159
-
160
-
161
-
162
-
163
-
164
-
165
-
166
-
167
-
168
-
169
-
170
-
171
-
172
-
173
-
174
-
175
-
176
-
177
-
178
-
179
-
180
-
181
-
182
-
183
-
184
-
185
-
186
-
187
-
188
-
189
-
190
-
191
-
192
-
193
-
194
-
195
-
196
-
197
-
198
-
199
-
200
-
201
-
202
-
203
-
204
-
205
-
206
-
207
-
208
-
209
-
210
-
211
-
212
-
213
-
214
-
215
-
216
-
217
-
218
-
219
-
220
-
221
-
222
-
223
-
224
-
225
-
226
-
227
-
228
-
229
-
230
-
231
-
232
-
233
-
234
-
235
-
236
-
237
-
238
-
239
-
240
-
241
-
242
-
243
-
244
-
245
-
246
-
247
-
248
-
249
-
250
 |
 |
