Lexmark X3470 User's Guide - Page 16
Navigating the control panel menus, Using the Copy menu, Using the Photo Card menu, Press, Menu item
 |
UPC - 814227010595
View all Lexmark X3470 manuals
Add to My Manuals
Save this manual to your list of manuals |
Page 16 highlights
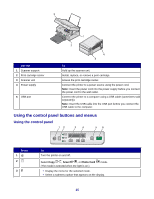
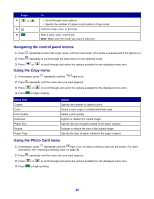
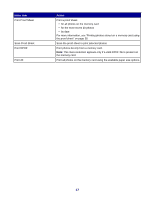
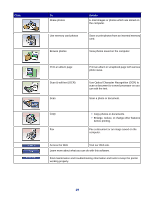
Press 4 or 5 6 To • Scroll through menu options. • Specify the number of copies to print while in Copy mode. Cancel a copy, scan, or print job. Start a copy, scan, or print job. Note: Make sure the mode you want is selected. Navigating the control panel menus 1 Press repeatedly to select the Copy, Scan, or Photo Card mode. (The mode is selected when the light is on.) 2 Press repeatedly to scroll through the menu items for the selected mode. 3 Press or to scroll through and select the options available for the displayed menu item. Using the Copy menu 1 If necessary, press repeatedly until the light is on. 2 Press repeatedly until the menu item you want appears. 3 Press 4 Press or to scroll through and select the options available for the displayed menu item. to begin copying. Menu item Copies Color Print Quality Darkness Paper Size Resize Paper Type Action Specify the number of copies to print. Select a color copy or a black-and-white copy. Select a print quality. Lighten or darken the copied image. Specify the size of paper loaded in the paper support. Enlarge or reduce the size of the copied image. Specify the type of paper loaded in the paper support. Using the Photo Card menu 1 If necessary, press repeatedly until the light is on, or insert a memory card into the printer. For more information, see "Inserting a memory card" on page 36. 2 Press repeatedly until the menu item you want appears. 3 Press 4 Press or to scroll through and select the options available for the displayed menu item. to begin printing. 16
-
 1
1 -
2
-
3
-
4
-
5
-
6
-
7
-
8
-
9
-
10
-
 11
11 -
 12
12 -
 13
13 -
 14
14 -
 15
15 -
 16
16 -
 17
17 -
 18
18 -
 19
19 -
 20
20 -
 21
21 -
22
-
23
-
24
-
25
-
26
-
27
-
28
-
29
-
30
-
31
-
32
-
33
-
34
-
35
-
36
-
37
-
38
-
39
-
40
-
41
-
42
-
43
-
44
-
45
-
46
-
47
-
48
-
49
-
50
-
51
-
52
-
53
-
54
-
55
-
56
-
57
-
58
-
59
-
60
-
61
-
62
-
63
-
64
-
65
-
66
-
67
-
68
-
69
-
70
-
71
-
72
-
73
-
74
-
75
-
76
-
77
-
78
-
79
-
80
-
81
-
82
-
83
-
84
-
85
 |
 |
