Lexmark X3470 User's Guide - Page 47
Scanning documents or images for e-mailing, See More Scan Settings, Display Advanced Scan Settings - printer driver
 |
UPC - 814227010595
View all Lexmark X3470 manuals
Add to My Manuals
Save this manual to your list of manuals |
Page 47 highlights
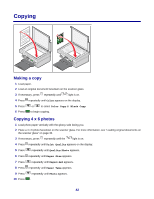
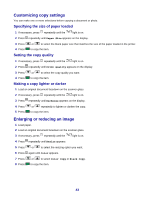
4 Press . The All-In-One Center appears on the computer screen with a scan preview of the document under the Scanning & Copying tab. 5 If you want to scan only a portion of the document, click and drag the dotted line box to select a specific area of the preview image to scan. 6 From the "Send scanned image to" menu, select a program. 7 Click See More Scan Settings. 8 Select what is being scanned. 9 Select a scan quality. 10 If you want to make additional selections: a Click Display Advanced Scan Settings. b Customize the scan settings. c Click OK. 11 Click Scan Now. Advanced Scan Settings tabs Options Scan • Select the color depth. • Select the scan resolution. • Select Optical Scan settings. • Select an auto-crop setting. • Select an exact area to be scanned. • Choose to convert the scanned item to text for editing. • Choose to scan multiple images before output. • Update the list of programs to send scans. • Update the default fax driver. Image Enhancements • Straighten images after scan (deskew). • Select whether to sharpen blurry edges. • Adjust brightness of the image. • Adjust the color correction curve (gamma) of the image. Image Patterns • Remove image patterns from magazines or newspapers (descreen). • Reduce more or less of the background noise (scratches) on the color document. Note: For more information, click Help at the bottom of the screen. Scanning documents or images for e-mailing 1 Make sure the printer is connected to a computer, and both the printer and the computer are on. 2 Load an original document facedown on the scanner glass. 3 From the desktop, double-click the Imaging Studio icon. 4 Click Share Photos. 47
-
 1
1 -
2
-
3
-
4
-
5
-
6
-
7
-
8
-
9
-
10
-
11
-
12
-
13
-
14
-
15
-
16
-
17
-
18
-
19
-
20
-
21
-
22
-
23
-
24
-
25
-
26
-
27
-
28
-
29
-
30
-
31
-
32
-
33
-
34
-
35
-
36
-
37
-
38
-
39
-
40
-
41
-
 42
42 -
 43
43 -
 44
44 -
 45
45 -
 46
46 -
 47
47 -
 48
48 -
 49
49 -
 50
50 -
 51
51 -
 52
52 -
53
-
54
-
55
-
56
-
57
-
58
-
59
-
60
-
61
-
62
-
63
-
64
-
65
-
66
-
67
-
68
-
69
-
70
-
71
-
72
-
73
-
74
-
75
-
76
-
77
-
78
-
79
-
80
-
81
-
82
-
83
-
84
-
85
 |
 |