Lexmark X5450 User's Guide (Mac) - Page 141
Failed to Connect, Fax Setup, Dialing and Sending, Dial Method, Fax Error, Fax Mode Unsupported
 |
View all Lexmark X5450 manuals
Add to My Manuals
Save this manual to your list of manuals |
Page 141 highlights
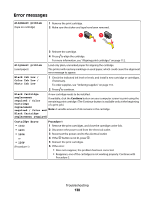
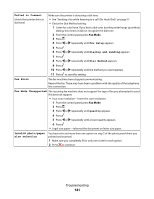
Failed to Connect (check that printer detects dial tone) Make sure the printer is detecting a dial tone. • See "Sending a fax while listening to a call (On Hook Dial)" on page 57. • Check the Dial Method setting. 1 Listen for a dial tone. If you hear a dial tone, but the printer hangs up without dialing, this means it did not recognize the dial tone. 2 From the control panel, press Fax Mode. 3 Press . 4 Press or repeatedly until Fax Setup appears. 5 Press . 6 Press or repeatedly until Dialing and Sending appears. 7 Press . 8 Press or repeatedly until Dial Method appears. 9 Press . 10 Press or repeatedly until the method you want appears. 11 Press to save this setting. Fax Error The fax machines have stopped communicating. Resend the fax. There may have been a problem with the quality of the telephone line connection. Fax Mode Unsupported The receiving fax machine does not support the type of fax you attempted to send. If it does not support: • Your scan resolution-lower the scan resolution. 1 From the control panel, press Fax Mode. 2 Press . 3 Press or repeatedly until Quality appears. 4 Press . 5 Press or repeatedly until a lower quality appears. 6 Press . • Legal-size paper-reformat the document on letter-size paper. Invalid photo/paper size selection You have selected more than one option on step 2 of the photo proof sheet you printed and scanned. 1 Make sure you completely fill in only one circle for each option. 2 Press to continue. Troubleshooting 141
-
 1
1 -
2
-
3
-
4
-
5
-
6
-
7
-
8
-
9
-
10
-
11
-
12
-
13
-
14
-
15
-
16
-
17
-
18
-
19
-
20
-
21
-
22
-
23
-
24
-
25
-
26
-
27
-
28
-
29
-
30
-
31
-
32
-
33
-
34
-
35
-
36
-
37
-
38
-
39
-
40
-
41
-
42
-
43
-
44
-
45
-
46
-
47
-
48
-
49
-
50
-
51
-
52
-
53
-
54
-
55
-
56
-
57
-
58
-
59
-
60
-
61
-
62
-
63
-
64
-
65
-
66
-
67
-
68
-
69
-
70
-
71
-
72
-
73
-
74
-
75
-
76
-
77
-
78
-
79
-
80
-
81
-
82
-
83
-
84
-
85
-
86
-
87
-
88
-
89
-
90
-
91
-
92
-
93
-
94
-
95
-
96
-
97
-
98
-
99
-
100
-
101
-
102
-
103
-
104
-
105
-
106
-
107
-
108
-
109
-
110
-
111
-
112
-
113
-
114
-
115
-
116
-
117
-
118
-
119
-
120
-
121
-
122
-
123
-
124
-
125
-
126
-
127
-
128
-
129
-
130
-
131
-
132
-
133
-
134
-
135
-
 136
136 -
 137
137 -
 138
138 -
 139
139 -
 140
140 -
 141
141 -
 142
142 -
 143
143 -
 144
144 -
 145
145 -
 146
146 -
147
-
148
-
149
-
150
-
151
-
152
-
153
-
154
-
155
 |
 |