Lexmark X5450 User's Guide (Mac) - Page 17
Collating copies using the computer, Enlarging or reducing an image, Sharpening an image
 |
View all Lexmark X5450 manuals
Add to My Manuals
Save this manual to your list of manuals |
Page 17 highlights
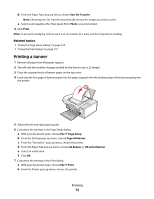
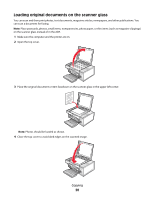
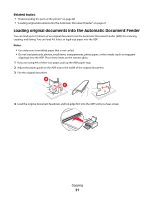
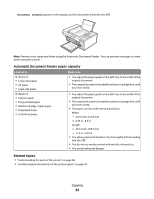
Related topics: • "Using the Print dialog" on page 101 Collating copies using the computer The printer can sort multiple copy jobs. If you print two copies of a three-page document, and you choose not to collate them, the pages print in this order: 1, 1, 2, 2, 3, 3. If you choose to collate, the pages print in this order: 1, 2, 3, 1, 2, 3. 1 With a document open, click File Œ Print. 2 Enter the number of copies to print in the Copies field. 3 Choose Collated. Related topics: • "Collating copies" on page 24 • "Using the Print dialog" on page 101 Enlarging or reducing an image 1 Load paper. Note: If you are copying photos, use photo or heavyweight matte paper, with the glossy or printable side facing you. (If you are not sure which side is the printable side, see the instructions that came with the paper.) 2 Load an original document facedown into the ADF or on the scanner glass. Note: Do not load postcards, photos, small items, transparencies, photo paper, or thin media (such as magazine clippings) into the ADF. Place these items on the scanner glass. 3 From the control panel, press Copy Mode. 4 Press . 5 Press or repeatedly until Resize appears. 6 Press . 7 Press or repeatedly until the setting you want appears. Note: To select Custom Resize, press and use the keypad to enter a custom size. 8 Press Start Color or Start Black. Related topics: • "Loading original documents on the scanner glass" on page 20 • "Loading original documents into the Automatic Document Feeder" on page 21 • "Using the control panel" on page 90 Sharpening an image 1 From the Finder desktop, double-click the Lexmark 5400 Series folder. 2 Double-click the Lexmark 5400 Series Center icon. Printing 17
-
 1
1 -
2
-
3
-
4
-
5
-
6
-
7
-
8
-
9
-
10
-
11
-
 12
12 -
 13
13 -
 14
14 -
 15
15 -
 16
16 -
 17
17 -
 18
18 -
 19
19 -
 20
20 -
 21
21 -
 22
22 -
23
-
24
-
25
-
26
-
27
-
28
-
29
-
30
-
31
-
32
-
33
-
34
-
35
-
36
-
37
-
38
-
39
-
40
-
41
-
42
-
43
-
44
-
45
-
46
-
47
-
48
-
49
-
50
-
51
-
52
-
53
-
54
-
55
-
56
-
57
-
58
-
59
-
60
-
61
-
62
-
63
-
64
-
65
-
66
-
67
-
68
-
69
-
70
-
71
-
72
-
73
-
74
-
75
-
76
-
77
-
78
-
79
-
80
-
81
-
82
-
83
-
84
-
85
-
86
-
87
-
88
-
89
-
90
-
91
-
92
-
93
-
94
-
95
-
96
-
97
-
98
-
99
-
100
-
101
-
102
-
103
-
104
-
105
-
106
-
107
-
108
-
109
-
110
-
111
-
112
-
113
-
114
-
115
-
116
-
117
-
118
-
119
-
120
-
121
-
122
-
123
-
124
-
125
-
126
-
127
-
128
-
129
-
130
-
131
-
132
-
133
-
134
-
135
-
136
-
137
-
138
-
139
-
140
-
141
-
142
-
143
-
144
-
145
-
146
-
147
-
148
-
149
-
150
-
151
-
152
-
153
-
154
-
155
 |
 |