Lexmark X5450 User's Guide (Mac) - Page 40
Editing the Customize list, From here, Go to, Click
 |
View all Lexmark X5450 manuals
Add to My Manuals
Save this manual to your list of manuals |
Page 40 highlights
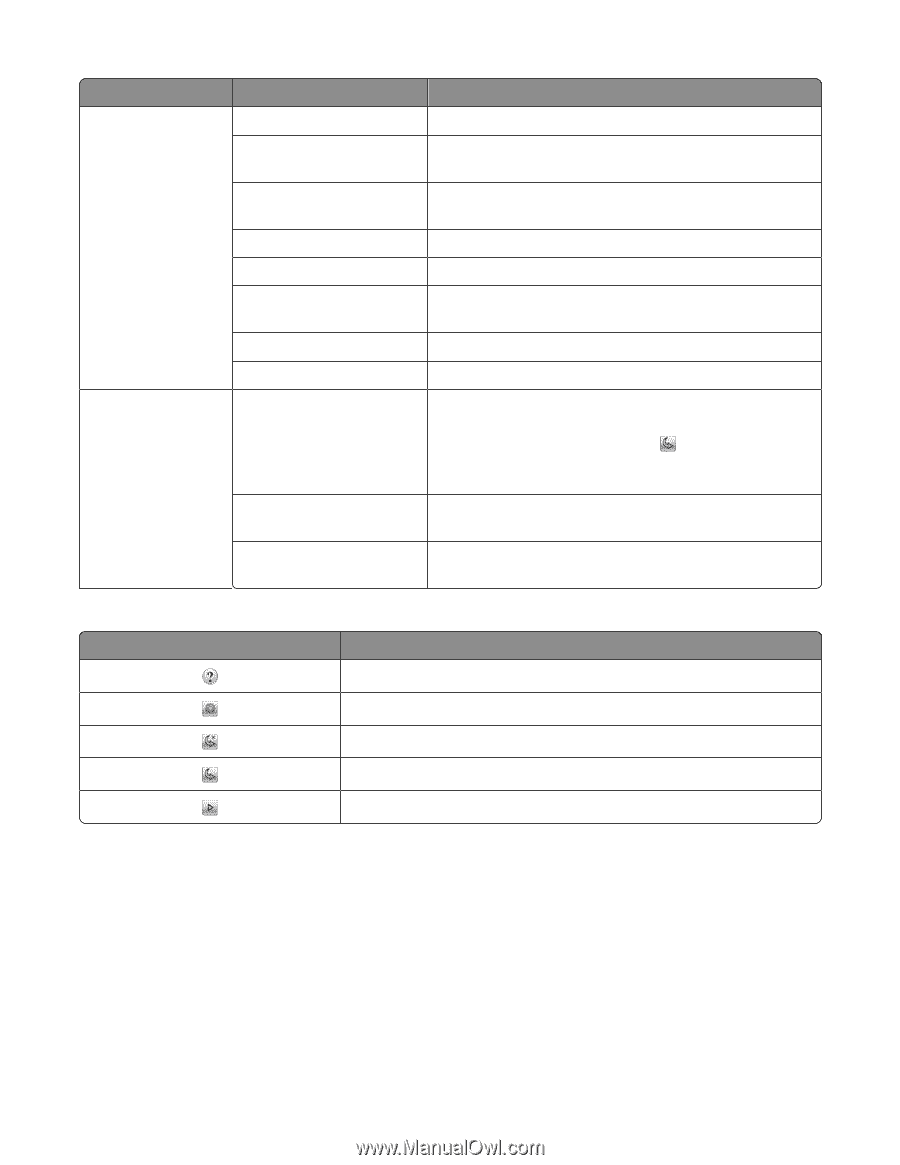
From here Adjustments tab Go to Brightness Contrast To Adjust the lightness and darkness of the scanned image. Adjust the tone of the image as it is set off against a light or dark background. Gamma Increase or decrease the color correction curve. Enabling gamma lets you adjust the amount of ink on the page. Blur/Sharpen Rotate Image Invert Colors Adjust the level of sharpness of the scanned image. Rotates the image 90 degrees clockwise per click. Reverse the colors of the image by inverting the RGB data. The effect created is similar to that of a film negative. Mirror Produce a mirror image of the document or image. Preview area Defaults Reset the Adjustment controls to the factory default settings. See a preview of the image. Some settings in the dialog are interactive, so you can readily view the changes on the image as you adjust the settings. Clicking re-scans the original document and shows the recent changes in the Preview area. Auto-crop sensitivity Select or clear Auto-crop sensitivity to activate or deactivate auto-cropping. Adjust the slider to adjust auto-cropping. Weight, height, and file size See the dimension of the scanned image. Select your display preferred unit of measurement from the pop-up menu. These buttons are at the bottom of the Preview area: Click To Go to the Help Center for more information. Show or hide the Scan Setup drawer. Exit the current dialog without saving any changes. Refresh the image in the Preview area. Start scanning. Related topics: • "Using the All-In-One Center" on page 105 Editing the Customize list The list of applications in the Customize list is generated when you install the All-In-One software. You can expand this list to a maximum of 50 applications. You can add, remove, or modify an application in the Customize list. 1 From the Finder desktop, double-click the Lexmark 5400 Series folder. 2 Double-click the Lexmark 5400 Series Center icon. Scanning 40
-
 1
1 -
2
-
3
-
4
-
5
-
6
-
7
-
8
-
9
-
10
-
11
-
12
-
13
-
14
-
15
-
16
-
17
-
18
-
19
-
20
-
21
-
22
-
23
-
24
-
25
-
26
-
27
-
28
-
29
-
30
-
31
-
32
-
33
-
34
-
 35
35 -
 36
36 -
 37
37 -
 38
38 -
 39
39 -
 40
40 -
 41
41 -
 42
42 -
 43
43 -
 44
44 -
 45
45 -
46
-
47
-
48
-
49
-
50
-
51
-
52
-
53
-
54
-
55
-
56
-
57
-
58
-
59
-
60
-
61
-
62
-
63
-
64
-
65
-
66
-
67
-
68
-
69
-
70
-
71
-
72
-
73
-
74
-
75
-
76
-
77
-
78
-
79
-
80
-
81
-
82
-
83
-
84
-
85
-
86
-
87
-
88
-
89
-
90
-
91
-
92
-
93
-
94
-
95
-
96
-
97
-
98
-
99
-
100
-
101
-
102
-
103
-
104
-
105
-
106
-
107
-
108
-
109
-
110
-
111
-
112
-
113
-
114
-
115
-
116
-
117
-
118
-
119
-
120
-
121
-
122
-
123
-
124
-
125
-
126
-
127
-
128
-
129
-
130
-
131
-
132
-
133
-
134
-
135
-
136
-
137
-
138
-
139
-
140
-
141
-
142
-
143
-
144
-
145
-
146
-
147
-
148
-
149
-
150
-
151
-
152
-
153
-
154
-
155
 |
 |