Lexmark X5450 User's Guide (Mac) - Page 16
Learning about the All-In-One software print options, Choosing a paper size, Choosing a print quality - printer manual
 |
View all Lexmark X5450 manuals
Add to My Manuals
Save this manual to your list of manuals |
Page 16 highlights
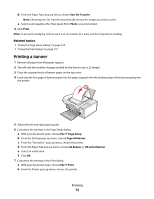
Learning about the All-In-One software print options Choosing a paper size 1 With a document open, click File Œ Page Setup. 2 From the "Format for" pop-up menu, choose 5400 Series. Note: When you select Any Printer, your paper size choices are limited. By selecting the name of your printer, you have many more paper size options. 3 From the Paper Size pop-up menu, choose a paper size. 4 Click OK. Related topics: • "Using the Page Setup dialog" on page 100 Choosing a paper type By default, the paper type sensor is set to Automatic. It can detect and adjust the paper type settings for plain, heavyweight matte, glossy/photo, and transparency paper. To manually choose the paper type: 1 With a document open, click File Œ Print. 2 From the Copies & Pages pop-up menu, choose Quality & Media. 3 From the Paper Type pop-up menu, choose a paper type. 4 Click Print. Notes: • Manually choosing a paper type turns off the paper type sensor for the current print job. • For multiple-page jobs, the printer assumes the subsequent pages are the same paper type as the first sheet detected. Related topics: • "Using the Print dialog" on page 101 Choosing a print quality 1 With a document open, click File Œ Print. 2 From the Printer pop-up menu, choose 5400 Series. 3 From the pop-up menu in the center, choose Quality & Media. 4 From the Print Quality menu, select the appropriate print quality for the document: • Automatic-The printer sets the print quality for the paper type loaded (default setting). • Quick Print-Best for text-only documents with reduced print quality but faster print speed. • Normal-Recommended for most types of documents. • Photo-Recommended for photos and documents with graphics. 5 Click Print. Printing 16
-
 1
1 -
2
-
3
-
4
-
5
-
6
-
7
-
8
-
9
-
10
-
 11
11 -
 12
12 -
 13
13 -
 14
14 -
 15
15 -
 16
16 -
 17
17 -
 18
18 -
 19
19 -
 20
20 -
 21
21 -
22
-
23
-
24
-
25
-
26
-
27
-
28
-
29
-
30
-
31
-
32
-
33
-
34
-
35
-
36
-
37
-
38
-
39
-
40
-
41
-
42
-
43
-
44
-
45
-
46
-
47
-
48
-
49
-
50
-
51
-
52
-
53
-
54
-
55
-
56
-
57
-
58
-
59
-
60
-
61
-
62
-
63
-
64
-
65
-
66
-
67
-
68
-
69
-
70
-
71
-
72
-
73
-
74
-
75
-
76
-
77
-
78
-
79
-
80
-
81
-
82
-
83
-
84
-
85
-
86
-
87
-
88
-
89
-
90
-
91
-
92
-
93
-
94
-
95
-
96
-
97
-
98
-
99
-
100
-
101
-
102
-
103
-
104
-
105
-
106
-
107
-
108
-
109
-
110
-
111
-
112
-
113
-
114
-
115
-
116
-
117
-
118
-
119
-
120
-
121
-
122
-
123
-
124
-
125
-
126
-
127
-
128
-
129
-
130
-
131
-
132
-
133
-
134
-
135
-
136
-
137
-
138
-
139
-
140
-
141
-
142
-
143
-
144
-
145
-
146
-
147
-
148
-
149
-
150
-
151
-
152
-
153
-
154
-
155
 |
 |