Netgear AC2200 User Manual - Page 39
User Class If Required, Use These DNS Servers
 |
View all Netgear AC2200 manuals
Add to My Manuals
Save this manual to your list of manuals |
Page 39 highlights
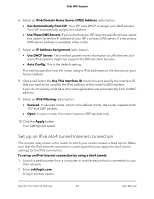
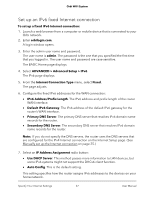
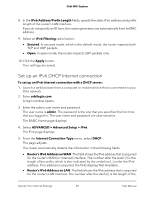
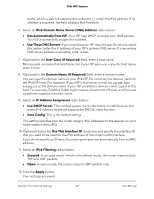
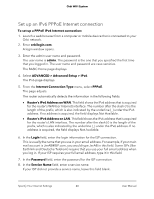
Orbi WiFi System prefix, which is also indicated by the underline (_) under the IPv6 address. If no address is acquired, the field displays Not Available. 6. Select an IPv6 Domain Name Server (DNS) Address radio button: • Get Automatically from ISP. Your ISP uses DHCP to assign your DNS servers. Your ISP automatically assigns this address. • Use These DNS Servers. If you know that your ISP requires specific servers, select this option. Enter the IP address of your ISP's primary DNS server. If a secondary DNS server address is available, enter it also. 7. (Optional) In the User Class (If Required) field, enter a host name. Most people can leave this field blank, but if your ISP gave you a specific host name, enter it here. 8. (Optional) In the Domain Name (If Required) field, enter a domain name. You can type the domain name of your IPv6 ISP. Do not enter the domain name for the IPv4 ISP here. For example, if your ISP's mail server is mail.xxx.yyy.zzz, type xxx.yyy.zzz as the domain name. If your ISP provided a domain name, type it in this field. For example, Earthlink Cable might require a host name of home, and Comcast sometimes supplies a domain name. 9. Select an IP Address Assignment radio button: • Use DHCP Server. This method passes more information to LAN devices, but some IPv6 systems might not support the DHCv6 client function. • Auto Config. This is the default setting. This setting specifies how the router assigns IPv6 addresses to the devices on your home network (the LAN). 10. (Optional) Select the Use This Interface ID check box and specify the interface ID that you want to be used for the IPv6 address of the router's LAN interface. If you do not specify an ID here, the router generates one automatically from its MAC address. 11. Select an IPv6 Filtering radio button: • Secured. In secured mode, which is the default mode, the router inspects both TCP and UDP packets. • Open. In open mode, the router inspects UDP packets only. 12. Click the Apply button. Your settings are saved. Specify Your Internet Settings 39 User Manual
-
 1
1 -
2
-
3
-
4
-
5
-
6
-
7
-
8
-
9
-
10
-
11
-
12
-
13
-
14
-
15
-
16
-
17
-
18
-
19
-
20
-
21
-
22
-
23
-
24
-
25
-
26
-
27
-
28
-
29
-
30
-
31
-
32
-
33
-
 34
34 -
 35
35 -
 36
36 -
 37
37 -
 38
38 -
 39
39 -
 40
40 -
 41
41 -
 42
42 -
 43
43 -
 44
44 -
45
-
46
-
47
-
48
-
49
-
50
-
51
-
52
-
53
-
54
-
55
-
56
-
57
-
58
-
59
-
60
-
61
-
62
-
63
-
64
-
65
-
66
-
67
-
68
-
69
-
70
-
71
-
72
-
73
-
74
-
75
-
76
-
77
-
78
-
79
-
80
-
81
-
82
-
83
-
84
-
85
-
86
-
87
-
88
-
89
-
90
-
91
-
92
-
93
-
94
-
95
-
96
-
97
-
98
-
99
-
100
-
101
-
102
-
103
-
104
-
105
-
106
-
107
-
108
-
109
-
110
-
111
-
112
-
113
-
114
-
115
-
116
-
117
-
118
-
119
-
120
-
121
-
122
-
123
-
124
-
125
-
126
-
127
-
128
-
129
-
130
-
131
-
132
-
133
-
134
-
135
-
136
-
137
-
138
-
139
-
140
-
141
-
142
-
143
-
144
-
145
-
146
-
147
-
148
-
149
-
150
-
151
-
152
-
153
-
154
-
155
-
156
-
157
-
158
-
159
-
160
-
161
-
162
-
163
-
164
 |
 |