Nikon COOLPIX 5700 User Manual - Page 126
Making Edges More Distinct, Image Sharpening
 |
UPC - 018208255047
View all Nikon COOLPIX 5700 manuals
Add to My Manuals
Save this manual to your list of manuals |
Page 126 highlights
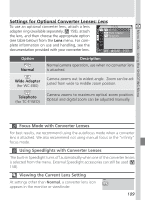
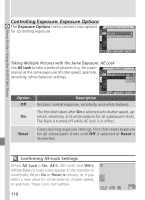
Menu Guide-Using the SHOOTING Menu Making Edges More Distinct: Image Sharpening This option controls whether pictures are processed for increased sharpness, and to what degree. Because this processing takes place only as the pictures are being saved to the memory card, the effects of sharpening can not be previewed in the monitor or viewfinder before shooting. In User Sets 1, 2, and 3, you can use the menu options shown below to control sharpening; in User Set A, Auto is the only setting. Option Auto High Normal Low Off Description Camera sharpens edges for optimal results; adjustment performed differs from image to image. Photos processed to increase sharpness, making edges more distinct. Camera performs same standard level of sharpening on all photos. Amount of sharpening reduced below normal level for a softer effect. No sharpening performed. Viewing the Current Image Sharpening Setting At settings other than Auto, the current imagesharpening setting is shown by an icon in the monitor or viewfinder. 114
-
 1
1 -
2
-
3
-
4
-
5
-
6
-
7
-
8
-
9
-
10
-
11
-
12
-
13
-
14
-
15
-
16
-
17
-
18
-
19
-
20
-
21
-
22
-
23
-
24
-
25
-
26
-
27
-
28
-
29
-
30
-
31
-
32
-
33
-
34
-
35
-
36
-
37
-
38
-
39
-
40
-
41
-
42
-
43
-
44
-
45
-
46
-
47
-
48
-
49
-
50
-
51
-
52
-
53
-
54
-
55
-
56
-
57
-
58
-
59
-
60
-
61
-
62
-
63
-
64
-
65
-
66
-
67
-
68
-
69
-
70
-
71
-
72
-
73
-
74
-
75
-
76
-
77
-
78
-
79
-
80
-
81
-
82
-
83
-
84
-
85
-
86
-
87
-
88
-
89
-
90
-
91
-
92
-
93
-
94
-
95
-
96
-
97
-
98
-
99
-
100
-
101
-
102
-
103
-
104
-
105
-
106
-
107
-
108
-
109
-
110
-
111
-
112
-
113
-
114
-
115
-
116
-
117
-
118
-
119
-
120
-
 121
121 -
 122
122 -
 123
123 -
 124
124 -
 125
125 -
 126
126 -
 127
127 -
 128
128 -
 129
129 -
 130
130 -
 131
131 -
132
-
133
-
134
-
135
-
136
-
137
-
138
-
139
-
140
-
141
-
142
-
143
-
144
-
145
-
146
-
147
-
148
-
149
-
150
-
151
-
152
-
153
-
154
-
155
-
156
-
157
-
158
-
159
-
160
-
161
-
162
-
163
-
164
-
165
-
166
-
167
-
168
-
169
-
170
-
171
-
172
-
173
-
174
-
175
-
176
-
177
-
178
-
179
-
180
-
181
-
182
-
183
-
184
-
185
-
186
-
187
-
188
-
189
-
190
-
191
-
192
 |
 |
