Nikon COOLPIX 5700 User Manual - Page 40
Step 5-Focus and Shoot, Custom Focus Settings User Sets 1 - camera user manual
 |
UPC - 018208255047
View all Nikon COOLPIX 5700 manuals
Add to My Manuals
Save this manual to your list of manuals |
Page 40 highlights
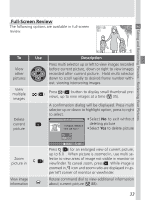
Autofocus Flash-ready indicator indicator Taking and Reviewing Pictures-Basic Picture Taking Step 5-Focus and Shoot 5.1 Focus In User Set A, the camera automatically focuses on the subject in the center of the frame. To lock focus, press the shutter-release button halfway and check the status of the autofocus ( ) and flash-ready indicators ( ), shown right, in the monitor or viewfinder. The following table explains the status of the autofocus and flash-ready indicators. Note that when focus mode is set to infinity, the autofocus indicator will not appear. Indicator Green Green (flashes) Red Red (flashes) None Meaning Subject in focus. Camera unable to focus on subject. Use focus lock ( 56) to focus on another subject at same distance, then recompose the picture. Speedlight will fire when picture is taken. Speedlight charging. Remove finger briefly from shutter-release button, then try again. Speedlight not required or set to "off". Custom Focus Settings (User Sets 1, 2, and 3) In User Sets 1, 2, and 3, manual focus ( 80) can be used in situations in which the camera is unable to focus using autofocus. Manual or automatic focusarea selection ( 112) can be used to focus on an off-center subject without using focus lock. 28
-
 1
1 -
2
-
3
-
4
-
5
-
6
-
7
-
8
-
9
-
10
-
11
-
12
-
13
-
14
-
15
-
16
-
17
-
18
-
19
-
20
-
21
-
22
-
23
-
24
-
25
-
26
-
27
-
28
-
29
-
30
-
31
-
32
-
33
-
34
-
 35
35 -
 36
36 -
 37
37 -
 38
38 -
 39
39 -
 40
40 -
 41
41 -
 42
42 -
 43
43 -
 44
44 -
 45
45 -
46
-
47
-
48
-
49
-
50
-
51
-
52
-
53
-
54
-
55
-
56
-
57
-
58
-
59
-
60
-
61
-
62
-
63
-
64
-
65
-
66
-
67
-
68
-
69
-
70
-
71
-
72
-
73
-
74
-
75
-
76
-
77
-
78
-
79
-
80
-
81
-
82
-
83
-
84
-
85
-
86
-
87
-
88
-
89
-
90
-
91
-
92
-
93
-
94
-
95
-
96
-
97
-
98
-
99
-
100
-
101
-
102
-
103
-
104
-
105
-
106
-
107
-
108
-
109
-
110
-
111
-
112
-
113
-
114
-
115
-
116
-
117
-
118
-
119
-
120
-
121
-
122
-
123
-
124
-
125
-
126
-
127
-
128
-
129
-
130
-
131
-
132
-
133
-
134
-
135
-
136
-
137
-
138
-
139
-
140
-
141
-
142
-
143
-
144
-
145
-
146
-
147
-
148
-
149
-
150
-
151
-
152
-
153
-
154
-
155
-
156
-
157
-
158
-
159
-
160
-
161
-
162
-
163
-
164
-
165
-
166
-
167
-
168
-
169
-
170
-
171
-
172
-
173
-
174
-
175
-
176
-
177
-
178
-
179
-
180
-
181
-
182
-
183
-
184
-
185
-
186
-
187
-
188
-
189
-
190
-
191
-
192
 |
 |
