Nikon COOLPIX 5700 User Manual - Page 24
tion manual included with the MB-E5700., If the view in the viewfinder appears blurred - battery pack
 |
UPC - 018208255047
View all Nikon COOLPIX 5700 manuals
Add to My Manuals
Save this manual to your list of manuals |
Page 24 highlights
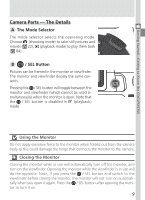
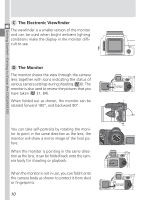
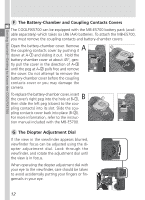
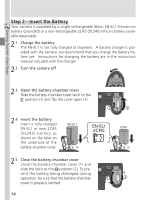
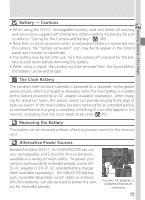
Getting Started-Getting to Know the COOLPIX5700 F The Battery-Chamber and Coupling Contacts Covers The COOLPIX5700 can be equipped with the MB-E5700 battery pack (available separately) which takes six LR6 (AA) batteries. To attach the MB-E5700, you must remove the coupling contacts and battery-chamber covers. A Open the battery-chamber cover. Remove the coupling contacts cover by pushing it down at A-ቢ and sliding it out. Hold the battery-chamber cover at about 45°, gently pull the cover in the direction of A-ቤ until the peg at A-ባ pulls free and remove the cover. Do not attempt to remove the battery-chamber cover before the coupling contacts cover or you may damage the camera. B To replace the battery-chamber cover, insert the cover's right peg into the hole at B-ቢ, then slide the left peg (closest to the coupling contacts) into its slot. Slide the coupling contacts cover back into place (B-ባ). For more information, refer to the instruction manual included with the MB-E5700. G The Diopter Adjustment Dial If the view in the viewfinder appears blurred, viewfinder focus can be adjusted using the diopter adjustment dial. Look through the viewfinder, and rotate the adjustment dial until the view is in focus. When operating the diopter adjustment dial with your eye to the viewfinder, care should be taken to avoid accidentally putting your fingers or fingernails in your eye. 12
-
 1
1 -
2
-
3
-
4
-
5
-
6
-
7
-
8
-
9
-
10
-
11
-
12
-
13
-
14
-
15
-
16
-
17
-
18
-
 19
19 -
 20
20 -
 21
21 -
 22
22 -
 23
23 -
 24
24 -
 25
25 -
 26
26 -
 27
27 -
 28
28 -
 29
29 -
30
-
31
-
32
-
33
-
34
-
35
-
36
-
37
-
38
-
39
-
40
-
41
-
42
-
43
-
44
-
45
-
46
-
47
-
48
-
49
-
50
-
51
-
52
-
53
-
54
-
55
-
56
-
57
-
58
-
59
-
60
-
61
-
62
-
63
-
64
-
65
-
66
-
67
-
68
-
69
-
70
-
71
-
72
-
73
-
74
-
75
-
76
-
77
-
78
-
79
-
80
-
81
-
82
-
83
-
84
-
85
-
86
-
87
-
88
-
89
-
90
-
91
-
92
-
93
-
94
-
95
-
96
-
97
-
98
-
99
-
100
-
101
-
102
-
103
-
104
-
105
-
106
-
107
-
108
-
109
-
110
-
111
-
112
-
113
-
114
-
115
-
116
-
117
-
118
-
119
-
120
-
121
-
122
-
123
-
124
-
125
-
126
-
127
-
128
-
129
-
130
-
131
-
132
-
133
-
134
-
135
-
136
-
137
-
138
-
139
-
140
-
141
-
142
-
143
-
144
-
145
-
146
-
147
-
148
-
149
-
150
-
151
-
152
-
153
-
154
-
155
-
156
-
157
-
158
-
159
-
160
-
161
-
162
-
163
-
164
-
165
-
166
-
167
-
168
-
169
-
170
-
171
-
172
-
173
-
174
-
175
-
176
-
177
-
178
-
179
-
180
-
181
-
182
-
183
-
184
-
185
-
186
-
187
-
188
-
189
-
190
-
191
-
192
 |
 |
