Nikon COOLPIX 5700 User Manual - Page 58
Viewing Pictures on a TV / VCR, Auto Off, Choosing a Video Mode - black screen
 |
UPC - 018208255047
View all Nikon COOLPIX 5700 manuals
Add to My Manuals
Save this manual to your list of manuals |
Page 58 highlights
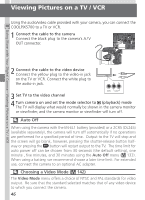
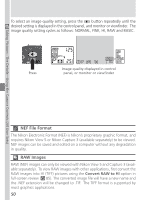
Doing More with Your Digital Camera-Viewing Pictures on a TV / VCR Viewing Pictures on a TV / VCR Using the audio/video cable provided with your camera, you can connect the COOLPIX5700 to a TV or VCR. 1 Connect the cable to the camera Connect the black plug to the camera's A / V OUT connector. 2 Connect the cable to the video device Connect the yellow plug to the video-in jack on the TV or VCR. Connect the white plug to the audio-in jack. 3 Set TV to the video channel 4 Turn camera on and set the mode selector to (playback) mode The TV will display what would normally be shown in the camera monitor or viewfinder, and the camera monitor or viewfinder will turn off. Auto Off When using the camera with the EN-EL1 battery (provided) or a 2CR5 (DL245) (available separately), the camera will turn off automatically if no operations are performed for a specified period of time. Output to the TV will stop and the screen will go blank, however, pressing the shutter-release button halfway or pressing the button will restart output to the TV. The time limit for auto power off can be chosen from 30 seconds (the default setting), one minute , five minutes, and 30 minutes using the Auto Off menu ( 133). When using a battery, we recommend choose a later time limit. For extended use, connect the camera to an optional AC adapter. Choosing a Video Mode ( 142) The Video Mode menu offers a choice of NTSC and PAL standards for video output. Be sure that the standard selected matches that of any video device to which you connect the camera. 46
-
 1
1 -
2
-
3
-
4
-
5
-
6
-
7
-
8
-
9
-
10
-
11
-
12
-
13
-
14
-
15
-
16
-
17
-
18
-
19
-
20
-
21
-
22
-
23
-
24
-
25
-
26
-
27
-
28
-
29
-
30
-
31
-
32
-
33
-
34
-
35
-
36
-
37
-
38
-
39
-
40
-
41
-
42
-
43
-
44
-
45
-
46
-
47
-
48
-
49
-
50
-
51
-
52
-
 53
53 -
 54
54 -
 55
55 -
 56
56 -
 57
57 -
 58
58 -
 59
59 -
 60
60 -
 61
61 -
 62
62 -
 63
63 -
64
-
65
-
66
-
67
-
68
-
69
-
70
-
71
-
72
-
73
-
74
-
75
-
76
-
77
-
78
-
79
-
80
-
81
-
82
-
83
-
84
-
85
-
86
-
87
-
88
-
89
-
90
-
91
-
92
-
93
-
94
-
95
-
96
-
97
-
98
-
99
-
100
-
101
-
102
-
103
-
104
-
105
-
106
-
107
-
108
-
109
-
110
-
111
-
112
-
113
-
114
-
115
-
116
-
117
-
118
-
119
-
120
-
121
-
122
-
123
-
124
-
125
-
126
-
127
-
128
-
129
-
130
-
131
-
132
-
133
-
134
-
135
-
136
-
137
-
138
-
139
-
140
-
141
-
142
-
143
-
144
-
145
-
146
-
147
-
148
-
149
-
150
-
151
-
152
-
153
-
154
-
155
-
156
-
157
-
158
-
159
-
160
-
161
-
162
-
163
-
164
-
165
-
166
-
167
-
168
-
169
-
170
-
171
-
172
-
173
-
174
-
175
-
176
-
177
-
178
-
179
-
180
-
181
-
182
-
183
-
184
-
185
-
186
-
187
-
188
-
189
-
190
-
191
-
192
 |
 |
