Nokia N80 Internet Edition Nokia N80ie User Guide in English - Page 28
Record videos
 |
View all Nokia N80 Internet Edition manuals
Add to My Manuals
Save this manual to your list of manuals |
Page 28 highlights
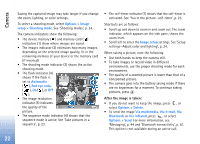
Camera • To zoom in or out, press or . • To move on a zoomed image, scroll up, down, left, or right. Record videos If the camera is in Image mode, select video mode by selecting Options > Video mode. To select the secondary camera to, for example, include yourself in the video, select Options > Use secondary camera. To delete copies of the transferred files, and empty memory for new video clips, select Options > Go to free memory (main camera only). 1 In the main camera, press the capture key, or in the secondary camera, press to start recording. The record icon is shown. The LED flash is lit, and a tone sounds, indicating to the subject that video is being recorded. There is no flash effect on the resultant video. 2 To pause recording at any time, select Pause. The pause icon ( ) blinks on the display. Video recording automatically stops if recording is set to pause and there are no keypresses within a minute. 3 Select Continue to resume recording. 4 Select Stop, to stop recording. The video clip is automatically saved to the Imgs. & video folder of Gallery. See 'Gallery', p. 31. To make lighting and color adjustments before recording a video, select Options > Video setup. See 'Setup settings- Adjust color and lighting', p. 24. To select a shooting mode, select Options > Video setup > Shooting mode. See 'Shooting modes', p. 24. Video recorder indicators show the following: • The device memory ( ) and memory card ( ) indicators (1) show where the video is saved. • The current video length indicator (2) shows elapsed time and time remaining. • The shooting mode indicator (3) shows the active shooting mode. • Image stabilizer (4) indicates that the image stabilizer is active, and dampens the effects of small movements on the image sharpness (main camera only). • The microphone indicator (5) shows that the microphone is muted. • The file format indicator (6) indicates the format of the video clip. • The video quality indicator (7) indicates whether the quality of the video is High, Normal or Sharing. 27
-
 1
1 -
2
-
3
-
4
-
5
-
6
-
7
-
8
-
9
-
10
-
11
-
12
-
13
-
14
-
15
-
16
-
17
-
18
-
19
-
20
-
21
-
22
-
 23
23 -
 24
24 -
 25
25 -
 26
26 -
 27
27 -
 28
28 -
 29
29 -
 30
30 -
 31
31 -
 32
32 -
 33
33 -
34
-
35
-
36
-
37
-
38
-
39
-
40
-
41
-
42
-
43
-
44
-
45
-
46
-
47
-
48
-
49
-
50
-
51
-
52
-
53
-
54
-
55
-
56
-
57
-
58
-
59
-
60
-
61
-
62
-
63
-
64
-
65
-
66
-
67
-
68
-
69
-
70
-
71
-
72
-
73
-
74
-
75
-
76
-
77
-
78
-
79
-
80
-
81
-
82
-
83
-
84
-
85
-
86
-
87
-
88
-
89
-
90
-
91
-
92
-
93
-
94
-
95
-
96
-
97
-
98
-
99
-
100
-
101
-
102
-
103
-
104
-
105
-
106
-
107
-
108
-
109
-
110
-
111
-
112
-
113
-
114
-
115
-
116
-
117
-
118
-
119
-
120
-
121
-
122
-
123
-
124
-
125
-
126
-
127
-
128
-
129
-
130
-
131
 |
 |