Panasonic BL-WV10A BL-MS103A Owner's Manual (English) - Page 46
Select [Admin. User Name] and press [ENTER].
 |
View all Panasonic BL-WV10A manuals
Add to My Manuals
Save this manual to your list of manuals |
Page 46 highlights
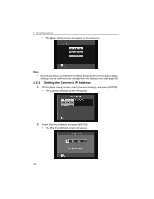
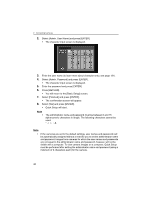
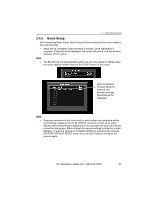
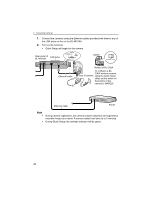
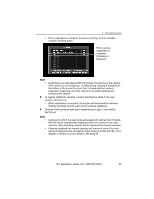
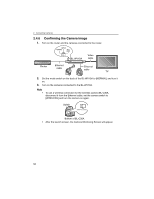
2 Connecting Cameras 2. Select [Admin. User Name] and press [ENTER]. • The character input screen is displayed. 3. Enter the user name (to learn more about character entry, see page 121). 4. Select [Admin. Password] and press [ENTER]. • The character input screen is displayed. 5. Enter the password and press [ENTER]. 6. Press [RETURN]. • You will return to the [Basic Setup] screen. 7. Select [Finished] and press [ENTER]. • The confirmation screen will appear. 8. Select [Yes] and press [ENTER]. • Quick Setup will start. Note • The administrator name and password must be between 6 and 15 alphanumeric characters in length. The following characters cannot be used: " < > : &. Note • If the cameras are set to the default settings, user names and passwords will be automatically assigned without a need for you to set the administrator name and password. Images from cameras for which the user names and passwords are not equal to the administrator name and password, however, will not be visible with a computer. To view camera images on a computer, Quick Setup must be performed after setting the administrator name and password (using a minimum of 6 characters each) for the camera. 46
-
 1
1 -
2
-
3
-
4
-
5
-
6
-
7
-
8
-
9
-
10
-
11
-
12
-
13
-
14
-
15
-
16
-
17
-
18
-
19
-
20
-
21
-
22
-
23
-
24
-
25
-
26
-
27
-
28
-
29
-
30
-
31
-
32
-
33
-
34
-
35
-
36
-
37
-
38
-
39
-
40
-
 41
41 -
 42
42 -
 43
43 -
 44
44 -
 45
45 -
 46
46 -
 47
47 -
 48
48 -
 49
49 -
 50
50 -
 51
51 -
52
-
53
-
54
-
55
-
56
-
57
-
58
-
59
-
60
-
61
-
62
-
63
-
64
-
65
-
66
-
67
-
68
-
69
-
70
-
71
-
72
-
73
-
74
-
75
-
76
-
77
-
78
-
79
-
80
-
81
-
82
-
83
-
84
-
85
-
86
-
87
-
88
-
89
-
90
-
91
-
92
-
93
-
94
-
95
-
96
-
97
-
98
-
99
-
100
-
101
-
102
-
103
-
104
-
105
-
106
-
107
-
108
-
109
-
110
-
111
-
112
-
113
-
114
-
115
-
116
-
117
-
118
-
119
-
120
-
121
-
122
-
123
-
124
-
125
-
126
-
127
-
128
-
129
-
130
-
131
-
132
-
133
-
134
-
135
-
136
-
137
-
138
-
139
-
140
-
141
-
142
-
143
-
144
-
145
-
146
-
147
-
148
-
149
-
150
-
151
-
152
-
153
-
154
-
155
-
156
-
157
-
158
-
159
-
160
-
161
-
162
-
163
-
164
-
165
-
166
-
167
-
168
-
169
-
170
-
171
-
172
-
173
-
174
-
175
-
176
-
177
-
178
-
179
-
180
-
181
-
182
-
183
-
184
 |
 |
