Panasonic BL-WV10A BL-MS103A Owner's Manual (English) - Page 83
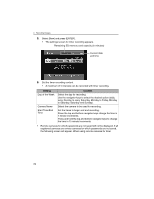
Changing the Record Mode, The Record Mode screen appears.
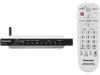 |
View all Panasonic BL-WV10A manuals
Add to My Manuals
Save this manual to your list of manuals |
Page 83 highlights
4 Recording Images Note • • • • HCM series cameras cannot record by sensor. Do not set sensor recording for an HCM series camera. If the power fails or is turned off during a continuous sensor recording, you may see an error result. If that occurs, erase the timer recording settings (see page 84). During continuous sensor recording, when sensor activation is used to record images, the sensor indicator will begin flashing once the camera's sensor is activated. To stop the flashing, see page 69. The sensor range may differ depending on the camera type. See the camera user guide for cautions in placing the camera to maximize that range. 4.4.3 Changing the Record Mode The image mode can be changed for timer and continuous sensor recording. 1. In the [Recorder] screen, select [Record Mode] and press [ENTER]. • The Record Mode screen appears. 2. Using the left and right navigator keys, select the desired mode and press [ENTER]. Note • A guide for the capacity of a 64MB SD memory card for each recording mode is indicated below (for more information see page 74). If the resolution is set to LOW, the recorded image will appear smaller, as will its image during recording. [For assistance, please call: 1-800-272-7033] 83
-
 1
1 -
2
-
3
-
4
-
5
-
6
-
7
-
8
-
9
-
10
-
11
-
12
-
13
-
14
-
15
-
16
-
17
-
18
-
19
-
20
-
21
-
22
-
23
-
24
-
25
-
26
-
27
-
28
-
29
-
30
-
31
-
32
-
33
-
34
-
35
-
36
-
37
-
38
-
39
-
40
-
41
-
42
-
43
-
44
-
45
-
46
-
47
-
48
-
49
-
50
-
51
-
52
-
53
-
54
-
55
-
56
-
57
-
58
-
59
-
60
-
61
-
62
-
63
-
64
-
65
-
66
-
67
-
68
-
69
-
70
-
71
-
72
-
73
-
74
-
75
-
76
-
77
-
 78
78 -
 79
79 -
 80
80 -
 81
81 -
 82
82 -
 83
83 -
 84
84 -
 85
85 -
 86
86 -
 87
87 -
 88
88 -
89
-
90
-
91
-
92
-
93
-
94
-
95
-
96
-
97
-
98
-
99
-
100
-
101
-
102
-
103
-
104
-
105
-
106
-
107
-
108
-
109
-
110
-
111
-
112
-
113
-
114
-
115
-
116
-
117
-
118
-
119
-
120
-
121
-
122
-
123
-
124
-
125
-
126
-
127
-
128
-
129
-
130
-
131
-
132
-
133
-
134
-
135
-
136
-
137
-
138
-
139
-
140
-
141
-
142
-
143
-
144
-
145
-
146
-
147
-
148
-
149
-
150
-
151
-
152
-
153
-
154
-
155
-
156
-
157
-
158
-
159
-
160
-
161
-
162
-
163
-
164
-
165
-
166
-
167
-
168
-
169
-
170
-
171
-
172
-
173
-
174
-
175
-
176
-
177
-
178
-
179
-
180
-
181
-
182
-
183
-
184
 |
 |
