Panasonic BL-WV10A BL-MS103A Owner's Manual (English) - Page 75
Standard Recording, Snapshot Recording, Recording
 |
View all Panasonic BL-WV10A manuals
Add to My Manuals
Save this manual to your list of manuals |
Page 75 highlights
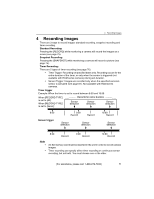
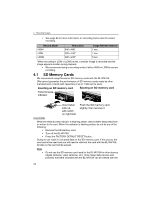
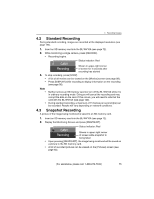
4 Recording Images 4.2 Standard Recording During standard recording, images are recorded at the displayed resolution (see page 124). 1. Insert an SD memory card into the BL-WV10A (see page 72). 2. While monitoring a single camera, press [RECORD]. • Recording begins. CAM1 Recording Status indicator: Red Shown in upper-right corner of screen for 4 seconds after recording has started 3. To stop recording, press [STOP]. • A list of all movies can be viewed on the [Movies] screen (see page 88). • Press [DISPLAY] while recording to display information on the recording (see page 90). Note • • Neither remove an SD memory card nor turn off the BL-WV10A while it is in ordinary recording mode. Doing so will cancel the recording and may corrupt the data on the card. If this occurs, you will need to reformat the card with the BL-WV10A (see page 120). During standard recording, a maximum of 15 frames per second (fps) can be recorded. Results will vary depending on network conditions. 4.3 Snapshot Recording A picture of the image being monitored is saved to an SD memory card. 1. Insert an SD memory card into the BL-WV10A (see page 72). 2. Display the Monitoring Screen and press [SNAPSHOT]. Status indicator: Red CAM1 Recording Shown in upper-right corner of screen while snapshot is being taken • Upon pressing [SNAPSHOT], the image being monitored will be saved as a picture to the SD memory card. • A list of recorded pictures can be viewed on the [Pictures] screen (see page 92). [For assistance, please call: 1-800-272-7033] 75
-
 1
1 -
2
-
3
-
4
-
5
-
6
-
7
-
8
-
9
-
10
-
11
-
12
-
13
-
14
-
15
-
16
-
17
-
18
-
19
-
20
-
21
-
22
-
23
-
24
-
25
-
26
-
27
-
28
-
29
-
30
-
31
-
32
-
33
-
34
-
35
-
36
-
37
-
38
-
39
-
40
-
41
-
42
-
43
-
44
-
45
-
46
-
47
-
48
-
49
-
50
-
51
-
52
-
53
-
54
-
55
-
56
-
57
-
58
-
59
-
60
-
61
-
62
-
63
-
64
-
65
-
66
-
67
-
68
-
69
-
 70
70 -
 71
71 -
 72
72 -
 73
73 -
 74
74 -
 75
75 -
 76
76 -
 77
77 -
 78
78 -
 79
79 -
 80
80 -
81
-
82
-
83
-
84
-
85
-
86
-
87
-
88
-
89
-
90
-
91
-
92
-
93
-
94
-
95
-
96
-
97
-
98
-
99
-
100
-
101
-
102
-
103
-
104
-
105
-
106
-
107
-
108
-
109
-
110
-
111
-
112
-
113
-
114
-
115
-
116
-
117
-
118
-
119
-
120
-
121
-
122
-
123
-
124
-
125
-
126
-
127
-
128
-
129
-
130
-
131
-
132
-
133
-
134
-
135
-
136
-
137
-
138
-
139
-
140
-
141
-
142
-
143
-
144
-
145
-
146
-
147
-
148
-
149
-
150
-
151
-
152
-
153
-
154
-
155
-
156
-
157
-
158
-
159
-
160
-
161
-
162
-
163
-
164
-
165
-
166
-
167
-
168
-
169
-
170
-
171
-
172
-
173
-
174
-
175
-
176
-
177
-
178
-
179
-
180
-
181
-
182
-
183
-
184
 |
 |
