Panasonic BL-WV10A BL-MS103A Owner's Manual (English) - Page 79
SD Recording, Record Type
 |
View all Panasonic BL-WV10A manuals
Add to My Manuals
Save this manual to your list of manuals |
Page 79 highlights
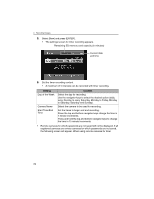
4 Recording Images recording, change their settings such that passwords are saved (see page 115). Setting Record Type SD Recording Content Select the recording method. All: Records all images from the camera during the time interval specified. Sensr (Sensor): Records images from the camera during the time interval specified, but only when the sensor is activated. To record to an SD memory card, select [O]. To record to a different destination, select [-]. When [SENSOR] has been selected for content, only [O] is available. • The sensor range may differ depending on the camera type. To record from remote cameras using sensor activation, confirm that the cameras are set for sensor use (see page 117). See the camera user guide for cautions in placing the camera to maximize that range. • To record images from the Monitoring Screen to a video deck or a DVD/ HDD recorder, select [-]. Use a video cable to connect the video output port on the BL-WV10A to the video input jack on a video deck or DVD/ HDD recorder, setting the time for recording on the video deck or DVD/ HDD recorder to match that of the BL-WV10A. At the set time, the Monitoring Screen for the specified camera will appear and be recorded on the video deck or DVD/HDD recorder. 7. After setting the content, press [ENTER]. • Timer recording is now set. 8. Press [TIMER] to turn the timer on. • Upon doing so, the timer/access indicator will turn green. [For assistance, please call: 1-800-272-7033] 79
-
 1
1 -
2
-
3
-
4
-
5
-
6
-
7
-
8
-
9
-
10
-
11
-
12
-
13
-
14
-
15
-
16
-
17
-
18
-
19
-
20
-
21
-
22
-
23
-
24
-
25
-
26
-
27
-
28
-
29
-
30
-
31
-
32
-
33
-
34
-
35
-
36
-
37
-
38
-
39
-
40
-
41
-
42
-
43
-
44
-
45
-
46
-
47
-
48
-
49
-
50
-
51
-
52
-
53
-
54
-
55
-
56
-
57
-
58
-
59
-
60
-
61
-
62
-
63
-
64
-
65
-
66
-
67
-
68
-
69
-
70
-
71
-
72
-
73
-
 74
74 -
 75
75 -
 76
76 -
 77
77 -
 78
78 -
 79
79 -
 80
80 -
 81
81 -
 82
82 -
 83
83 -
 84
84 -
85
-
86
-
87
-
88
-
89
-
90
-
91
-
92
-
93
-
94
-
95
-
96
-
97
-
98
-
99
-
100
-
101
-
102
-
103
-
104
-
105
-
106
-
107
-
108
-
109
-
110
-
111
-
112
-
113
-
114
-
115
-
116
-
117
-
118
-
119
-
120
-
121
-
122
-
123
-
124
-
125
-
126
-
127
-
128
-
129
-
130
-
131
-
132
-
133
-
134
-
135
-
136
-
137
-
138
-
139
-
140
-
141
-
142
-
143
-
144
-
145
-
146
-
147
-
148
-
149
-
150
-
151
-
152
-
153
-
154
-
155
-
156
-
157
-
158
-
159
-
160
-
161
-
162
-
163
-
164
-
165
-
166
-
167
-
168
-
169
-
170
-
171
-
172
-
173
-
174
-
175
-
176
-
177
-
178
-
179
-
180
-
181
-
182
-
183
-
184
 |
 |
