Panasonic CFU1AQCXZ2M Reference Manual
Panasonic CFU1AQCXZ2M - CLOSEOUT: Z520 1.33GHZ Manual
 |
UPC - 092281896410
View all Panasonic CFU1AQCXZ2M manuals
Add to My Manuals
Save this manual to your list of manuals |
Panasonic CFU1AQCXZ2M manual content summary:
- Panasonic CFU1AQCXZ2M | Reference Manual - Page 1
1 Reference Manual Personal Computer CF-U1 Model No. Series We recommend that this Reference Manual be printed. - Panasonic CFU1AQCXZ2M | Reference Manual - Page 2
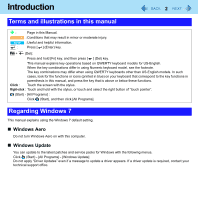
(Del) key. Click : This manual explains key operations based on QWERTY keyboard functions in parenthesis in this manual, and press the key Programs]. Regarding Windows 7 This manual explains using the Windows 7 default update to the latest patches and service packs for Windows with the following - Panasonic CFU1AQCXZ2M | Reference Manual - Page 3
purchase. (Î page 7) z To display the start menu with keyboard operations, press (Windows) 3 times when Sticky Key function is enabled. z The key operations illustrated in this manual explain when Sticky Key function is disabled. - Panasonic CFU1AQCXZ2M | Reference Manual - Page 4
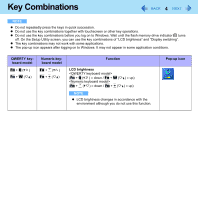
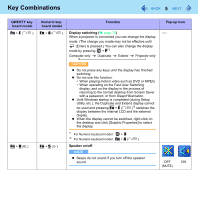
Key Combinations 4 NOTE z Do not repeatedly press the keys in quick succession. z Do not use the key combinations together with touchscreen or other key operations. z Do not use the key combinations before you log on to Windows. Wait until the flash memory drive indicator turns off. On the Setup - Panasonic CFU1AQCXZ2M | Reference Manual - Page 5
Key Combinations 5 QWERTY keyboard model Fn + E ( ) Fn + R ( ) Numeric keyboard model Fn + 4 ( ) Fn + 5 ( ) Function Display switching (Î page 75) When a projector is connected you can change the display mode. (The change you made may not be effective until (Enter) is pressed.) You can - Panasonic CFU1AQCXZ2M | Reference Manual - Page 6
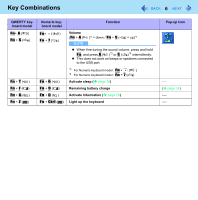
Key Combinations 6 QWERTY keyboard model Fn+ A ( ) Fn + S ( ) Fn + T ( ) Fn + F ( ) Fn + G ( ) Fn + Z ( ) Numeric keyboard model Fn+ ( ) Fn + 7 ( ) Fn + 6 ( ) Fn + 9 ( ) Fn + 0 ( ) Fn + Ctrl ( ) Function Volume (Fn + A ( )*3 = down / Fn + S ( ) = up)*4 NOTE z When fine-tuning the sound volume, - Panasonic CFU1AQCXZ2M | Reference Manual - Page 7
you press another key. Use this when pressing difficult key combinations. • Pop-up icon on/off 1 Start up the Hotkey Settings. Click (Start) - [All Programs] - [Panasonic] - [Hotkey Settings]. - Panasonic CFU1AQCXZ2M | Reference Manual - Page 8
Key Combinations 8 2 Make the settings. [Use Fn key lock] z When using an Fn key combination A Press Fn once. (Fn key is locked and the indicator next to the key lights up.) B Press another key. (Lock released) z When using successive Fn key combinations A Press Fn twice. (Fn key is locked and the - Panasonic CFU1AQCXZ2M | Reference Manual - Page 9
as an administrator. B Click (Start) and input [c:\util\pnotif\setup.exe] in [Search Programs and files], and press (Enter). Follow the on-screen instructions. C Add a check mark for [Yes, I want to restart my computer now.], and click [Finish]. The computer restarts. "Shift Key ON" will be - Panasonic CFU1AQCXZ2M | Reference Manual - Page 10
Touchscreen 10 You can use the touchscreen function to perform the same operation as a mouse. Touch the screen surface with the stylus (included). For further information, click (Start) - [Control Panel] - [Hardware and Sound] - [Pen and Touch] - [Flicks] - [Practice using flicks]. z To right- - Panasonic CFU1AQCXZ2M | Reference Manual - Page 11
coating, an approved soft cloth has been included to wipe the LCD surface of the computer. Before using the computer, be sure to read the instructions provided below. • Be sure to wipe the LCD display to remove fingerprints, etc., with the soft cloth. • Do not wipe areas other than the LCD - Panasonic CFU1AQCXZ2M | Reference Manual - Page 12
Touchscreen 12 • Use the soft cloth when it is dry. Do not apply water or solvents to the soft cloth. • First, lightly wipe foreign particles and dust adhering to the LCD display on one side of the soft cloth. Do not use force, since the LCD surface may be damaged with - Panasonic CFU1AQCXZ2M | Reference Manual - Page 13
Touchscreen 13 „ Calibration by a standard user NOTE z Perform the following calibration for each user. 1 Run [Tablet PC Settings]. Click (Start) - [Control Panel] - [Hardware and Sound] - [Tablet PC Settings]. 2 Click [Calibrate]. 3 Select [Touch input] or [Pen input]. 4 Using the stylus, touch - Panasonic CFU1AQCXZ2M | Reference Manual - Page 14
Hardware Button Setting 14 You can adjust the scroll speed for Scroll button or assign the startup functions of your favorite applications to 4 Applications Buttons. 1 Click on the notification area and then click to display the menu. 2 Click [Setup] Hardware Button Setting starts up. 3 Make the - Panasonic CFU1AQCXZ2M | Reference Manual - Page 15
[Search Programs and files], and press (Enter). Follow the on-screen instructions. 3 Click (Start) and input [c:\util\meiskb\setup.exe] in [ on. If is not dis- played, click (Start) - [All Programs] - [Panasonic] - [Software Keyboard]. 1 Touch the software keyboard. z To use shortcut key - Panasonic CFU1AQCXZ2M | Reference Manual - Page 16
Software Keyboard 16 NOTE z You can set a different language to each application (⇒ Windows help), and the keyboard layout switches according to the application. z Depending in the language, some keys are displayed in orange. You can use them to input characters such as ë and ö. Software Keyboard - Panasonic CFU1AQCXZ2M | Reference Manual - Page 17
Software Keyboard 17 NOTE z You can change the currency symbol (B) of the numeric keypad. B Click (Start) - [Control Panel] - [Clock, Language, and Region] - [Region and Language] - [Formats] - [Additional settings] - [Currency] - [Currency symbol]. z After changing the currency symbol, click - Panasonic CFU1AQCXZ2M | Reference Manual - Page 18
Zoom Function 18 By zooming in the screen, small characters or icons become easy to see. You can operate the computer (e.g. click) with the zoomed screen. NOTE z The Zoom function is not available in the following conditions. • When selecting a larger display resolution than the actual display - Panasonic CFU1AQCXZ2M | Reference Manual - Page 19
Zoom Function 19 NOTE z The Zoom ratio returns to 100% in the following conditions even while the screen is zoomed. • When you switch the log in user • When the computer resumes from Sleep/Hibernation • In the log off condition • When you press Ctrl + Alt + Fn + (Del)*1 • When the [User Account - Panasonic CFU1AQCXZ2M | Reference Manual - Page 20
Zoom Function 20 Cursor synchronization mode You can synchronize the movement of zoomed screen with the movement of cursor by the following setting. 1 Click on the notification area and then click . Zoom menu appears. 2 Click [Zoom Up Area by Moving Cursor Position] to add a check mark. Cursor - Panasonic CFU1AQCXZ2M | Reference Manual - Page 21
Zoom Function 21 „ Hot Key Setting You can make the zoom setting by key combinations. A Click on the notification area and then click to display Zoom menu. B Click [Setting]. C Click the text box (A) and press the key you prefer. You can use only Ctrl or (Shift)*2 key for combinations. A • - Panasonic CFU1AQCXZ2M | Reference Manual - Page 22
on the notification area and right-click , then click [Exit Panasonic Hand Writing], and then restart Panasonic Hand Writing. z Panasonic Hand Writing may not work properly if another application software is [Edit] - [Copy], and paste it in another application software that supports bitmap format. - Panasonic CFU1AQCXZ2M | Reference Manual - Page 23
Display Rotation 23 Rotating the Display 1 Click on the notification area and click . 2 Click one of the display angles. NOTE z While the display is rotated: • Do not use the Extended Desktop. The touch pad or touchscreen may not work properly. • Do not operate Touch Screen Calibration Utility. • - Panasonic CFU1AQCXZ2M | Reference Manual - Page 24
Display Rotation Changing the Settings 1 Click on the notification area and click . The Display Rotation Tool screen appears. 2 Click [Settings]. 3 Change the settings. A. You can choose the order of the display rotation. If you choose [None], the order is skipped. You can change the following - Panasonic CFU1AQCXZ2M | Reference Manual - Page 25
Sleep and Hibernation Functions 25 Starting Up Your Computer Quickly The sleep or hibernation functions allow you to shut off the computer without closing programs and documents. You can quickly return to the programs and documents that you were working on before sleep or hibernation. Function - Panasonic CFU1AQCXZ2M | Reference Manual - Page 26
Sleep and Hibernation Functions 26 Entering/Resuming from Sleep or Hibernation „ To enter sleep or hibernation 1 Press the power switch (A) until a beep*1 sounds. Sleep: The power indicator (B) blinks green. Hibernation: The power indicator (B) goes off. z There are another 2 ways to enter Sleep/ - Panasonic CFU1AQCXZ2M | Reference Manual - Page 27
Sleep and Hibernation Functions „ To resume from sleep or hibernation 1 Press the power switch(A). z In the default setting, the Windows password will be requested to resume. 27 A CAUTION z Do not perform the following operations until resuming is complete. After the display is resumed, wait - Panasonic CFU1AQCXZ2M | Reference Manual - Page 28
Sleep and Hibernation Functions 28 Changing When the Computer Sleeps or Hibernates „ Sleep 1 Click or on the notification area, and click [More power options]. 2 Click [Change plan settings] of the power plan you want to change. 3 Select the setting for [Put the computer to sleep], and then click - Panasonic CFU1AQCXZ2M | Reference Manual - Page 29
power consumption. z Change [Power Options] Click (Start) - [Control Panel] - [System and Security] - [Power Options] to select [Power saver]. While [Panasonic Power Management] is selected as the factory default, selecting [Power saver] will further reduce power consumption. Also, to make detailed - Panasonic CFU1AQCXZ2M | Reference Manual - Page 30
page 92): For further information, refer to the Installation Manual of "Trusted Platform Module (TPM)". Setting the Supervisor Password Password, you will not be able to use your computer. Con- tact Panasonic Technical Support. z When running the Setup Utility, do not leave and go away from - Panasonic CFU1AQCXZ2M | Reference Manual - Page 31
without setting the Supervisor Password. Set the Supervisor Password beforehand (Î page 30). z When you have your flash memory drive repaired • Contact Panasonic Technical Support. • Before sending back the flash memory drive, be sure to set the [Hard Disk Lock] to [Disabled]. NOTE z The flash - Panasonic CFU1AQCXZ2M | Reference Manual - Page 32
Battery Power Battery Indicator You can attach 2 batteries packs to this com- puter. The battery indicators are prepared for A each battery. A : Battery 1 indicators B : Battery 2 indicators 32 B B A Battery indicator Not lit Orange Green Blinking green Battery status The battery pack - Panasonic CFU1AQCXZ2M | Reference Manual - Page 33
Battery Power 33 Battery indicator Red Blinking red Blinking orange Blinking green and orange alternately Battery status The remaining battery is approximately 9% or less. When blinking approx. every 1 second: The battery pack or the charging circuit is not operating properly. When blinking - Panasonic CFU1AQCXZ2M | Reference Manual - Page 34
Battery Power 34 Checking the Remaining Battery Charge You can check the remaining battery charge on the screen. (After logging on to Windows) 1 Press Fn + F ( )*3. z When the battery pack is inserted (example) Normal temperature mode (Î page 35) In charging High temperature mode (Î page 35) In - Panasonic CFU1AQCXZ2M | Reference Manual - Page 35
Battery Power 35 High temperature mode The high temperature mode can prevent the battery from deteriorating when the computer is used in high-temperature environment or used for a long time with its battery fully charged. Select [Auto] (default) or [High Temperature] in [Environment] of the [Main] - Panasonic CFU1AQCXZ2M | Reference Manual - Page 36
with the battery down and you resume the operation without charging the battery, the Windows Resume Loader starts up. Follow the on-screen instructions. After that, however, Windows may not start up normally, or the [Low battery level]/[Critical battery level] function may not work normally - Panasonic CFU1AQCXZ2M | Reference Manual - Page 37
Perform "Battery Recalibration". A Click (Start) - [All Programs] - [Panasonic] - [Battery] - [Battery Recalibration]. B When the confirmation message the computer. B Press and hold Fn + (F9)*4 while the [Panasonic] boot screen is displayed just after the computer starts the startup procedure. - Panasonic CFU1AQCXZ2M | Reference Manual - Page 38
Battery Power 38 Replacing the Battery Pack If you have a battery charger (optional) or Cradle (optional), you can remove one battery pack to charge while the other battery pack is operating. The battery pack is a consumable item so the replacement will be necessary. If the battery operation time - Panasonic CFU1AQCXZ2M | Reference Manual - Page 39
Battery Power 39 1 Place the computer with the panel side down. z Place it on a soft cloth, etc. 2 Remove right and left hand strap clips from the computer. The illustration shows the clip on the left side as an example. A Remove the edge of hand strap passing through the clip. B Tip the top of - Panasonic CFU1AQCXZ2M | Reference Manual - Page 40
dent of computer. B Press down the latch side of cover to close. z If the cover does not close firmly, insert the claw again. If the problem persists, check if the battery is inserted properly. 40 B - Panasonic CFU1AQCXZ2M | Reference Manual - Page 41
Battery Power 9 Pressing and holding the battery cover, slide the latch to fix. 10 Attach the hand strap back to the original form. z Take the step 2 (A to C) in the reverse order. 41 A CAUTION z Make sure the latch is securely locked, otherwise the battery pack may fall when you carry the - Panasonic CFU1AQCXZ2M | Reference Manual - Page 42
Customizing the Power Setting 42 You can choose the optimum power setting for your operating condition by selecting a power plan. You can also create your own power plan. Changing the Power Plan Setting 1 Click or on the notification area and click [More power options]. 2 Click [Change plan - Panasonic CFU1AQCXZ2M | Reference Manual - Page 43
z This computer supports SDHC Memory Cards copyright protection function which is compatible with content on-demand services on the Internet, etc. z To use the SD devices. For further information, refer to the instruc- tion manual of the devices. Handling and storage cautions z Store the - Panasonic CFU1AQCXZ2M | Reference Manual - Page 44
remove the card before the operation is completed, the data may be damaged or the card access may no longer be performed normally. z Note that Panasonic assumes absolutely no liability for any loss of data recorded by the user, or any other damages, direct or indirect. z Do not forcibly draw out - Panasonic CFU1AQCXZ2M | Reference Manual - Page 45
SD Memory Card 45 „ To remove the card Preparation z Save the data and close all applications. z Open the cover and confirm the SD Memory Card indicator (A) is off. 1 Disable the card function. A Click on the notification area and click . B Select the card. A z These steps are not necessary - Panasonic CFU1AQCXZ2M | Reference Manual - Page 46
the USB port. When using the cable specifically designed for this, you can tighten screws at position (A). For further information, refer to the instruction manual of the USB device. A „ To remove the USB device 1 Disable the USB device. A Click on the notification area and click . B Select the USB - Panasonic CFU1AQCXZ2M | Reference Manual - Page 47
setting for the USB ports of the Cradle. z You may need to install the driver for the USB device. Follow the on-screen instructions or refer to the instruction man- ual of the USB device. z You may need to install the driver again when connecting the device to another port. z If the - Panasonic CFU1AQCXZ2M | Reference Manual - Page 48
48 I Camera Light Camera Lens . CAUTION z Do not look directly at the camera light. „ Using the Camera 1 Hold both sides of the computer to aim the camera. NOTE z When the computer is moved from hot and humid environments to cold environments, dew condensation - Panasonic CFU1AQCXZ2M | Reference Manual - Page 49
49 Starting up Panasonic Camera Utility Start up the Panasonic Camera Utility to take pictures and videos. 1 Click (Start) - [All Programs] - [Panasonic] - [Panasonic Camera Utility]. NOTE z If you use this utility and other multi-media software at the same time, an error may occur. Close all - Panasonic CFU1AQCXZ2M | Reference Manual - Page 50
Light/Zoom In/Take Photo Functions to an Application Button") z The light turns off automatically after a certain period of time. Click [Control] - [Camera Light] - [Settings] to set your lighting duration preferences. z To maximize battery and LED life, it is not recommended to keep the light on - Panasonic CFU1AQCXZ2M | Reference Manual - Page 51
an Application Button") NOTE z You can view pictures by clicking or through Windows Explorer (default location is my pictures folder). z When the distance between the camera and subject is too close, the image may be out of focus. z When you take photos while the light is on, the light-up duration - Panasonic CFU1AQCXZ2M | Reference Manual - Page 52
Camera 52 „ Burst Shooting You can take pictures in fixed intervals. 1 Click or click [Photos] - [Start Burst Shooting]. z During Burst shooting, the icon changes to 2 Click - Panasonic CFU1AQCXZ2M | Reference Manual - Page 53
and subject is too close, the image may be out of focus. z If you specify an externally connected storage device as the save destination, the camera software may operate slowly. In this case, specify the flash memory as the save destination. z The file is saved with the resolution set for [Video - Panasonic CFU1AQCXZ2M | Reference Manual - Page 54
Camera 54 Changing the Settings for Recording Video 1 Click [Video] - [Settings]. 2 Change to preferred settings and click [OK]. z When the following boxes are checked, • Box (A) only: - Panasonic CFU1AQCXZ2M | Reference Manual - Page 55
Camera 55 „ Setting Image Quality Set your image quality preferences on the [Image Control] the range of the display resolution of this computer (Refer to "Specifications Display Method" in OPERATING INSTRUCTIONS). z If you set [Output Size], the [Frame Rate] is automatically determined. z The - Panasonic CFU1AQCXZ2M | Reference Manual - Page 56
is not running, and if you press one of the buttons to which the "Zoom in" function, "Take photo" function, etc. are assigned, the Panasonic Camera Utility will be activated. Press the button again to use the function assigned. z If you operate the Utility after assigning the "Take photo" function - Panasonic CFU1AQCXZ2M | Reference Manual - Page 57
AT THE LASER LIGHT. DO NOT LOOK DIRECTLY AT THE LED LIGHT. z Be sure to read "Precautions" in OPERATING INSTRUCTIONS. NOTE z When the computer is moved from hot and humid environments to cold environment, dew condensation may mist up inside the lens. This is not - Panasonic CFU1AQCXZ2M | Reference Manual - Page 58
Barcode Reader 58 Setting for Barcode Reader Click on the notification area then the following menu opens by clicking (for model with 1D Barcode Reader) / (for model with 2D Barcode Reader) icon. Connection to Barcode (Power Saving Mode) To reduce the power consumption, stop barcode reader - Panasonic CFU1AQCXZ2M | Reference Manual - Page 59
Barcode Reader 59 NOTE z When the computer enters Sleep or Hibernation in Power Saving Mode or Always-On mode, the Barcode Reader is disabled. [Barcode Module was disconnected by changing the power status] message appears at the next resume timing. • In Power Saving Mode, click [OK] to reconnect - Panasonic CFU1AQCXZ2M | Reference Manual - Page 60
Barcode Reader 60 z Hold the reader farther away when reading a larger barcode, and closer in when reading a smaller barcode or a thinner barcode. z Perform reading so that the red read beam for reading intersects the barcode itself (including at least 12.7 mm - Panasonic CFU1AQCXZ2M | Reference Manual - Page 61
water, detergent, or alcohol, on the surface of the window. For parts other than the reading window, please read "Maintenance" in the Personal Computer Operating Instructions. - Panasonic CFU1AQCXZ2M | Reference Manual - Page 62
Fingerprint Reader 62 Fingerprint Reader NOTE z Enrollment and authentication is unavailable to an extremely minority of people including those whose fingerprints give little data for personal identification. How to Use the Fingerprint Reader This - Panasonic CFU1AQCXZ2M | Reference Manual - Page 63
• Power-on Password Step 3 TPM Fingerprint Utility Initialization (If the TPM is not being used, skip this step.) „ To access the online manual This manual describes Step 2, 3 and the initial part of Step 4. For further information, refer to the UPEK Protector Suite QL Help menu. z Click (Start - Panasonic CFU1AQCXZ2M | Reference Manual - Page 64
such an interaction. Installation 1 TPM Installation Refer to the Installation Manual of "Trusted Platform Module (TPM)". z Click (Start), input Enter). D Click [Next]. Installation starts. Follow the on-screen instructions. E When the "Protector Suite *.* has been successfully installed." - Panasonic CFU1AQCXZ2M | Reference Manual - Page 65
users can enroll their fingerprints. z When the [Finish] screen appears, read the description carefully. z [User Enrollment] wizard starts. Follow the on-screen instructions. NOTE z Enroll at least 2 fingers. Even if one of them is injured, you can use another one to access your account and secret - Panasonic CFU1AQCXZ2M | Reference Manual - Page 66
[Close]. E Add a check mark for [Power-On] in [Password Types]. F Enter the password (step C), and click [OK]. G Click [Next]. • Follow the on-screen instructions. NOTE z To use the Power-on Security feature, enable it by following the steps described above. Do not use the fingerprint lists in the - Panasonic CFU1AQCXZ2M | Reference Manual - Page 67
authentication will be necessary. A Turn on or restart the computer. B Press Fn + U (F2) or Fn + the startup procedure. (Del) while [Panasonic] boot screen is displayed soon after the computer starts C Select the [Security] menu. D Select [Setup Supervisor Password], and press (Enter). E Enter - Panasonic CFU1AQCXZ2M | Reference Manual - Page 68
the user data. • Click (Start) - [All Programs] - [Protector Suite QL] - [Control Center] - [Fingerprints]. For further information, refer to the software's online manual (Î page 63). z Password used by each user • Backup Password for Enrollment This backup password can be used in case of hardware - Panasonic CFU1AQCXZ2M | Reference Manual - Page 69
2 independent forms. • There can be auto submit problems with web forms which do not have Submit button. limitations: The following Windows applications cannot be supported. • Applications which do not use standard functions, refer to the software's online manual (Î page 63). Handling & Maintenance - Panasonic CFU1AQCXZ2M | Reference Manual - Page 70
]. I Click [Close]. • Confirm that there is no item in [Password Types]. J Click [Next] - [Next]. K Click [Finish]. • Follow the on-screen instructions. 2 Delete Fingerprint Data. Performed by each user. A Click [Fingerprints], and click [Delete]. The [Swipe finger] screen will appear. B Swipe user - Panasonic CFU1AQCXZ2M | Reference Manual - Page 71
*.*], and select [Remove]. E Select [Remove all Protector Suite *.* data], and click [Next]. • Uninstallation starts. Follow the on-screen instructions. F When the "Protector Suite *.* has been successfully uninstalled." Message appears, click [Finish]. • If the confirmation message appears, click - Panasonic CFU1AQCXZ2M | Reference Manual - Page 72
If the specific solutions for your problem in Fingerprint Reader (Î page 109) do not work, you can use these instructions as the last measure and reboot and try again. If it still does not work, please contact Panasonic Technical Support. E Restore or create passport. • If you have a backup of your - Panasonic CFU1AQCXZ2M | Reference Manual - Page 73
the computer to the Cradle. For further information, read the operating instructions that come with the Cradle or Mini Port Replicator. „ Setting the . Contact failure may occur. z The Cradle/Mini Port Replicator for does not support a serial mouse. z To boot the computer from a USB - Panasonic CFU1AQCXZ2M | Reference Manual - Page 74
use the simultaneous display, DVD-Video, MPEG files and other motion image files may not be played back smoothly. z Carefully read the instruction manual of the external display. z When connecting an external display that does not conform to the Plug & Play standards, select the display driver - Panasonic CFU1AQCXZ2M | Reference Manual - Page 75
External Display 75 CAUTION z Before disconnecting the external display, switch to the internal LCD by pressing + P *3 or Fn + E ( )*4. Oth- erwise the displayed image quality may become different after disconnection (e.g., wrong resolution). In this case, press + P *3 or Fn + E ( )*4 to - Panasonic CFU1AQCXZ2M | Reference Manual - Page 76
External Display 76 Extended Desktop The extended desktop function allows you to use the working area across both the internal LCD and the external display. You can drag an object from the internal LCD to the external display and vice versa. „ To switch to the Extended Desktop 1 Press + P *7 or - Panasonic CFU1AQCXZ2M | Reference Manual - Page 77
External Display 77 z Do not use the display rotation in the extended desktop. z To switch left (primary device) and right (secondary device), once return the display to "notebook only". Follow the steps below. A Right-click the desktop and click [Graphics Options]. B Click [Output To] - [MID]. C - Panasonic CFU1AQCXZ2M | Reference Manual - Page 78
LAN Connecting LAN 1 Turn off the computer. z Do not use sleep or hibernation function. 2 Set the computer to the Cradle. 3 Connect the LAN port (A) and the network system (server, HUB, etc.) by using a LAN cable. 4 Turn on the computer. 78 A - Panasonic CFU1AQCXZ2M | Reference Manual - Page 79
about Wireless LAN: Î page 82 z For further information about Bluetooth: Î page 85 z For further information about Wireless WAN: Refer to the instruction manual of the wireless device. The Wireless Switch 1 Open the cover. A Slide the latch down to unlock the cover. B Open the cover. „ To - Panasonic CFU1AQCXZ2M | Reference Manual - Page 80
Disabling/Enabling Wireless Communication 80 „ To check the wireless communication status 1 Click on the notification area and place the cursor over the Wireless Switch Utility icon ( or ). A tool tip appears. NOTE z If you uninstall the Wireless Switch Utility, set the wireless switch to ON. z Do - Panasonic CFU1AQCXZ2M | Reference Manual - Page 81
Disabling/Enabling Wireless Communication 81 „ To enable or disable particular wireless devices 1 Click the Wireless Switch Utility icon to show the pop-up menu. 2 Select ON or OFF for the device you want to enable or disable. „ To change the function of the wireless switch In the default setting, - Panasonic CFU1AQCXZ2M | Reference Manual - Page 82
LAN> CAUTION z Do not use wireless LAN on airplanes, in hospitals, or in other locations where wireless LAN signals may affect devices. Follow the instructions of airline companies and hospitals. If you use the computer in these locations, turn off the wireless LAN. z To avoid unauthorized access to - Panasonic CFU1AQCXZ2M | Reference Manual - Page 83
on. • If you cannot select [Turn wireless on], the wireless switch is turned off. Setting the wireless LAN access point Preparation Follow the instruction manual of the wireless LAN access point to make settings for the access point to recognize the computer. 1 Turn the wireless LAN on. 2 Click - Panasonic CFU1AQCXZ2M | Reference Manual - Page 84
Wireless LAN 84 z A standard user needs to enter an administrator password. NOTE z In some countries, communication using IEEE802.11a (5 GHz wireless LAN) standard is restricted by law. z The Wireless Switch Utility icon ( or ) indicates the on/off status of wireless LAN and/or Bluetooth and/or - Panasonic CFU1AQCXZ2M | Reference Manual - Page 85
Bluetooth Î page 79, Disabling/Enabling Wireless Communication „ To check the Bluetooth communication status Î page 80, To check the wireless communication status „ To access the online manual 1 Click (Start) - [All Programs] - [Bluetooth] - [User's Guide]. - Panasonic CFU1AQCXZ2M | Reference Manual - Page 86
Fn + U (F2) Press F2 Starting the Setup Utility 1 Turn on or restart the computer. 2 Press Fn + U (F2) or Fn + (Del) several times while [Panasonic] boot screen is dis- played soon after the computer starts the startup procedure. When [Enter Password] is displayed, input your password. When you - Panasonic CFU1AQCXZ2M | Reference Manual - Page 87
Setup Utility Information Menu Language Product Information Model No Serial No System Information Processor Type Processor Speed Memory Size Available Memory Hard Disk BIOS Information BIOS Embedded Controller Accumulative Operating Time Access Level 87 Underlined items are the factory presets. - Panasonic CFU1AQCXZ2M | Reference Manual - Page 88
Setup Utility 88 Main Menu System Date • Week/Month/Day/Year. • You can use Tab to move the cursor. Underlined items are the factory presets. [xxx xx/xx/xxxx] System Time • 24-hr. style. • You can use Tab to move the cursor. [xx:xx:xx] Main Configuration Touchscreen Mode Touchscreen Mode - Panasonic CFU1AQCXZ2M | Reference Manual - Page 89
Setup Utility 89 Display • The display during the Windows start-up process. When an external display is not connected, the information appears on the internal LCD even though the [External Monitor] is selected. Battery Charging Indicator Environment Battery 1 Current Status • Only when [ - Panasonic CFU1AQCXZ2M | Reference Manual - Page 90
Setup Utility Cradle USB Port Legacy USB Support Camera • Only for model with Camera Ambient Light Sensor Threshold XWireless Configuration XSerial Port Configuration • Used to configure the GPS and Barcode Reader *1 The sub-menu that appears when [Wireless Configuration] is selected: Wireless - Panasonic CFU1AQCXZ2M | Reference Manual - Page 91
Option] operates. [USB Floppy Disk*3] [Hard Disk] [USB Hard Disk] [USB CD/DVD Drive] [LAN] Disabled *3 The operation is confirmed by Panasonic USB floppy disk drive (optional: CF-VFDU03U). NOTE z To boot from the following devices, make the settings as below. To boot from You need to set • USB - Panasonic CFU1AQCXZ2M | Reference Manual - Page 92
[Disabled], the message "Press F2 for Setup" is not displayed on [Panasonic] boot screen. However U (F2) and will work even if the message XEmbedded Security (TPM) • For information on TPM, refer to the Installation Manual of "Trusted Platform Module (TPM)". Click (Start), input [c:\util\drivers\tpm - Panasonic CFU1AQCXZ2M | Reference Manual - Page 93
Setup Utility Exit Menu Save Values and Reboot Reboot Without Saving Changes Save Options Save Current Values Load Previous Values Load Default Values Boot Override (Device Information) 93 Reboot the system after saving the changes. Reboot the system without saving the changes. Save the changes for - Panasonic CFU1AQCXZ2M | Reference Manual - Page 94
not there is a problem. If the utility discovers a problem in the hardware, contact Panasonic Technical Support. Software cannot be model with wireless WAN *4 Only for model with Bluetooth *5 Only for model with GPS z When the video diagnostic check is running, the display may be distorted, - Panasonic CFU1AQCXZ2M | Reference Manual - Page 95
not remove the AC adaptor, or attach any peripheral devices. 2 Turn on or restart the computer, and press Fn + U (F2) or Fn + (Del) while [Panasonic] boot screen is displayed. The Setup Utility starts up. z If the password is requested, enter the Supervisor Password. z If you are using the computer - Panasonic CFU1AQCXZ2M | Reference Manual - Page 96
will restart. 5 Press and hold Ctrl + Fn + K (F7) while [Panasonic] boot screen is displayed. When the PC-Diagnostic Utility starts up, it will Wait until the process is complete. • Green: No problems discovered • Red: Problems discovered NOTE z Using the following procedure, you can run - Panasonic CFU1AQCXZ2M | Reference Manual - Page 97
and the message "Check Result TEST FAILED" is displayed, you can assume that there is a problem with the computer's hardware. Confirm which hardware component is displayed as red, and contact Panasonic Technical Support. If the display is green and the message "Check Result TEST PASSED" is displayed - Panasonic CFU1AQCXZ2M | Reference Manual - Page 98
using key combinations of Fn and other keys. When using USB keyboard, press buttons indicated in ( ). Example: Press Fn + U (F2) Press F2 Panasonic Corporation will bear no responsibility for any damage suffered (including loss of data) as a result of the use of this function. Creating a backup - Panasonic CFU1AQCXZ2M | Reference Manual - Page 99
], then click [OK]. 6 Click [System Restore] and follow the on-screen instructions. NOTE z If pressing Fn + L (F8) does not display [System Recovery on the computer, and press Fn + U (F2) or Fn + (Del) while [Panasonic] boot screen is displayed. • The Setup Utility starts up. • If the password is - Panasonic CFU1AQCXZ2M | Reference Manual - Page 100
been erased using this method. If you need to erase highly confidential data, we recommend that you contact a company that specializes in this process. Panasonic Corporation will bear no responsibility for losses or damages suffered as a result of the use of this utility. NOTE z You cannot choose - Panasonic CFU1AQCXZ2M | Reference Manual - Page 101
Data Erase Utility 101 4 Press Fn + B (F10) z At the confirmation message, select [Yes] and press (Enter). z The computer will restart. 5 When [Panasonic] boot screen displays, press and hold Fn + U (F2) or Fn + (Del) . z If [Enter Password] is displayed during the following procedure, input the - Panasonic CFU1AQCXZ2M | Reference Manual - Page 102
Error Code / Message 102 Follow the instructions below when an error message or code appears. If the problem persists or if the error code/message is not shown here, contact Panasonic Technical Support. Error Code/Message Bad System CMOS System CMOS Checksum Error Invalid Year. System date - Panasonic CFU1AQCXZ2M | Reference Manual - Page 103
] and [Hibernate after]. (Î page 28) About Windows-related files The Windows files included in the Windows 7 DVD-ROM are contained in the following folders: c:\windows\support\migwiz, c:\windows\support\tools, c:\windows\support\logging - Panasonic CFU1AQCXZ2M | Reference Manual - Page 104
Troubleshooting (Advanced) 104 Refer to the following instructions when a problem occurs. If the remedies indicated in the chart do not solve the problem, contact Panasonic Technical Support. For a software problem, refer to the instruction manual of the software. • To check the computer's usage - Panasonic CFU1AQCXZ2M | Reference Manual - Page 105
Troubleshooting (Advanced) 105 „ Sound Distorted sound. Cannot change the volume by pressing Fn + A ( ) or Fn + S ( ) .*2 z Performing Fn key combinations sometimes causes sound distortion. Stop and restart - Panasonic CFU1AQCXZ2M | Reference Manual - Page 106
Troubleshooting (Advanced) 106 „ Wireless Communication (only for model with wireless LAN/Bluetooth/wireless WAN) Cannot connect to a network. Access point is not detected. z Slide the wireless - Panasonic CFU1AQCXZ2M | Reference Manual - Page 107
Troubleshooting (Advanced the Device Manager, remove and insert the device. If the problem persists, restart the computer. z The computer may not recognize Check the mouse connection. z The operation is confirmed by using Panasonic CF-VFDU03U USB floppy disk drive (optional) when the computer boots - Panasonic CFU1AQCXZ2M | Reference Manual - Page 108
Troubleshooting (Advanced) 108 „ Connecting Peripherals Cannot print. LAN transmission speed slows down noticeably. Wireless LAN connection is cut. „ Touchscreen z Check - Panasonic CFU1AQCXZ2M | Reference Manual - Page 109
Troubleshooting (Advanced) 109 „ Barcode Reader (only for model with Barcode Reader) Reading is not possible. z Confirm the reading sensor may be malfunctioning when it continues to perform poorly after the steps described above have been performed. Contact Panasonic Technical Support. - Panasonic CFU1AQCXZ2M | Reference Manual - Page 110
Troubleshooting (Advanced) • Other functions Replace/Repair the sensor, then follow the instructions in section "Replacing sensor." (Î page 111). Some limited is strongly recommended to enroll at least 2 fingers to avoid this problem. If you enrolled multiple fingers, simply use other finger. If - Panasonic CFU1AQCXZ2M | Reference Manual - Page 111
Troubleshooting (Advanced) 111 „ Fingerprint Reader (only for model "Protector Suite QL" has not stored any data on the device and therefore has no problem to continue after you replaced the sensor. However, in case you use the Power-on ], refer to the software's online manual (Î page 63). - Panasonic CFU1AQCXZ2M | Reference Manual - Page 112
Troubleshooting (Advanced) 112 „ Fingerprint Reader (only for model with Fingerprint Reader) properly. z When switching to a different user with the Fast User Switching function, the following problems may occur. • Some applications may not work properly. • Key combination with Fn may not - Panasonic CFU1AQCXZ2M | Reference Manual - Page 113
Troubleshooting (Advanced) 113 „ Others No response. z Press Ctrl, (Shift)*5, Fn and Tab ( usage status in the PC Information Viewer. You may need this information when calling Panasonic Technical Support for advice. NOTE z This computer periodically records the management information of the flash - Panasonic CFU1AQCXZ2M | Reference Manual - Page 114
Troubleshooting (Advanced) 114 „ To save the information as a text file 1 in the following procedure. A Log on to Windows as an administrator. B Click (Start) - [All Programs] - [Panasonic] - [PC Information Viewer]. C Right-click [Screen Copy] and click [Properties] - [Shortcut]. D Move the - Panasonic CFU1AQCXZ2M | Reference Manual - Page 115
of Intel Corporation. • SDHC Logo is a trademark. • Bluetooth™ is a trademark owned by Bluetooth SIG, Inc., U.S.A. and licensed to Panasonic Corporation. • Names of products, brands, etc., appearing in this manual are trademarks or registered trademarks of their respective own companies. PCE0290G_7
-
 1
1 -
 2
2 -
 3
3 -
 4
4 -
 5
5 -
 6
6 -
 7
7 -
8
-
9
-
10
-
11
-
12
-
13
-
14
-
15
-
16
-
17
-
18
-
19
-
20
-
21
-
22
-
23
-
24
-
25
-
26
-
27
-
28
-
29
-
30
-
31
-
32
-
33
-
34
-
35
-
36
-
37
-
38
-
39
-
40
-
41
-
42
-
43
-
44
-
45
-
46
-
47
-
48
-
49
-
50
-
51
-
52
-
53
-
54
-
55
-
56
-
57
-
58
-
59
-
60
-
61
-
62
-
63
-
64
-
65
-
66
-
67
-
68
-
69
-
70
-
71
-
72
-
73
-
74
-
75
-
76
-
77
-
78
-
79
-
80
-
81
-
82
-
83
-
84
-
85
-
86
-
87
-
88
-
89
-
90
-
91
-
92
-
93
-
94
-
95
-
96
-
97
-
98
-
99
-
100
-
101
-
102
-
103
-
104
-
105
-
106
-
107
-
108
-
109
-
110
-
111
-
112
-
113
-
114
-
115
 |
 |
1
Reference Manual
Personal Computer
Model No.
CF-U1 Series
We recommend that this Reference Manual be printed.