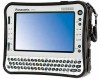
Panasonic CFU1AQCXZ2M Reference Manual - Page 51
Zoom In, Take Photo, Adjust the direction of camera, zoom See above, picture quality
 |
UPC - 092281896410
View all Panasonic CFU1AQCXZ2M manuals
Add to My Manuals
Save this manual to your list of manuals |
Page 51 highlights
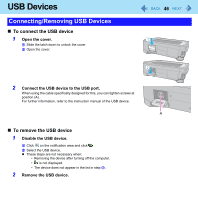
Camera 51 „ Zoom In To enlarge or reduce the camera image. 1 Click or click [Control] - [Zoom] and select [x 1.0], [x 1.5], [x 2.0], [x 2.5], or [x 3.0]. z You can assign the Zoom In function to an application button. (Î page 56 "Assigning the Light/Zoom In/Take Photo Functions to an Application Button") z Each time you click the zoom magnification goes up in the order of [x 1.0], [x 1.5], [x 2.0], [x 2.5], [x 3.0]. To return to [x 1.0], click when the zoom is [x 3.0]. z You can zoom in/out by dragging the screen up-and-down. NOTE z Enlarging the screen by using the zoom button on the left of the LCD (Î page 18) will not enlarge the camera's image. „ Take Photo You can record the camera image as a picture. 1 Adjust the direction of camera, zoom (See above), picture quality (Î page 52), etc.. 2 Click or click [Photos] - [Take photo]. z While taking photos, the icon changes to indicating the photo is being captured. z You can assign the Take Photo function to an application button. (Î page 56 "Assigning the Light/Zoom In/Take Photo Functions to an Application Button") NOTE z You can view pictures by clicking or through Windows Explorer (default location is my pictures folder). z When the distance between the camera and subject is too close, the image may be out of focus. z When you take photos while the light is on, the light-up duration is reset to the time setting for the "Auto Off Setting" (Î page 50).
-
 1
1 -
2
-
3
-
4
-
5
-
6
-
7
-
8
-
9
-
10
-
11
-
12
-
13
-
14
-
15
-
16
-
17
-
18
-
19
-
20
-
21
-
22
-
23
-
24
-
25
-
26
-
27
-
28
-
29
-
30
-
31
-
32
-
33
-
34
-
35
-
36
-
37
-
38
-
39
-
40
-
41
-
42
-
43
-
44
-
45
-
 46
46 -
 47
47 -
 48
48 -
 49
49 -
 50
50 -
 51
51 -
 52
52 -
 53
53 -
 54
54 -
 55
55 -
 56
56 -
57
-
58
-
59
-
60
-
61
-
62
-
63
-
64
-
65
-
66
-
67
-
68
-
69
-
70
-
71
-
72
-
73
-
74
-
75
-
76
-
77
-
78
-
79
-
80
-
81
-
82
-
83
-
84
-
85
-
86
-
87
-
88
-
89
-
90
-
91
-
92
-
93
-
94
-
95
-
96
-
97
-
98
-
99
-
100
-
101
-
102
-
103
-
104
-
105
-
106
-
107
-
108
-
109
-
110
-
111
-
112
-
113
-
114
-
115
 |
 |
