Panasonic KX-TA82483 Programming Guide - Page 98
Connect
 |
UPC - 037988851393
View all Panasonic KX-TA82483 manuals
Add to My Manuals
Save this manual to your list of manuals |
Page 98 highlights
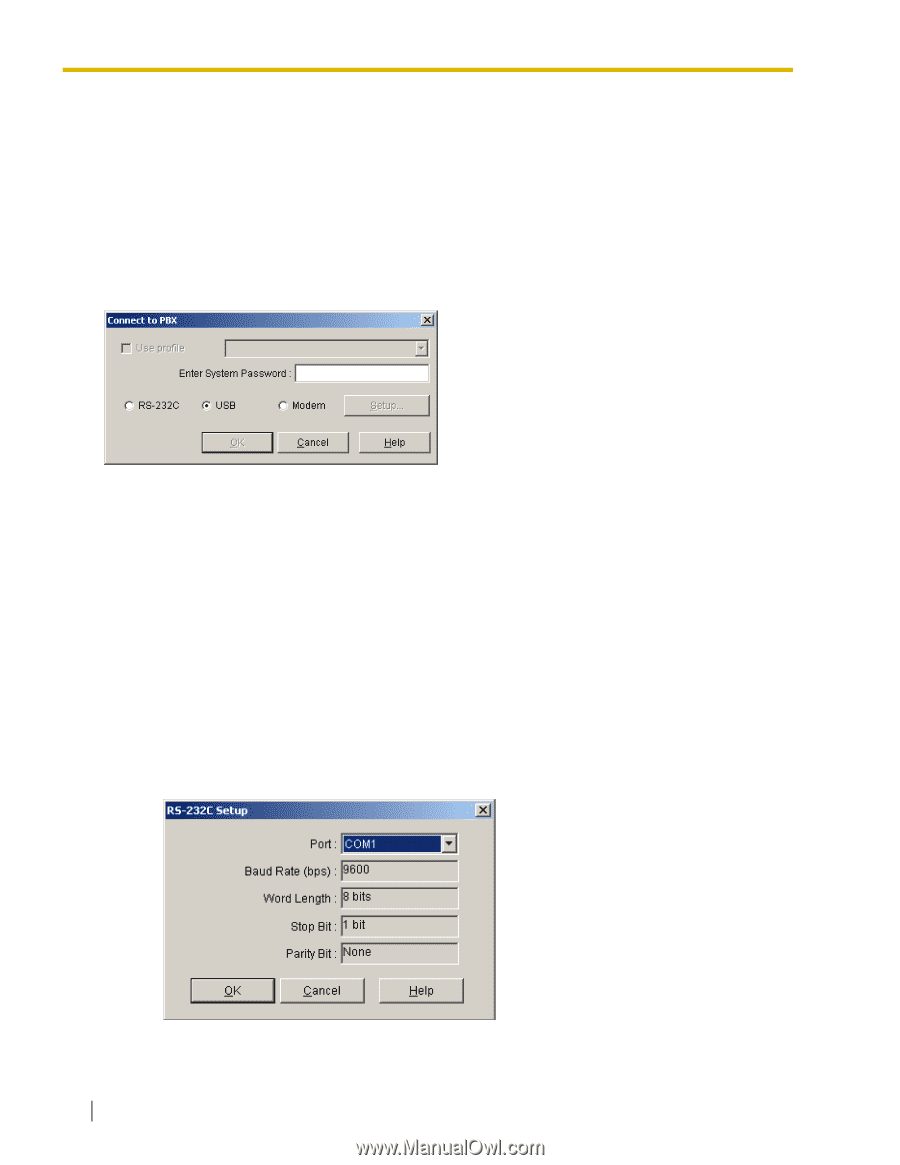
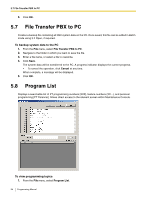
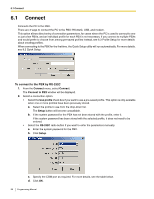
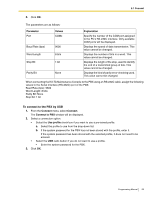
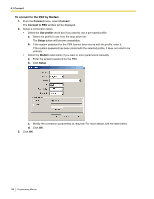
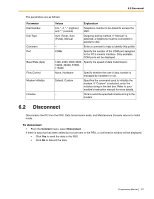
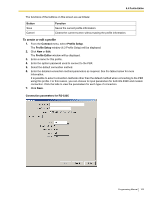
6.1 Connect 6.1 Connect Connects the PC to the PBX. There are 3 ways to connect the PC to the PBX: RS-232C, USB, and modem. This option allows direct entry of connection parameters, for cases where the PC is used to connect to one or just a few PBXs, and an individual profile for each PBX is not necessary. If you connect to multiple PBXs and would prefer to choose from among pre-saved profiles instead, see 6.3 Profile Setup for more details about creating profiles. When connecting to the PBX for the first time, the Quick Setup utility will run automatically. For more details, see 8.2 Quick Setup. To connect to the PBX by RS-232C 1. From the Connect menu, select Connect. The Connect to PBX window will be displayed. 2. Select a connection option. • Select the Use profile check box if you want to use a pre-saved profile. This option is only available when one or more profiles have been previously stored. a. Select the profile to use from the drop-down list. The Setup button will become unavailable. b. If the system password for the PBX has not been stored with the profile, enter it. If the system password has been stored with the selected profile, it does not need to be entered. • Select the RS-232C radio button if you want to enter the parameters manually. a. Enter the system password for the PBX. b. Click Setup. c. Specify the COM port as required. For more details, see the table below. d. Click OK. 98 Programming Manual
-
 1
1 -
2
-
3
-
4
-
5
-
6
-
7
-
8
-
9
-
10
-
11
-
12
-
13
-
14
-
15
-
16
-
17
-
18
-
19
-
20
-
21
-
22
-
23
-
24
-
25
-
26
-
27
-
28
-
29
-
30
-
31
-
32
-
33
-
34
-
35
-
36
-
37
-
38
-
39
-
40
-
41
-
42
-
43
-
44
-
45
-
46
-
47
-
48
-
49
-
50
-
51
-
52
-
53
-
54
-
55
-
56
-
57
-
58
-
59
-
60
-
61
-
62
-
63
-
64
-
65
-
66
-
67
-
68
-
69
-
70
-
71
-
72
-
73
-
74
-
75
-
76
-
77
-
78
-
79
-
80
-
81
-
82
-
83
-
84
-
85
-
86
-
87
-
88
-
89
-
90
-
91
-
92
-
 93
93 -
 94
94 -
 95
95 -
 96
96 -
 97
97 -
 98
98 -
 99
99 -
 100
100 -
 101
101 -
 102
102 -
 103
103 -
104
-
105
-
106
-
107
-
108
-
109
-
110
-
111
-
112
-
113
-
114
-
115
-
116
-
117
-
118
-
119
-
120
-
121
-
122
-
123
-
124
-
125
-
126
-
127
-
128
-
129
-
130
-
131
-
132
-
133
-
134
-
135
-
136
-
137
-
138
-
139
-
140
-
141
-
142
-
143
-
144
-
145
-
146
-
147
-
148
-
149
-
150
-
151
-
152
-
153
-
154
-
155
-
156
-
157
-
158
-
159
-
160
-
161
-
162
-
163
-
164
-
165
-
166
-
167
-
168
-
169
-
170
-
171
-
172
-
173
-
174
-
175
-
176
-
177
-
178
-
179
-
180
-
181
-
182
-
183
-
184
-
185
-
186
-
187
-
188
-
189
-
190
-
191
-
192
-
193
-
194
-
195
-
196
-
197
-
198
-
199
-
200
-
201
-
202
-
203
-
204
-
205
-
206
-
207
-
208
-
209
-
210
-
211
-
212
-
213
-
214
-
215
-
216
-
217
-
218
-
219
-
220
-
221
-
222
-
223
-
224
-
225
-
226
-
227
-
228
-
229
-
230
-
231
-
232
-
233
-
234
 |
 |