Panasonic UF-4500 Operating Instructions - Page 173
Clearing a Recording Paper Jam - drum reset
 |
View all Panasonic UF-4500 manuals
Add to My Manuals
Save this manual to your list of manuals |
Page 173 highlights
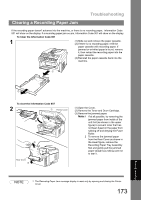
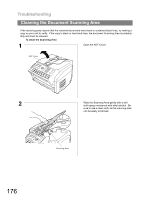
Troubleshooting Clearing a Recording Paper Jam If the recording paper doesn't advance into the machine, or there is no recording paper, Information Code 001 will show on the display. If a recording paper jam occurs, Information Code 007 will show on the display. To Clear the Information Code 001 1 (1) Slide out and remove the paper cassette. (2) If there is no recording paper, refill the paper cassette with recording paper. If jammed or wrinkled paper is found, remove it, then reload the recording paper into the paper cassette. (3) Reinstall the paper cassette back into the machine. To clear the Information Code 007 2 Printer Cover Rear Cover (1) Open the Cover. (2) Remove the Toner and Drum Cartridge. (3) Remove the jammed paper. Note:1 If at all possible, try removing the jammed paper from inside of the unit first (as shown in the upper figure) to prevent toner that has not been fused on the paper from rubbing off and dirtying the Fuser Roller. 2 To remove the jammed paper from the Rear Cover as shown in the lower figure, remove the Recording Paper Tray Assembly first and gently pull the jammed paper straight out, taking care not to tear it. NOTE 1. The Recording Paper Jam message display is reset only by opening and closing the Printer Cover. 173 Problem Solving
-
 1
1 -
2
-
3
-
4
-
5
-
6
-
7
-
8
-
9
-
10
-
11
-
12
-
13
-
14
-
15
-
16
-
17
-
18
-
19
-
20
-
21
-
22
-
23
-
24
-
25
-
26
-
27
-
28
-
29
-
30
-
31
-
32
-
33
-
34
-
35
-
36
-
37
-
38
-
39
-
40
-
41
-
42
-
43
-
44
-
45
-
46
-
47
-
48
-
49
-
50
-
51
-
52
-
53
-
54
-
55
-
56
-
57
-
58
-
59
-
60
-
61
-
62
-
63
-
64
-
65
-
66
-
67
-
68
-
69
-
70
-
71
-
72
-
73
-
74
-
75
-
76
-
77
-
78
-
79
-
80
-
81
-
82
-
83
-
84
-
85
-
86
-
87
-
88
-
89
-
90
-
91
-
92
-
93
-
94
-
95
-
96
-
97
-
98
-
99
-
100
-
101
-
102
-
103
-
104
-
105
-
106
-
107
-
108
-
109
-
110
-
111
-
112
-
113
-
114
-
115
-
116
-
117
-
118
-
119
-
120
-
121
-
122
-
123
-
124
-
125
-
126
-
127
-
128
-
129
-
130
-
131
-
132
-
133
-
134
-
135
-
136
-
137
-
138
-
139
-
140
-
141
-
142
-
143
-
144
-
145
-
146
-
147
-
148
-
149
-
150
-
151
-
152
-
153
-
154
-
155
-
156
-
157
-
158
-
159
-
160
-
161
-
162
-
163
-
164
-
165
-
166
-
167
-
 168
168 -
 169
169 -
 170
170 -
 171
171 -
 172
172 -
 173
173 -
 174
174 -
 175
175 -
 176
176 -
 177
177 -
 178
178 -
179
-
180
-
181
-
182
-
183
-
184
-
185
-
186
-
187
-
188
-
189
-
190
-
191
-
192
-
193
-
194
-
195
-
196
-
197
-
198
-
199
-
200
 |
 |
